前言 {#%E5%89%8D%E8%A8%80}
国内网络环境一言难尽,在访问 GitHub 的时候要么不能访问,要么下载速度极慢,毫无体验可言。
无论是在本地还是在国内服务器中都不能直接访问拉取 GitHub 的代码。
除了挂 代理,本篇文章给大家分享另外一种方式,可以自建一个 GitHub 的代理服务来使用
不想自建的话,大家可以直接使用我部署的 免费 API 代理服务,戳我查看怎么使用
有两种部署方式:
- 通过免费的
Cloudflare Worker部署(免费版每天有 10 万次免费请求,并且有每分钟1000次请求的限制)- 需要一台国外服务器,用
Docker方式部署
相关链接 {#%E7%9B%B8%E5%85%B3%E9%93%BE%E6%8E%A5}
- 服务器需安装docker、docker-compose环境,没安装的可参考文章 - docker、docker-compose安装
- 反代服务,可以使用Nginx、Caddy,如果不熟悉的话,可以使用可视化Nginx服务 - Nginx Proxy Manager
- GitHub地址:https://github.com/hunshcn/gh-proxy
- Docker镜像地址:https://hub.docker.com/r/stilleshan/gh-proxy
搭建方式 {#%E6%90%AD%E5%BB%BA%E6%96%B9%E5%BC%8F}
Cloudflare worker部署 {#cloudflare-worker%E9%83%A8%E7%BD%B2}
首页:https://workers.cloudflare.com
注册,登陆,Start building,取一个子域名,Create a Worker。
复制 下面代码 到左侧代码框,Save and deploy。如果正常,右侧应显示首页。
'use strict'
/**
- static files (404.html, sw.js, conf.js)
/
const ASSET_URL = 'https://hunshcn.github.io/gh-proxy/'
// 前缀,如果自定义路由为example.com/gh/,将PREFIX改为 '/gh/',注意,少一个杠都会错!
const PREFIX = '/'
// 分支文件使用jsDelivr镜像的开关,0为关闭,默认关闭
const Config = {
jsdelivr: 0
}
const whiteList = [] // 白名单,路径里面有包含字符的才会通过,e.g. ['/username/']
/** @type {RequestInit} /
const PREFLIGHT_INIT = {
status: 204,
headers: new Headers({
'access-control-allow-origin': '',
'access-control-allow-methods': 'GET,POST,PUT,PATCH,TRACE,DELETE,HEAD,OPTIONS',
'access-control-max-age': '1728000',
}),
}
const exp1 = /^(?:https?://)?github.com/.+?/.+?/(?:releases|archive)/.$/i
const exp2 = /^(?:https?://)?github.com/.+?/.+?/(?:blob|raw)/.$/i
const exp3 = /^(?:https?://)?github.com/.+?/.+?/(?:info|git-).$/i
const exp4 = /^(?:https?://)?raw.(?:githubusercontent|github).com/.+?/.+?/.+?/.+$/i
const exp5 = /^(?:https?://)?gist.(?:githubusercontent|github).com/.+?/.+?/.+$/i
const exp6 = /^(?:https?://)?github.com/.+?/.+?/tags.$/i
/**
-
@param {any} body
-
@param {number} status
-
@param {Object<string, string>} headers
/
function makeRes(body, status = 200, headers = {}) {
headers['access-control-allow-origin'] = ''
return new Response(body, {status, headers})
}
/**
- @param {string} urlStr
*/
function newUrl(urlStr) {
try {
return new URL(urlStr)
} catch (err) {
return null
}
}
addEventListener('fetch', e => {
const ret = fetchHandler(e)
.catch(err => makeRes('cfworker error:\n' + err.stack, 502))
e.respondWith(ret)
})
function checkUrl(u) {
for (let i of [exp1, exp2, exp3, exp4, exp5, exp6]) {
if (u.search(i) === 0) {
return true
}
}
return false
}
/**
- @param {FetchEvent} e
*/
async function fetchHandler(e) {
const req = e.request
const urlStr = req.url
const urlObj = new URL(urlStr)
let path = urlObj.searchParams.get('q')
if (path) {
return Response.redirect('https://' + urlObj.host + PREFIX + path, 301)
}
// cfworker 会把路径中的
// 合并成 /
path = urlObj.href.substr(urlObj.origin.length + PREFIX.length).replace(/^https?:/+/, 'https://')
if (path.search(exp1) === 0 || path.search(exp5) === 0 || path.search(exp6) === 0 || path.search(exp3) === 0 || path.search(exp4) === 0) {
return httpHandler(req, path)
} else if (path.search(exp2) === 0) {
if (Config.jsdelivr) {
const newUrl = path.replace('/blob/', '@').replace(/^(?:https?://)?github.com/, 'https://cdn.jsdelivr.net/gh')
return Response.redirect(newUrl, 302)
} else {
path = path.replace('/blob/', '/raw/')
return httpHandler(req, path)
}
} else if (path.search(exp4) === 0) {
const newUrl = path.replace(/(?<=com/.+?/.+?)/(.+?/)/, '@$1').replace(/^(?:https?://)?raw.(?:githubusercontent|github).com/, 'https://cdn.jsdelivr.net/gh')
return Response.redirect(newUrl, 302)
} else {
return fetch(ASSET_URL + path)
}
}
/**
-
@param {Request} req
-
@param {string} pathname
*/
function httpHandler(req, pathname) {
const reqHdrRaw = req.headers
// preflight
if (req.method === 'OPTIONS' &&
reqHdrRaw.has('access-control-request-headers')
) {
return new Response(null, PREFLIGHT_INIT)
}
const reqHdrNew = new Headers(reqHdrRaw)
let urlStr = pathname
let flag = !Boolean(whiteList.length)
for (let i of whiteList) {
if (urlStr.includes(i)) {
flag = true
break
}
}
if (!flag) {
return new Response("blocked", {status: 403})
}
if (urlStr.startsWith('github')) {
urlStr = 'https://' + urlStr
}
const urlObj = newUrl(urlStr)
/** @type {RequestInit} */
const reqInit = {
method: req.method,
headers: reqHdrNew,
redirect: 'manual',
body: req.body
}
return proxy(urlObj, reqInit)
}
/**
*
-
const status = res.status
if (resHdrNew.has('location')) {
let _location = resHdrNew.get('location')
if (checkUrl(_location))
resHdrNew.set('location', PREFIX + _location)
else {
reqInit.redirect = 'follow'
return proxy(newUrl(_location), reqInit)
}
}
resHdrNew.set('access-control-expose-headers', '')
resHdrNew.set('access-control-allow-origin', '')
resHdrNew.delete('content-security-policy')
resHdrNew.delete('content-security-policy-report-only')
resHdrNew.delete('clear-site-data')
return new Response(res.body, { status, headers: resHdrNew, }) }
ASSET_URL 是静态资源的 url(实际上就是现在显示出来的那个输入框单页面)
PREFIX 是前缀,默认(根路径情况为 / ),如果自定义路由为 example.com/gh/*,请将PREFIX改为 /gh/,注意,少一个杠都会错!
Docker命令方式 {#docker%E5%91%BD%E4%BB%A4%E6%96%B9%E5%BC%8F}
安装完 Docker 环境后,可以直接执行命令把 Docker 容器跑起来(注意端口换成宿主机上未被使用的端口):
docker run -d --name gh-proxy-py -p 9011:80 --restart always hunsh/gh-proxy-py
然后运行命令 docker ps 能查看到启动的容器了。
Docker Compose方式 {#docker-compose%E6%96%B9%E5%BC%8F}
创建目录 {#%E5%88%9B%E5%BB%BA%E7%9B%AE%E5%BD%95}
mkdir -p /root/docker_data/github_proxy
cd /root/docker_data/github_proxy
创建yml文件 {#%E5%88%9B%E5%BB%BAyml%E6%96%87%E4%BB%B6}
在 /root/docker_data/github_proxy 文件夹下面新建 docker-compose.yml 文件如下:
version: '3.3'
services:
    gh-proxy-py:
        container_name: gh-proxy-py
        ports:
            - '9011:80' # 左侧端口换成宿主机上未被占用的端口
        restart: always
        image: 'hunsh/gh-proxy-py'
运行yml文件 {#%E8%BF%90%E8%A1%8Cyml%E6%96%87%E4%BB%B6}
进入 /root/docker_data/github_proxy 文件夹下面,运行命令:
docker-compose up -d
或者在任意文件夹下面,运行命令:
docker-compose -f /root/docker_data/github_proxy/docker-compose.yml up -d
然后运行命令 docker ps 能查看到启动的容器了。
配置反向代理 {#%E9%85%8D%E7%BD%AE%E5%8F%8D%E5%90%91%E4%BB%A3%E7%90%86}
Docker 容器运行成功后,可以用 【IP】+【端口】进行访问和使用(服务器需要暴露对应的端口号)。
但是建议用域名的方式进行访问,域名配置下 DNS 解析,Nginx 反向代理配置示例如下:
server {
  server_name api-ghp.example.com;
  listen 443 ssl http2;
  ssl_certificate /xxx/xxx/xxx.cer;
  ssl_certificate_key /xxx/xxx/xxx.key;
  ssl_protocols TLSv1 TLSv1.1 TLSv1.2 TLSv1.3;
  listen 80;
  if ($scheme = http) {
    return 301 https://$host:443$request_uri;
  }
  location / {
    proxy_pass http://172.17.0.1:9100;
    proxy_set_header Host $host;
    proxy_set_header X-Real-IP $remote_addr;
    proxy_set_header X-Forwarded-For $proxy_add_x_forwarded_for;
    proxy_set_header X-Forwarded-Host $http_host;
    proxy_set_header X-Forwarded-Port $server_port;
    proxy_set_header X-Forwarded-Proto $scheme;
    proxy_redirect http:// https://;
  }
}
访问 {#%E8%AE%BF%E9%97%AE}
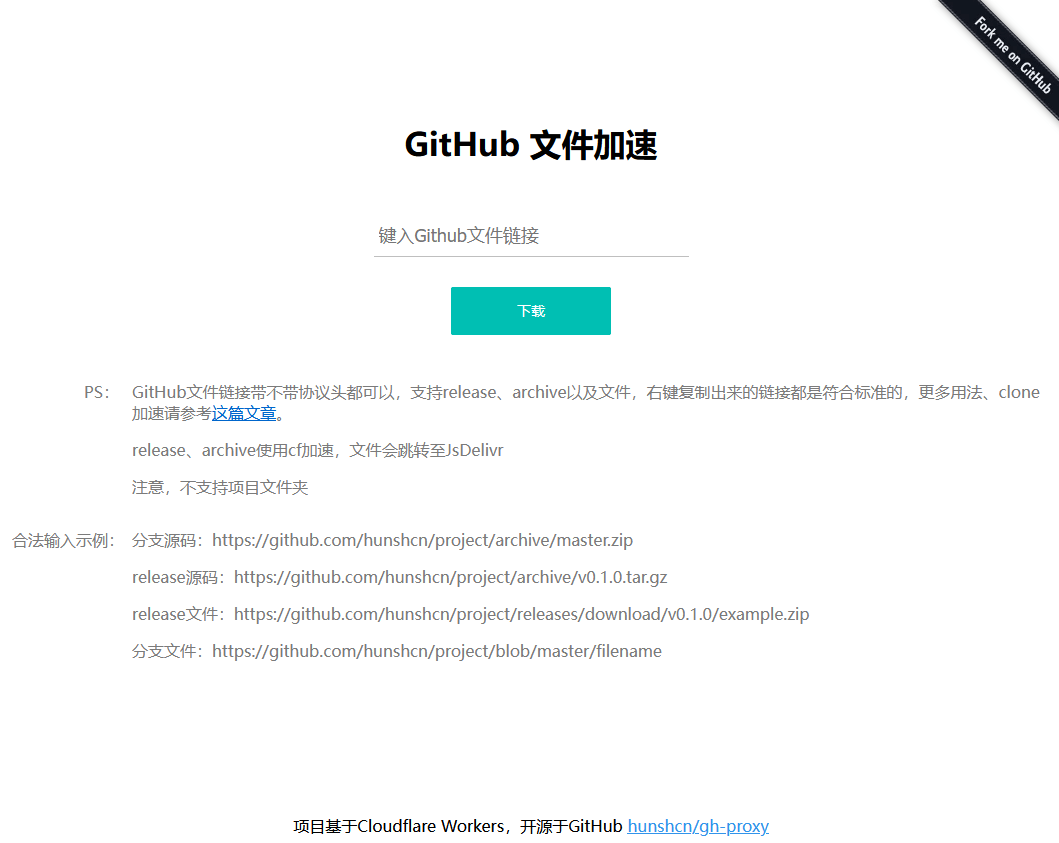
可以使用 【IP】 + 【端口】或者 【域名】的方式进行访问,如果出现下图,即代表成功:

使用 {#%E4%BD%BF%E7%94%A8}
部署成功后,可以直接使用 站点,或者在我们拉取代码的时候,直接在 GitHub 地址前面加上你的服务器地址即可。
例如你的服务器地址为:http://1.2.3.4:9011,或者域名为:https://api-ghp.example.com,那么你可以这样输入:
http://1.2.3.4:9011/https://github.com/junyangfan/jy-ui.githttps://api-ghp.example.com/https://github.com/junyangfan/jy-ui.git
视频链接 {#%E8%A7%86%E9%A2%91%E9%93%BE%E6%8E%A5}
- YouTube:https://youtu.be/xZXLU2gXvKQ
- Bilibili:https://bilibili.com/video/BV1Uz4y1A7n4
 51工具盒子


