我之前用 Electron 写过一个 OCR 识别和翻译的程序,OCR 使用的是百度和腾讯的 API,最近我准备加一个讯飞的 OCR API。讯飞的 OCR API 没有提供 SDK,需要通过 HTTP 请求的方式来调用,下面就是 Node.js 调用 讯飞 OCR API 的方法。
开通 OCR 通用文字识别 {#%E5%BC%80%E9%80%9A+OCR+%E9%80%9A%E7%94%A8%E6%96%87%E5%AD%97%E8%AF%86%E5%88%AB3886}
访问 https://www.xfyun.cn/services/common-ocr,滚动到下方的价格区域,可以免费领取 10 万次的免费包,如果你是第一次使用讯飞的服务的话,第一次开通可能需要创建一个应用。
开通完成后进入控制台,在左侧侧边栏选择 通用文字识别,讯飞有两种通用文字识别,一种是 通用文字识别,另一种是 通用文字识别intsig,两种 API 的调用方式会有些不一样,我这里使用的就是 通用文字识别。
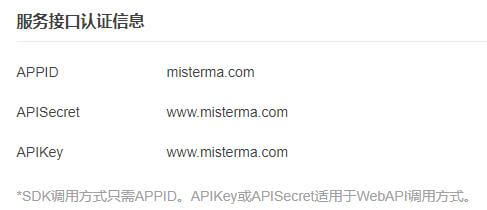
进入 通用文字识别 后,在右侧的 服务接口认证信息 区域可以看到 APPID、APISecret、APIKey :

APPID、APISecret、APIKey 主要用于身份验证,在发送识别请求的时候也需要一起发送。在左侧的 实时用量 区域可以查看使用次数和剩余次数。
鉴权签名 {#%E9%89%B4%E6%9D%83%E7%AD%BE%E5%90%8D8899}
在发送请求时,地址后面还需要有 authorizatio、host、date 三个 query 参数,下面是参数说明:
authorization:签名信息host:请求主机date:时间戳
authorization 包含 api_key、algorithm、 headers、signature 四部分组成。
下面是生成 authorization 的过程:
首先需要生成一个 signature,signature 又包含了 host 请求主机、date 时间戳、request-line 请求参数,这些参数需要一行一个,如下:
host: api.xf-yun.com
date: Wed, 11 Aug 2021 06:55:18 GMT
POST /v1/private/sf8e6aca1 HTTP/1.1
其中的 date 时间戳需要实时生成,提交后服务器会校验时间。
下面还需要使用 hmac-sha256 算法结合 apiSecret 对上面的 signature 进行签名,签名完成后把 signature 转换为 base64,这样才算是生成了一个完整的 signature。
authorization 包含四个部分,上面已经有了 signature,还差 algorithm、headers、api_key,剩下的三个部分都可以写死,algorithm 是加密算法,只支持 hmac-sha256,headers 是参与签名的参数名,也是写死的,只支持 host date request-line。
一个 authorization 把四个部分拼接后就是下面这样的:
api_key="你的api_key",algorithm="hmac-sha256",headers="host date request-line",signature="你的签名"
最后还需要把上面拼接后的 authorization 转换为 base64,这样才算是生成了一个完整的 authorization。
下面就使用 Node.js 生成一个 authorization:
const crypto = require('crypto');
const APPId = 'misterma.com'; // app_id 控制台查看
const APISecret = 'www.misterma.com'; // APISecret 控制台查看
const APIKey = 'www.misterma.com'; // APIKey 控制台查看
const host = 'api.xf-yun.com';  // 请求主机
const urlPath = '/v1/private/sf8e6aca1';  // 地址路径
// 生成时间戳,RFC1123格式("EEE, dd MMM yyyy HH:mm:ss z")
const date = new Date().toUTCString();
// 生成 signature
let signature = host: ${host} date: ${date} POST ${urlPath} HTTP/1.1;
// 使用 hmac-sha256 算法结合 apiSecret 对 signature 签名
signature = crypto.createHmac('sha256', APISecret).update(signature).digest('base64');
// 拼接 authorization
let authorization = api_key="${APIKey}", algorithm="hmac-sha256", headers="host date request-line", signature="${signature}";
// authorization base64编码
authorization = Buffer.from(authorization).toString('base64');
生成的 authorization 发送请求时需要放到地址后面,通过 query 参数的方式发送,如下:
https://api.xf-yun.com/v1/private/sf8e6aca1?authorization=authorization&host=api.xf-yun.com&date=时间戳
发送请求 {#%E5%8F%91%E9%80%81%E8%AF%B7%E6%B1%827360}
图片文件在发送之前需要转换为 base64,图片转换为 base64 后不能超过 4MB,发送的数据格式为 JSON 字符串,如下:
{
  "header": {
    "app_id": "你的app_id",
    "status": 3
  },
  "parameter": {
    "sf8e6aca1": {
      "category": "ch_en_public_cloud",
      "result": {
        "encoding": "utf8",
        "compress": "raw",
        "format": "json"
      }
    }
  },
  "payload": {
    "sf8e6aca1_data_1": {
      "encoding": "jpg",
      "status": 3,
      "image": "图片base64"
    }
  }
}
其中的 payload.sf8e6aca1_data_1.image 就是图片base64。
payload.sf8e6aca1_data_1.encoding 是图片类型,可以是 jpg、png、bmp。
parameter.sf8e6aca1.category 是识别语言,上面的 ch_en_public_cloud 是中文和英文。
我这里发送 HTTP 请求会用到 axios,关于 axios 的使用可以看 JavaScript 使用 Axios 发送 GET 和 POST 请求。
下面是调用讯飞 OCR 通用文字识别的完整过程,包含生成签名和发送请求:
const crypto = require('crypto');
const axios = require('axios').default;
const fs = require('fs');
const path = require('path');
const APPId = 'misterma.com'; // app_id 控制台查看
const APISecret = 'www.misterma.com'; // APISecret 控制台查看
const APIKey = 'www.misterma.com'; // APIKey 控制台查看
const host = 'api.xf-yun.com';  // 请求主机
const urlPath = '/v1/private/sf8e6aca1';  // 地址路径
// 生成时间戳,RFC1123格式("EEE, dd MMM yyyy HH:mm:ss z")
const date = new Date().toUTCString();
// 生成 signature
let signature = host: ${host} date: ${date} POST ${urlPath} HTTP/1.1;
// 使用 hmac-sha256 算法结合 apiSecret 对 signature 签名
signature = crypto.createHmac('sha256', APISecret).update(signature).digest('base64');
// 拼接 authorization
let authorization = api_key="${APIKey}", algorithm="hmac-sha256", headers="host date request-line", signature="${signature}";
// authorization base64编码
authorization = Buffer.from(authorization).toString('base64');
// 读取当前目录下的 img.jpg 图片,然后转换为 base64
const image = fs.readFileSync(path.join(__dirname, 'img.jpg'), 'base64');
// 要发送的数据
const submitData = {
header: { app_id: APPId, status: 3 },
parameter: {
sf8e6aca1: {
category: 'ch_en_public_cloud',
result: {
encoding: 'utf8',
compress: 'raw',
format: 'json'
}
}
},
payload: {
sf8e6aca1_data_1: {
encoding: 'jpg',
status: 3,
image: image
}
}
};
// 使用 axios 发送 post 请求
axios({
url: https://${host}${urlPath}?authorization=${authorization}&host=${host}&date=${date},
method: 'post',
data: JSON.stringify(submitData),
headers: {
'Content-Type': 'application/json'
}
}).then(result => {
if (result.data.header.message !== 'success') {
// 如果没有识别成功就输出错误信息,然后返回
console.log(result.data.header.message);
return false;
}
// 获取识别结果
let text = Buffer.from(result.data.payload.result.text, 'base64').toString('utf-8');
// 把识别结果转换为对象
text = JSON.parse(text);
const textList = [];
// 获取每一行的文字
text.pages[0].lines.forEach(val => {
textList.push(val.words[0].content);
});
console.log(textList);
}).catch(error => {
// 输出错误信息
console.log(error.message);
// 输出讯飞服务器返回的结果
console.log(error.response.data);
});
鉴权信息和识别配置都需要发送,鉴权信息写在地址后面,通过 query 参数的方式发送,识别配置使用 JSON String,需要写在请求 body 中发送。
识别结果 {#%E8%AF%86%E5%88%AB%E7%BB%93%E6%9E%9C8424}
讯飞的服务器会通过 JSON 格式返回识别结果,如果识别成功会返回如下的 JSON:
{
  "header": {
    "code": 0,
    "message": "success",
    "sid": "as0922903c05c3882"
  },
  "payload": {
    "result": {
      "compress": "raw",
      "encoding": "utf8",
      "format": "json",
      "text": "识别结果base64"
    }
  }
}
识别后的文字和位置信息在 payload.result.text,这是一个 base64 格式的 JSON 字符串,要获取识别文字需要先对 payload.result.text 进行 base64 解码,然后转换为对象。
下面是 payload.result.text 的 JSON:
{
  "category": "ch_en_public_cloud",
  "version": "3.5.0.2094",
  "pages": [
    {
      "lines": [
        {
          "coord": [{ "x": 4, "y": 6 }, { "x": 47, "y": 6 }, { "x": 47, "y": 27 }, { "x": 4, "y": 27 }],
          "exception": 0,
          "words": [
            {
              "content": "新年",
              "conf": 0.997823,
              "coord": [{ "x": 4, "y": 6 }, { "x": 46, "y": 6 },{ "x": 46, "y": 28 },{ "x": 4, "y": 28 }]
            }
          ],
          "conf": 0.997823,
          "word_units": [
            {
              "content": "新",
              "conf": 0.997561812,
              "coord": [{ "x": 4, "y": 6 },{ "x": 26, "y": 6 },{ "x": 26, "y": 28 },{ "x": 4, "y": 28 }],
              "center_point": { "x": 15, "y": 16 }
            },
            {
              "content": "年",
              "conf": 0.998084188,
              "coord": [{ "x": 27, "y": 6 }, { "x": 46, "y": 6 }, { "x": 46, "y": 28 }, { "x": 27, "y": 28 }],
              "center_point": { "x": 36, "y": 17 }
            }
          ],
          "angle": 0
        },
        {
          "coord": [{ "x": 20, "y": 56 }, { "x": 20, "y": 50 }, { "x": 24, "y": 50 }, { "x": 24, "y": 56 }],
          "exception": -1,
          "conf": -1.10607679e32,
          "angle": 270
        },
        {
          "coord": [{ "x": 4, "y": 34 }, { "x": 47, "y": 34 }, { "x": 47, "y": 56 }, { "x": 4, "y": 56 }],
          "exception": 0,
          "words": [
            {
              "content": "快乐",
              "conf": 0.997530699,
              "coord": [{ "x": 4, "y": 34 }, { "x": 46, "y": 34 }, { "x": 46, "y": 57 }, { "x": 4, "y": 57 }]
            }
          ],
          "conf": 0.997530699,
          "word_units": [
            {
              "content": "快",
              "conf": 0.995663464,
              "coord": [{ "x": 4, "y": 34 }, { "x": 24, "y": 34 }, { "x": 24, "y": 57 }, { "x": 4, "y": 57 }],
              "center_point": { "x": 14, "y": 45 }
            },
            {
              "content": "乐",
              "conf": 0.999397874,
              "coord": [{ "x": 25, "y": 34 }, { "x": 46, "y": 34 }, { "x": 46, "y": 57 }, { "x": 25, "y": 57 }],
              "center_point": { "x": 35, "y": 45 }
            }
          ],
          "angle": 0
        }
      ],
      "exception": 0,
      "angle": 0,
      "height": 63,
      "width": 56
    }
  ]
}
识别文字会包含很多位置信息,我上面只是识别了 新年快乐 4个字,一共两行,每行两个字。
如果你不需要位置信息,只想获取每一行的文字的画,可以像下面这样获取:
const result = '识别结果 JSON';
// 把 base64 的识别文字转换为 JSON 字符串
let text = Buffer.from(result.payload.result.text, 'base64').toString('utf-8');
// 把 JSON 字符串的识别文字转换为可操作的对象
text = JSON.parse(text);
// 在控制台输出每一行的识别文字
text.pages[0].lines.forEach(val => {
  console.log(val.words[0].content);
});
更详细的识别结果说明可以查看官方文档 https://www.xfyun.cn/doc/words/universal_character_recognition/API.html 。
错误处理 {#%E9%94%99%E8%AF%AF%E5%A4%84%E7%90%861791}
如果是鉴权出错,服务器会返回 401 或 403,通过获取服务器返回的数据可以查看错误信息,服务器返回的数据是一个 JSON,就像下面这样:
{ "message": "HMAC signature does not match" }
如果是识别出错可能会返回 400,错误信息可能是下面这样:
{
  "header": {
    "code": 10163,
    "message": "base64 decode error",
    "sid": "ase00084fcab05bf882"
  }
}
更详细的错误信息说明可以查看官方文档 https://www.xfyun.cn/doc/words/universal_character_recognition/API.html 。
 51工具盒子


