# (一)概述 {#一-概述}
SpringBoot使用一个全局的配置文件来修改SpringBoot自动配置的默认值,SpringBoot提供了三种格式的配置文件:

如果一个项目中同时有上面三种配置文件,按顺序执行yml->yaml->properties,如果配置有冲突,则后执行的配置文件中的配置覆盖前面执行的。
yml和yaml具有相同的格式 key:空格value 注意这个空格不能没有
server:
  port: 8080
properties的格式为 key=value
server.port=8080
# (二)配置文件从哪来的? {#二-配置文件从哪来的}
springboot的配置文件中存在大量的配置,这一点在官网上就能看到了: https://docs.spring.io/spring-boot/docs/2.1.6.RELEASE/reference/html/common-application-properties.html 如果要用的时候直接去官方文档或者百度取确实是个办法,但却并不是最好的办法,最好的办法是理解这些配置文件的原理,以后要用的时候直接通过原理去写配置文件。
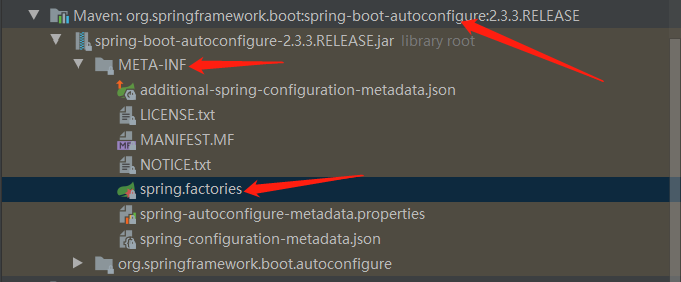
在前面一章讲自动装配的时候我们已经知道了,Springboot项目在启动时会去META-INF/spring.factories取配置信息

配置文件的源头也来自于这里。
我们以Redis的配置类为例子讲解配置文件的原理,点开spring.factories,通过ctrl+F查找redis,可以找到一个叫RedisAutoConfiguration的类。

点进去后你能见到一个叫@EnableConfigurationProperties的注解,并且他后面会带上一个叫XXXProperties的类,Redis这里叫做RedisProperties。XXXProperties是配置文件的核心。 @EnableConfigurationProperties的意思是让@ConfigurationProperties 注解的类生效,后面我们就能看到

XXXProperties这个类被@ConfigurationProperties注解,这就和前面的@EnableConfigurationProperties对应上了,@ConfigurationProperties可以将配置文件(比如applicaition.yaml)加载进来,填充对象的对应字段的数据,然后供其他Bean使用。这里需要写一个前缀,在配置文件中通过"前缀.变量"的形式配置相应的值。
@ConfigurationProperties(prefix = "spring.redis")
public class RedisProperties {
/**
* Database index used by the connection factory.
/
private int database = 0;
/*
* Connection URL. Overrides host, port, and password. User is ignored. Example:
* redis://user:password@example.com:6379
/
private String url;
/*
* Redis server host.
/
private String host = "localhost";
/*
* Login password of the redis server.
/
private String password;
/*
* Redis server port.
/
private int port = 6379;
/*
* Whether to enable SSL support.
/
private boolean ssl;
/*
* Connection timeout.
/
private Duration timeout;
/*
* Client name to be set on connections with CLIENT SETNAME.
*/
private String clientName;
private Sentinel sentinel;
private Cluster cluster;
private final Jedis jedis = new Jedis();
private final Lettuce lettuce = new Lettuce();
//。。。。。。。。。。
看到这里我想你们已经知道配置文件的原理了,我们平常写的配置文件,肯定是为某一个类的变量赋予了值,我们写配置文件就可以通过"前缀.变量"的形式来写。 还是以上面的代码为例,我们如果想要给redis设置一个地址,"前缀.变量"就是spring.redis.host,这个值就会被RedisProperties 获取到,

# (三)配置文件处理总结 {#三-配置文件处理总结}
- 我们可以在META-INF/spring.factories中找到XXXAutoConfiguration这个自动装配类
- 所有在配置文件中能配置的属性都是在xxxxProperties类中封装着;
- 配置文件能配置什么就可以参照某个功能对应的这个属性类
# (四)自己写一个配置类 {#四-自己写一个配置类}
既然我们知道了springboot是如何取配置文件的,那么我们可以自己来写一个配置类读取配置。 新建一个package properties,在里面新建一个类叫做UserProperties。
@Data
@Component
@ConfigurationProperties(prefix = "myproperties.user")
public class UserProperties {
    private String name;
    private Integer age;
}
在使用@ConfigurationProperties的同时必须激活它,我现在用了@Component让 Component Scan 扫描到,如果单纯写一个@ConfigurationProperties注解,会提示报错
Not registered via @EnableConfigurationProperties, marked as Spring component, or scanned via @ConfigurationPropertiesScan
接着在配置文件中赋值,我这里用的是application.yaml
myproperties:
  user:
    name: javayz
    age: 23
通过测试方法测试:
@SpringBootTest
class SpringbootdemoApplicationTests {
    @Autowired
    UserProperties userProperties;
    @Test
    void contextLoads() {
        System.out.println(userProperties);
    }
}

除了使用@Component来激活配置注解外,我们还可以参考源码的方式激活它:源码是这样写的

现在去除UserProperties的@Component注解,新建一个package config,并新建一个类叫UserConfig
@Configuration
@EnableConfigurationProperties(UserProperties.class)
public class UserConfig {
}
运行测试类后获得相同的正确结果。这就是阅读源码的好处,通过源码学习别人的编码方式。
# (五)结语 {#五-结语}
如果完整的看完整篇文章,我相信你对SpringBoot的配置文件以及自动配置的原理有了比较深刻的原理,看源码有时候并不难。
 51工具盒子


