神器!SpringBoot 3.3 中实现 API 接口限流就是这么简单
在互联网飞速发展的今天,随着系统用户规模的不断扩大和分布式架构的广泛应用,API 接口的稳定性和性能成为系统设计中至关重要的因素。无论是应对突发的流量高峰,还是防止恶意爬虫的恶意请求,限流策略都已成为现代系统不可或缺的一部分。
为什么需要接口限流?
-
防止系统过载: 在短时间内大量的请求可能导致系统资源耗尽,进而导致服务降级甚至宕机。通过限流,我们可以有效控制流量的上限,确保系统在高负载下仍然能够提供稳定的服务。
-
保护关键资源: 一些关键的 API 接口可能涉及到数据库、缓存等有限资源的操作,如果不加限制,可能会导致资源耗尽,影响系统整体性能。限流可以确保这些关键资源的访问量在可控范围内。
-
应对恶意攻击: 分布式拒绝服务攻击(DDoS)是常见的网络攻击手段,攻击者通过发送大量请求瘫痪系统。限流策略可以作为第一道防线,快速识别并过滤掉异常流量,减少攻击对系统的影响。
-
提升用户体验: 在用户访问量大的情况下,如果不加以控制,可能会出现系统响应速度下降的情况,影响用户体验。合理的限流策略能够为用户提供更加稳定和一致的服务质量。
-
公平资源分配: 在多用户、多租户的场景下,限流能够确保系统资源的公平分配,避免某个用户或租户独占资源,影响其他用户的正常使用。
为了解决上述问题,我们可以在 API 接口上实施限流策略,使得系统能够在高并发环境下保持稳定,并且能够合理应对各类突发情况。在本文中,我们将探讨如何在 SpringBoot 3.3 中,通过简单的配置和代码实现 API 接口的限流。
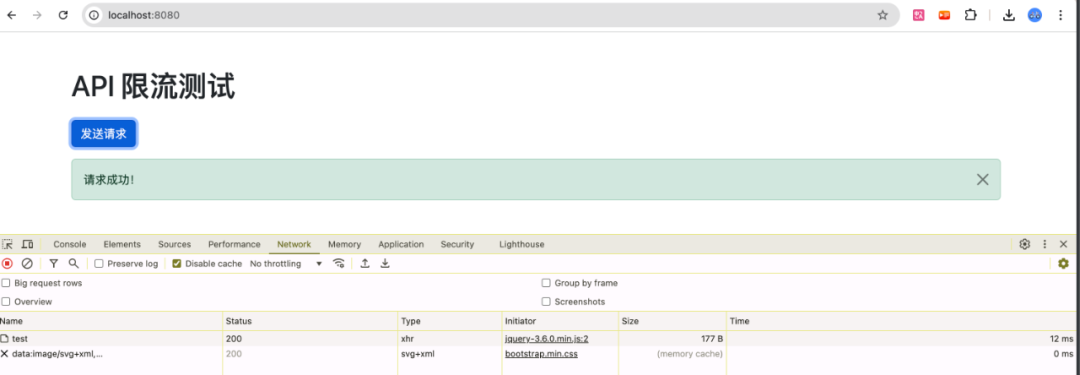
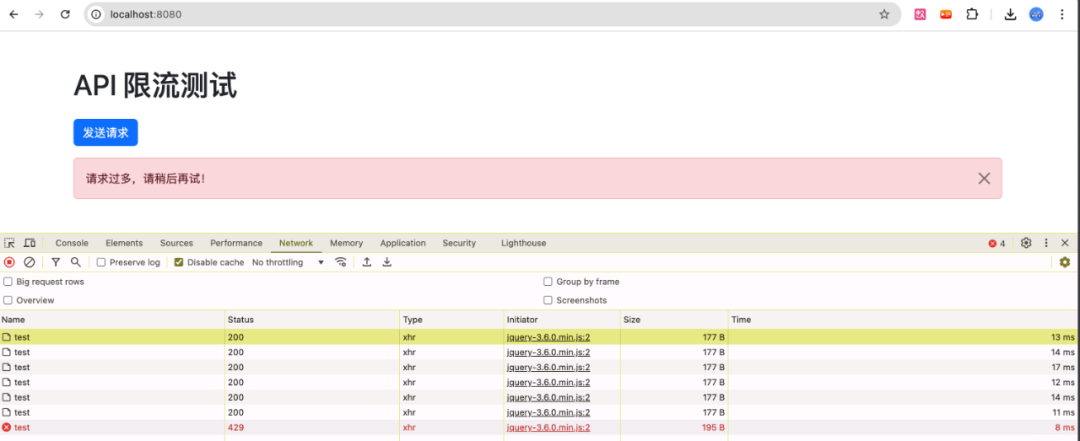
运行效果:
若想获取项目完整代码以及其他文章的项目源码,且在代码编写时遇到问题需要咨询交流,欢迎加入下方的知识星球。
项目结构
我们将从项目的结构开始,先了解一下本示例项目的文件布局。
rate-limiter/
├── src/
│   ├── main/
│   │   ├── java/com/icoderoad/ratelimiter/
│   │   │   ├── controller/
│   │   │   │   └── RateLimiterController.java
│   │   │   ├── config/
│   │   │   │   └── RateLimiterConfig.java
│   │   │   ├── properties/
│   │   │   │   └── RateLimiterProperties.java
│   │   │   └── application/
│   │   │       └── SpringBootRateLimiterApplication.java
│   │   ├── resources/
│   │   │   ├── templates/
│   │   │   │   └── index.html
│   │   │   └── application.yml
└── pom.xml
接下来,我们将逐步搭建项目,实现 API 接口限流功能。
引入依赖
在 pom.xml 中引入以下依赖:
<?xml version="1.0" encoding="UTF-8"?>
<project xmlns="http://maven.apache.org/POM/4.0.0" xmlns:xsi="http://www.w3.org/2001/XMLSchema-instance"
xsi:schemaLocation="http://maven.apache.org/POM/4.0.0 https://maven.apache.org/xsd/maven-4.0.0.xsd">
<modelVersion>4.0.0</modelVersion>
<parent>
<groupId>org.springframework.boot</groupId>
<artifactId>spring-boot-starter-parent</artifactId>
<version>3.3.3</version>
<relativePath/> <!-- lookup parent from repository -->
</parent>
<groupId>com.icoderoad</groupId>
<artifactId>ratelimiter</artifactId>
<version>0.0.1-SNAPSHOT</version>
<name>ratelimiter</name>
<description>Demo project for Spring Boot</description>
<properties>
<java.version>17</java.version>
<guava.version>31.1-jre</guava.version>
</properties>
<dependencies>
<!-- Spring Boot Web Starter -->
<dependency>
<groupId>org.springframework.boot</groupId>
<artifactId>spring-boot-starter-web</artifactId>
</dependency>
<!-- Guava 用于限流 -->
<dependency>
<groupId>com.google.guava</groupId>
<artifactId>guava</artifactId>
<version>${guava.version}</version>
</dependency>
<!-- Thymeleaf 模板引擎 -->
<dependency>
<groupId>org.springframework.boot</groupId>
<artifactId>spring-boot-starter-thymeleaf</artifactId>
</dependency>
<dependency>
<groupId>org.projectlombok</groupId>
<artifactId>lombok</artifactId>
<optional>true</optional>
</dependency>
<dependency>
<groupId>org.springframework.boot</groupId>
<artifactId>spring-boot-starter-test</artifactId>
<scope>test</scope>
</dependency>
</dependencies>
<build>
<plugins>
<plugin>
<groupId>org.springframework.boot</groupId>
<artifactId>spring-boot-maven-plugin</artifactId>
</plugin>
</plugins>
</build>
</project>
配置限流参数
在 src/main/resources/application.yml 中配置限流参数:
server:
  port: 8080
rate-limiter:
  permits-per-second: 5       # 每秒许可数
  warmup-period: 0            # 预热时间(秒)
  timeout: 0                  # 获取许可的超时时间(秒)
参数说明:
-
permits-per-second: 每秒允许的请求数量。
-
warmup-period: 限流器预热时间,用于平滑地增加到最大速率。
-
timeout: 获取许可的超时时间,0 表示立即返回获取结果。
创建限流配置属性类
在 src/main/java/com/icoderoad/ratelimiter/properties/RateLimiterProperties.java 中创建配置属性类,用于映射 application.yml 中的配置:
package com.icoderoad.ratelimiter.propertie;
import org.springframework.boot.context.properties.ConfigurationProperties;
import org.springframework.stereotype.Component;
import lombok.Data;
@Data
@Component
@ConfigurationProperties(prefix = "rate-limiter")
public class RateLimiterProperties {
    /**
     * 每秒许可数
     */
    private double permitsPerSecond;
    /**
     * 预热时间(秒)
     */
    private long warmupPeriod;
    /**
     * 获取许可的超时时间(秒)
     */
    private long timeout;
}
说明:
-
使用
@ConfigurationProperties注解将配置属性映射到类中,便于在代码中使用。 -
提供对应的 Getter 和 Setter 方法,方便 Spring Boot 自动注入配置。
配置 RateLimiter
在 src/main/java/com/icoderoad/ratelimiter/config/RateLimiterConfig.java 中创建限流器配置:
package com.icoderoad.ratelimiter.config;
import java.util.concurrent.TimeUnit;
import org.springframework.context.annotation.Bean;
import org.springframework.context.annotation.Configuration;
import com.google.common.util.concurrent.RateLimiter;
import com.icoderoad.ratelimiter.propertie.RateLimiterProperties;
@Configuration
public class RateLimiterConfig {
    /**
     * 配置 RateLimiter Bean
     *
     * @param properties 注入的限流配置属性
     * @return RateLimiter 实例
     */
    @Bean
    public RateLimiter rateLimiter(RateLimiterProperties properties) {
        if (properties.getWarmupPeriod() > 0) {
            // 创建带有预热期的 RateLimiter
            return RateLimiter.create(
                    properties.getPermitsPerSecond(),
                    properties.getWarmupPeriod(),
                    TimeUnit.SECONDS
            );
        } else {
            // 创建标准的 RateLimiter
            return RateLimiter.create(properties.getPermitsPerSecond());
        }
    }
}
说明:
-
根据配置文件中的参数动态创建
RateLimiter实例。 -
支持带有预热期的限流器配置,满足不同场景下的需求。
创建控制器
在 src/main/java/com/icoderoad/ratelimiter/controller/RateLimiterController.java 中创建控制器,处理 API 请求:
package com.icoderoad.ratelimiter.controller;
import java.util.concurrent.TimeUnit;
import org.springframework.beans.factory.annotation.Autowired;
import org.springframework.http.ResponseEntity;
import org.springframework.stereotype.Controller;
import org.springframework.web.bind.annotation.GetMapping;
import org.springframework.web.bind.annotation.ResponseBody;
import com.google.common.util.concurrent.RateLimiter;
import com.icoderoad.ratelimiter.propertie.RateLimiterProperties;
@Controller
public class RateLimiterController {
    @Autowired
    private RateLimiter rateLimiter;
    @Autowired
    private RateLimiterProperties properties;
    /**
     * 测试限流接口
     *
     * @return 请求结果
     */
    @GetMapping("/api/test")
    @ResponseBody
    public ResponseEntity<String> testApi() {
        boolean acquired = rateLimiter.tryAcquire(properties.getTimeout(), TimeUnit.SECONDS);
        if (acquired) {
            // 允许请求,返回成功响应
            return ResponseEntity.ok("请求成功!");
        } else {
            // 拒绝请求,返回限流响应
            return ResponseEntity.status(429).body("请求过多,请稍后再试!");
        }
    }
}
说明:
-
使用
rateLimiter.tryAcquire(timeout, TimeUnit.SECONDS)方法尝试获取许可,支持超时等待。 -
根据获取许可的结果返回对应的响应:
-
成功获取:返回 200 状态码和成功消息。
-
获取失败:返回 429 状态码和错误提示。
-
创建前端页面
在 src/main/resources/templates/index.html 中创建前端页面,使用 Thymeleaf、Bootstrap 和 jQuery 实现:
<!DOCTYPE html>
<html xmlns:th="http://www.thymeleaf.org">
<head>
<meta charset="UTF-8">
<title>API 限流测试</title>
<!-- 引入 Bootstrap CSS -->
<link rel="stylesheet" href="https://cdn.jsdelivr.net/npm/bootstrap@5.3.0/dist/css/bootstrap.min.css">
<!-- 自定义样式 -->
<style>
body {
padding-top: 50px;
}
</style>
</head>
<body>
<div class="container">
<h1 class="mb-4">API 限流测试</h1>
<button id="testButton" class="btn btn-primary">发送请求</button>
<div id="alertPlaceholder" class="mt-3"></div>
</div>
<!-- 引入 jQuery -->
<script src="https://code.jquery.com/jquery-3.6.0.min.js"></script>
<!-- 引入 Bootstrap JS -->
<script src="https://cdn.jsdelivr.net/npm/bootstrap@5.3.0/dist/js/bootstrap.bundle.min.js"></script>
<script>
$(document).ready(function () {
$('#testButton').click(function () {
$.ajax({
url: '/api/test',
method: 'GET',
success: function (response) {
showAlert(response, 'success');
},
error: function (xhr) {
if (xhr.status === 429) {
showAlert(xhr.responseText, 'danger');
} else {
showAlert('发生未知错误,请稍后重试。', 'warning');
}
}
});
});
/**
* 显示提示信息
* @param message 消息内容
* @param type 提示类型('success', 'danger', 'warning' 等)
*/
function showAlert(message, type) {
const alertHtml = <div class="alert alert-${type} alert-dismissible fade show" role="alert"> ${message} <button type="button" class="btn-close" data-bs-dismiss="alert" aria-label="Close"></button> </div> ;
$('#alertPlaceholder').html(alertHtml);
}
});
</script>
</body>
</html>
说明:
-
引入资源:
- 使用 CDN 加载 Bootstrap 和 jQuery,确保资源的快速和稳定加载。
-
页面结构:
-
一个按钮用于触发 API 请求。
-
一个占位符
div用于显示提示信息。
-
-
JavaScript 逻辑:
-
使用 jQuery 监听按钮点击事件,发送 AJAX 请求到
/api/test接口。 -
根据响应结果,调用
showAlert函数,在页面上显示不同类型的提示信息。 -
showAlert函数使用 Bootstrap 的 Alert 组件,提供友好的用户提示。
-
效果展示:
-
请求成功: 显示绿色的成功提示。
-
请求被限流: 显示红色的错误提示,提示用户请求过多。
-
未知错误: 显示黄色的警告提示,提示发生未知错误。
启动应用
在 src/main/java/com/icoderoad/ratelimiter/application/SpringBootRateLimiterApplication.java 中启动 Spring Boot 应用:
package com.icoderoad.ratelimiter;
import org.springframework.boot.SpringApplication;
import org.springframework.boot.autoconfigure.SpringBootApplication;
@SpringBootApplication(scanBasePackages = "com.icoderoad.ratelimiter")
public class RatelimiterApplication {
public static void main(String[] args) {
	SpringApplication.run(RatelimiterApplication.class, args);
}

}
说明:
-
使用
@SpringBootApplication注解标注主启动类,并指定扫描的基础包路径。 -
运行
main方法即可启动应用。
8. 测试与验证
步骤:
-
启动应用: 运行主启动类,启动 Spring Boot 应用。
-
访问页面: 在浏览器中访问
http://localhost:8080/,看到 API 限流测试页面。 -
发送请求:
点击"发送请求"按钮,观察页面提示信息。
-
正常情况: 如果请求未超过限流阈值,显示绿色的"请求成功!"提示。
-
限流情况: 如果在短时间内连续多次点击按钮,超过配置的每秒许可数,将显示红色的"请求过多,请稍后再试!"提示。
-
-
调整配置: 可以修改
application.yml中的限流参数,重新启动应用,测试不同的限流策略效果。
示例演示:
-
设置
permits-per-second为 2,表示每秒允许 2 个请求。 -
连续快速点击按钮,多数请求将被限流,提示用户稍后重试。
9. 总结
通过本文的示例,我们成功地在 Spring Boot 3.3 中实现了简单而有效的 API 接口限流功能。我们利用了 Guava 提供的 RateLimiter 工具,结合 Spring Boot 的配置属性管理和依赖注入机制,实现了灵活可配的限流策略。同时,通过前端页面的简单设计和友好提示,使得用户能够清晰地感知到限流机制的存在和作用。
 51工具盒子
