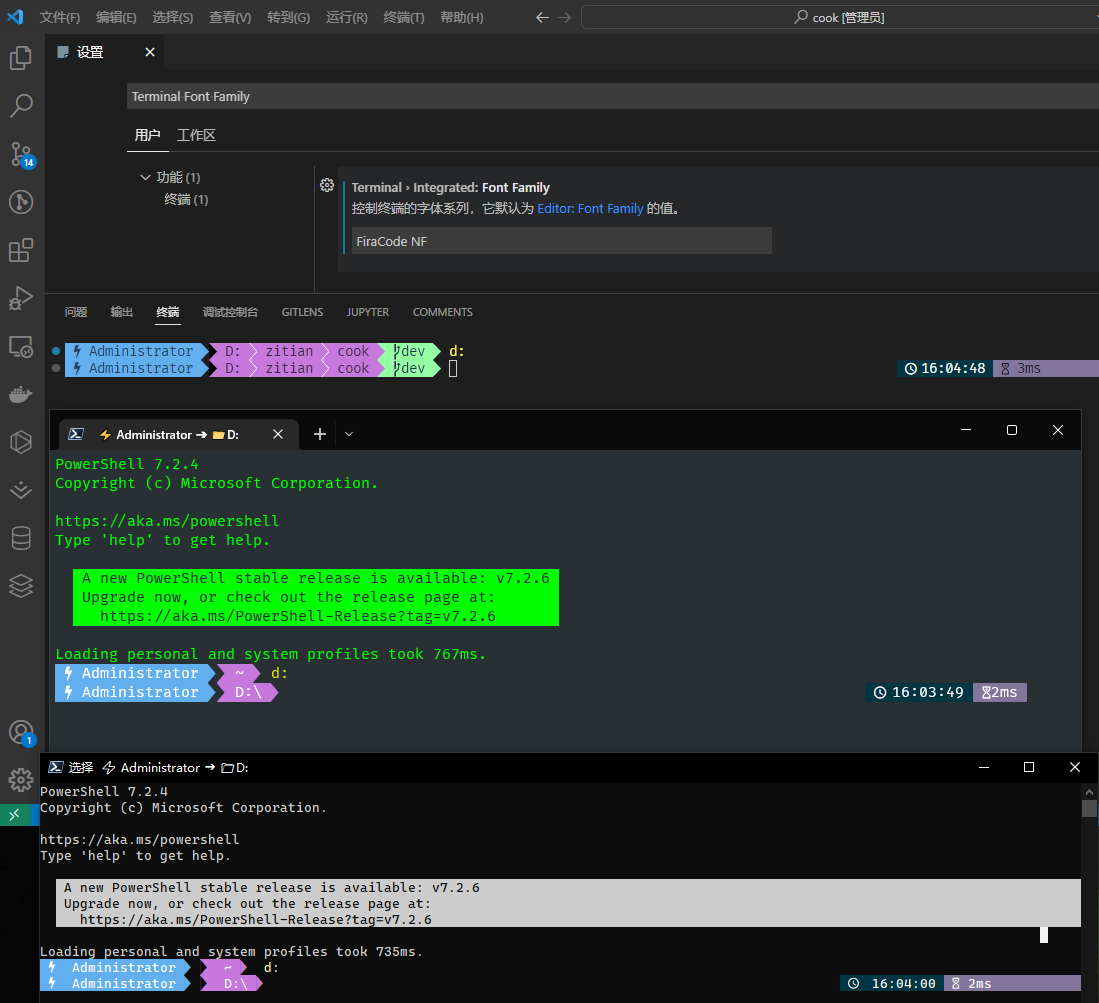
在看 VScode的更新文档 时发现官方的终端很好看,遂研究了一下。
首先终端必须使用微软新的 PowerShell 7 ,以下操作都相当于是在美化PowerShell 7 以下仅在Windows系统中操作成功,其它系统未尝试。
主题引擎 {#%E4%B8%BB%E9%A2%98%E5%BC%95%E6%93%8E}
oh-my-posh主题引擎
-
01
官方:https://ohmyposh.dev/
</code>
</pre>
-
关于字体说明
官方:https://ohmyposh.dev/docs/installation/fonts
</code>
</pre>
下载适合主题的字体 {#%E4%B8%8B%E8%BD%BD%E9%80%82%E5%90%88%E4%B8%BB%E9%A2%98%E7%9A%84%E5%AD%97%E4%BD%93}
----------------------------------------------------------------------------------------------
1. FiraCode
https://github.com/ryanoasis/nerd-fonts/releases/download/v2.2.2/FiraCode.zip
</code>
</pre>
选择常规字体 ` Fira Code Regular Nerd Font Complete Windows Compatible.ttf ` 右键安装
2. nerd-fonts
https://github.com/AaronFriel/nerd-fonts/releases/download/v1.2.0/CascadiaCode.Nerd.Font.Complete.ttf
</code>
</pre>
选一个就好了, 我选的是 ` FiraCode `
安装主题和其它插件 {#%E5%AE%89%E8%A3%85%E4%B8%BB%E9%A2%98%E5%92%8C%E5%85%B6%E5%AE%83%E6%8F%92%E4%BB%B6}
----------------------------------------------------------------------------------------------
# 1. 安装 PSReadline 包,该插件可以让命令行很好用,类似 zsh
Install-Module -Name PSReadLine -Scope CurrentUser
2. 安装 posh-git 包,让你的 git 更好用
============================
Install-Module posh-git -Scope CurrentUser
3. 安装 oh-my-posh 包,让你的命令行更酷炫、优雅
===============================
Install-Module oh-my-posh -Scope CurrentUser # oh-my-posh不支持Import-Module的形式了
=============================================================================
winget install JanDeDobbeleer.OhMyPosh -s winget
</code>
</pre>
> winget安装很慢,我大概等了3\~5分钟吧,可以参考 https://ohmyposh.dev/docs/installation/windows 使用别的方法安装
>
>
编辑PowerShell 7配置文件 {#%E7%BC%96%E8%BE%91powershell-7%E9%85%8D%E7%BD%AE%E6%96%87%E4%BB%B6}
----------------------------------------------------------------------------------------
打开 ` PowerShell 7 ` 运行:
notepad.exe $Profile
</code>
</pre>
内容 ( https://zhuanlan.zhihu.com/p/137595941 )
````ini
#------------------------------- Import Modules BEGIN -------------------------------
# 引入 posh-git
Import-Module posh-git
引入 oh-my-posh
=============
Import-Module oh-my-posh # oh-my-posh不支持Import-Module了
======================================================
winget install JanDeDobbeleer.OhMyPosh
======================================
引入 ps-read-line
===============
Import-Module PSReadLine
设置 PowerShell 主题 (其中xxx..json就是主题的配置,oh-my-posh包含了多种主题配置,可在官网浏览https://ohmyposh.dev/docs/themes)
================================================================================================
oh-my-posh init pwsh --config "$env:POSH_THEMES_PATH\\powerlevel10k_classic.omp.json" \| Invoke-Expression
==========================================================================================================
oh-my-posh init pwsh --config "$env:POSH_THEMES_PATH\\paradox.omp.json" \| Invoke-Expression
============================================================================================
oh-my-posh init pwsh --config "$env:POSH_THEMES_PATH\\capr4n.omp.json" \| Invoke-Expression
#------------------------------- Import Modules END -------------------------------
#------------------------------- Set Hot-keys BEGIN -------------------------------
设置预测文本来源为历史记录
=============
Set-PSReadLineOption -PredictionSource History
每次回溯输入历史,光标定位于输入内容末尾
====================
Set-PSReadLineOption -HistorySearchCursorMovesToEnd
设置 Tab 为菜单补全和 Intellisense
==========================
Set-PSReadLineKeyHandler -Key "Tab" -Function MenuComplete
设置 Ctrl+d 为退出 PowerShell
========================
Set-PSReadlineKeyHandler -Key "Ctrl+d" -Function ViExit
设置 Ctrl+z 为撤销
=============
Set-PSReadLineKeyHandler -Key "Ctrl+z" -Function Undo
设置向上键为后向搜索历史记录
==============
Set-PSReadLineKeyHandler -Key UpArrow -Function HistorySearchBackward
设置向下键为前向搜索历史纪录
==============
Set-PSReadLineKeyHandler -Key DownArrow -Function HistorySearchForward
#------------------------------- Set Hot-keys END -------------------------------
#------------------------------- Functions BEGIN -------------------------------
Python 直接执行
===========
$env:PATHEXT += ";.py"
更新系统组件
======
function Update-Packages {
# update pip
Write-Host "Step 1: 更新 pip" -ForegroundColor Magenta -BackgroundColor Cyan
$a = pip list --outdated
$num_package = $a.Length - 2
for ($i = 0; $i -lt $num_package; $i++) {
$tmp = ($a\[2 + $i\].Split(" "))\[0\]
pip install -U $tmp
}
# update TeX Live
$CurrentYear = Get-Date -Format yyyy
Write-Host "Step 2: 更新 TeX Live" $CurrentYear -ForegroundColor Magenta -BackgroundColor Cyan
tlmgr update --self
tlmgr update --all
# update Chocolotey
Write-Host "Step 3: 更新 Chocolatey" -ForegroundColor Magenta -BackgroundColor Cyan
choco outdated
}
#------------------------------- Functions END -------------------------------
#------------------------------- Set Alias BEGIN -------------------------------
1. 编译函数 make
============
function MakeThings {
nmake.exe $args -nologo
}
Set-Alias -Name make -Value MakeThings
2. 更新系统 os-update
=================
Set-Alias -Name os-update -Value Update-Packages
3. 查看目录 ls \& ll
================
function ListDirectory {
(Get-ChildItem).Name
Write-Host("")
}
Set-Alias -Name ls -Value ListDirectory
Set-Alias -Name ll -Value Get-ChildItem
4. 打开当前工作目录
===========
function OpenCurrentFolder {
param
(
# 输入要打开的路径
# 用法示例:open C:
# 默认路径:当前工作文件夹
$Path = '.'
)
Invoke-Item $Path
}
Set-Alias -Name open -Value OpenCurrentFolder
#------------------------------- Set Alias END -------------------------------
#------------------------------- Set Network BEGIN -------------------------------
1. 获取所有 Network Interface
=========================
function Get-AllNic {
Get-NetAdapter \| Sort-Object -Property MacAddress
}
Set-Alias -Name getnic -Value Get-AllNic
2. 获取 IPv4 关键路由
===============
function Get-IPv4Routes {
Get-NetRoute -AddressFamily IPv4 \| Where-Object -FilterScript {$_.NextHop -ne '0.0.0.0'}
}
Set-Alias -Name getip -Value Get-IPv4Routes
3. 获取 IPv6 关键路由
===============
function Get-IPv6Routes {
Get-NetRoute -AddressFamily IPv6 \| Where-Object -FilterScript {$_.NextHop -ne '::'}
}
Set-Alias -Name getip6 -Value Get-IPv6Routes
#------------------------------- Set Network END -------------------------------
</code>
</pre>
为PowerShell 7更换字体 {#%E4%B8%BApowershell-7%E6%9B%B4%E6%8D%A2%E5%AD%97%E4%BD%93}
------------------------------------------------------------------------------
此时可能会看到终端中有符号乱码,这是还没更换字体导致的。
* ` PowerShell 7 ` 在左上角「属性」-> 「字体」中更换
* ` Windows Terminal ` 在标签右边下拉「设置」-> 「选择自己的终端配置文件」-> 「外观」-> 「字体」中更换
* ` VS Code ` 在设置中搜索 ` Terminal Font Family ` 将字体设置为 ` FiraCode NF `
效果 {#%E6%95%88%E6%9E%9C}
------------------------

### 关于 ` Windows Terminal ` 的美化 {#%E5%85%B3%E4%BA%8Ewindows-terminal%E7%9A%84%E7%BE%8E%E5%8C%96}
` Windows Terminal ` 标签右边下拉「设置」-\> 左下角「打开JSON文件」
```json
......
"profiles":
{
"defaults": {},
"list":
[
......
# 找到自己终端的配置项或新建一个
{
"name": "PowerShell (my)",
"closeOnExit": "graceful",
"colorScheme": "Homebrew", # 使用的配色方案名
"commandline": "\"C:\\Program Files\\PowerShell\\7\\pwsh.exe\"",
"cursorColor": "#FFFFFF",
"cursorShape": "bar",
"font":
{
"face": "FiraCode NF",
"weight": "semi-light"
},
"guid": "{这个id是自动生成的}",
"hidden": false,
"historySize": 9001,
"icon": "ms-appx:///ProfileIcons/pwsh.png",
"opacity": 100,
"padding": "5, 5, 20, 25",
"snapOnInput": true,
"startingDirectory": "%USERPROFILE%",
"useAcrylic": true
}
]
}
...
增加名为Homebrew的配色方案
=================
"schemes":
\[
{
"name": "Homebrew",
"background": "#283033",
"black": "#000000",
"blue": "#6666E9",
"brightBlack": "#666666",
"brightBlue": "#0000FF",
"brightCyan": "#00E5E5",
"brightGreen": "#00D900",
"brightPurple": "#E500E5",
"brightRed": "#E50000",
"brightWhite": "#E5E5E5",
"brightYellow": "#E5E500",
"cursorColor": "#FFFFFF",
"cyan": "#00A6B2",
"foreground": "#00FF00",
"green": "#00A600",
"purple": "#B200B2",
"red": "#FC5275",
"selectionBackground": "#FFFFFF",
"white": "#BFBFBF",
"yellow": "#999900"
},
......
\]
</code>
</pre>
*** ** * ** ***
回到开头
\> VScode用的主题是哪个?
\> 我不道啊...
\> VScode是用的oh-my-posh吗?
\> 我...(°Д°) 我不道啊...
```
````
 51工具盒子


