Vue每日一学:介绍vue中nextTick作用和几个简单的使用场景。
nextTick作用
在下次 DOM 更新循环结束之后执行延迟回调。在修改数据之后立即使用这个方法,获取更新后的 DOM。
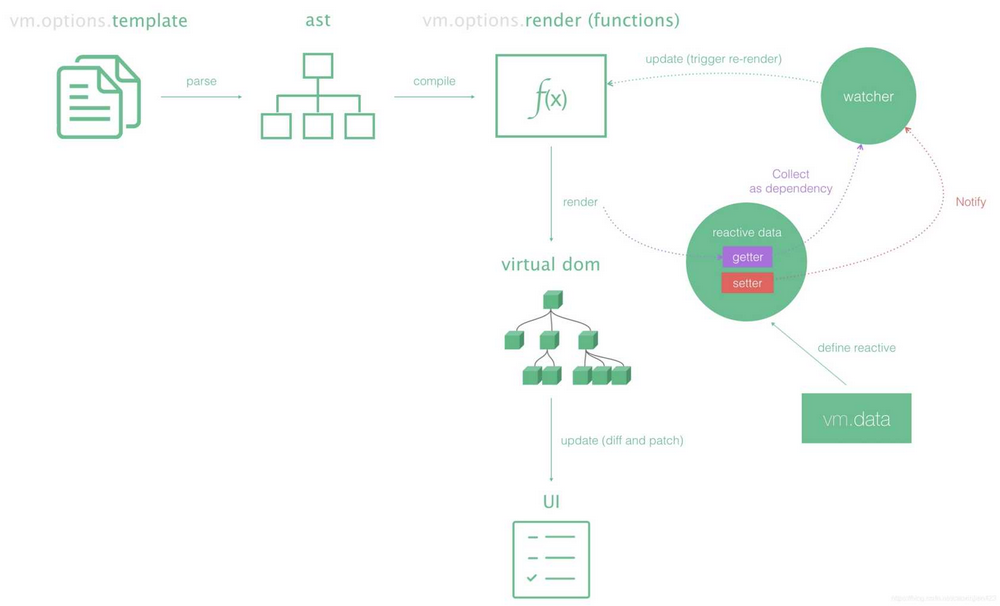
我想各位都知道或了解 Vue 的渲染流程,Vue 在监听到数据变化后会重新渲染,配合 VDOM 更新真实的 DOM,而 nextTick 的触发时机就是在调用方法后的第一次重新渲染完毕后。

如何使用?
有两种使用方法,一种是传入回调,另一种是 Promise,官方使用示例如下:
// 修改数据
vm.msg = 'Hello'
// DOM 还没有更新
Vue.nextTick(function () {
 // DOM 更新了
})

// 作为一个 Promise 使用 (2.1.0 起新增,详见接下来的提示)
Vue.nextTick()
 .then(function () {
 // DOM 更新了
})
如果在 SPA(单文件组件) 中,可能是这个样子:
<template>
 <div id="test">{{msg}}</div>
</template>
<script>
export default {
 name: 'app',
 data() {
 return {
  "msg": "Hello World!"
 }
 },
 method() {
 this.msg = "Hi World!";
 this.$nextTick(() => {
  console.log('DOM updated:', document.getElementById('test').innerHTML)
 });
 }
}
</script>
有什么使用场景?
需要等待渲染完成后执行的一些方法
初始化绑定或操作 DOM
比如在 created 和 mounted 回调中,需要操作渲染好的 DOM,则需要在 nextTick 中执行相关逻辑,这在必须使用一些老的需要绑定 DOM 的库时很有用。
比如,在加载 UEditor 时,可能会这样玩
<template>
<script id="container" name="content" type="text/plain"> 这里写你的初始化内容 </script>
</template>
<script>
export default {
 mounted() {
  this.nextTick(() => {
   var ue = UE.getEditor('container');
  });
 }
}
获取元素宽度
在 Vue 中获取元素宽度有两种方式,第一种是通过 $refs[ref名称].style.width,第二种可以使用传统操作 DOM 的方式获取,但这两者要获取到准确的元素宽度,则需要在 DOM 渲染完毕后执行。
<template>
<p ref="myWidth" v-if="showMe">{{ message }}</p> <button @click="getMyWidth">获取p元素宽度</button>
</template>
<script>
export default {
 data() {
 return {
  message: "Hello world!",
  showMe: false,
 },
 methods: {
  getMyWidth() {
  this.showMe = true;
  //this.message = this.refs.myWidth.offsetWidth;  //报错 TypeError: this.refs.myWidth is undefined
  this.nextTick(()=>{
  //dom元素更新后执行,此时能拿到p元素的属性   this.message = this.refs.myWidth.offsetWidth; })
  }
 }
 }
}
</script>
总结
虽说 Vue 的设计理念并不建议我们去直接操作 DOM,但有些场景下出现了特别令人迷惑的问题,理解 Vue 的渲染逻辑后,使用 nextTick() 可以解决。
 51工具盒子


