之前简单写了一下 搭建 V2Ray 的过程,使用了脚本来安装和配置,也没有使用混淆之类的,在流量比较大的时候还是不太安全。这里就使用 WebSocket + TLS 来配合 V2Ray 做混淆,主要就是把 V2Ray 的服务器伪装成一个网站服务器。
准备
首先需要有一个域名,对于有网站的站长来说可以设置一个二级域名解析到服务器。如果没有域名的话,可以买一个,一些小众后缀的域名价格也比较便宜,不到 10 元 就可以买一年。购买后还是把域名解析到服务器。
除了域名外还需要申请一个 SSL 证书,SSL 证书可以免费申请,关于申请 SSL 可以看 申请免费的 SSL 证书为网站开启 HTTPS 。
安装 V2Ray
首先安装 cURL,CentOS 之类的系统可以输入:
yum install curl
如果是 Debian 或 Ubuntu 之类的系统可以输入:
apt install curl
接下来就是下载和安装 V2Ray:
bash <(curl -L -s https://install.direct/go.sh)
安装完成后会生成 PORT (端口) 和 UUID ,如下:
PORT:14204
UUID:01c68858-1939-4dd0-d514-0037afe1240a
Created symlink from /etc/systemd/system/multi-user.target.wants/v2ray.service to /etc/systemd/system/v2ray.service.
V2Ray v4.22.1 is installed.
如果不配置 TLS + WebSocket 的话,打开端口就可以使用了。
配置 TLS 和 WebSocket
V2Ray 的配置文件是 JSON 格式的,要更改 V2Ray 的配置文件需要能看懂 JSON。
V2Ray 的配置文件在 /etc/v2ray/config.json,可以用 VI 或 VIM 之类的编辑器打开编辑,关于 VI 的使用可以看 Linux VI 编辑器简单使用教程 。
默认的配置文件大致如下:
{
  "inbounds": [
    {
      "port": 14204,
      "protocol": "vmess",
      "settings": {
        "clients": [
          {
            "id": "01c68858-1939-4dd0-b344-0037afe1770a",
            "level": 1,
            "alterId": 64
          }
        ]
      }
    }
  ],
  "outbounds": [
    {
      "protocol": "freedom",
      "settings": {}
    },
    {
      "protocol": "blackhole",
      "settings": {},
      "tag": "blocked"
    }
  ],
  "routing": {
    "rules": [
      {
        "type": "field",
        "ip": [
          "geoip:private"
        ],
        "outboundTag": "blocked"
      }
    ]
  }
}
WebSocket 和 TLS 的 inbounds 配置如下:
{
  "port": 443,
  "listen": "0.0.0.0",
  "protocol": "vmess",
  "settings": {
    "clients": [
      {
        "id": "18c347ee-3315-4237-8c6d-9fdb4774771a",
        "alterId": 64
      }
    ]
  },
  "streamSettings": {
    "network": "ws",
    "security": "tls",
    "tlsSettings": {
      "serverName": "xxx.com",
      "allowInsecure": true,
      "certificates": [
        {
          "certificateFile": "/home/ssl/full_chain.pem",
          "keyFile": "/home/ssl/private.key"
        }
      ]
    },
    "wsSettings": {
      "path": "/",
      "headers": {}
    }
  },
  "tag": "",
  "sniffing": {
    "enabled": true,
    "destOverride": [
      "http",
      "tls"
    ]
  }
}
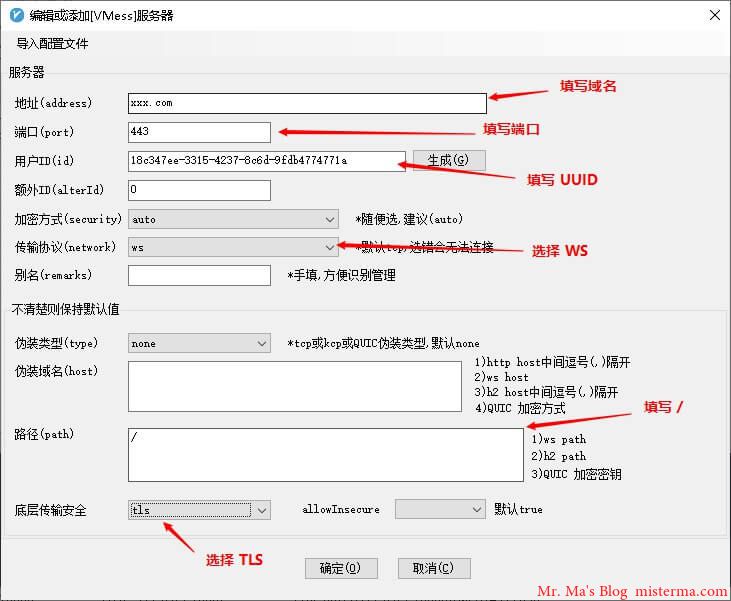
其中的 port 就是端口,如果你的服务器上还有其它网站的话可以更改一下端口。id 就是 UUID,有很多在线生成 UUID 的网站,可以重新生成一个。serverName 就是域名,可以更改为你的域名。certificates 中的 certificateFile 就是证书文件的位置,需要绝对路径,keyFile 就是证书密钥的位置。
上面的 inbounds 配置需要添加到 V2Ray 配置文件的 inbounds 中,添加后的 V2Ray 配置文件大致如下:
{
  "inbounds": [
    {
      "port": 14204,
      "protocol": "vmess",
      "settings": {
        "clients": [
          {
            "id": "01c68858-1939-4dd0-b344-0037afe1770a",
            "level": 1,
            "alterId": 64
          }
        ]
      }
    },
    {
      "port": 443,
      "listen": "0.0.0.0",
      "protocol": "vmess",
      "settings": {
        "clients": [
          {
            "id": "18c347ee-3315-4237-8c6d-9fdb4774771a",
            "alterId": 64
          }
        ]
      },
      "streamSettings": {
        "network": "ws",
        "security": "tls",
        "tlsSettings": {
          "serverName": "xxx.com",
          "allowInsecure": true,
          "certificates": [
            {
              "certificateFile": "/home/ssl/full_chain.pem",
              "keyFile": "/home/ssl/private.key"
            }
          ]
        },
        "wsSettings": {
          "path": "/",
          "headers": {}
        }
      },
      "tag": "",
      "sniffing": {
        "enabled": true,
        "destOverride": [
          "http",
          "tls"
        ]
      }
    }
  ],
  "outbounds": [
    {
      "protocol": "freedom",
      "settings": {}
    },
    {
      "protocol": "blackhole",
      "settings": {},
      "tag": "blocked"
    }
  ],
  "routing": {
    "rules": [
      {
        "type": "field",
        "ip": [
          "geoip:private"
        ],
        "outboundTag": "blocked"
      }
    ]
  }
}
安装 V2Ray 时生成的 inbounds 配置如果不用的话也可以删除。
保存配置后输入 service v2ray start 启动 V2Ray,别忘了打开设置的端口,CentOS 设置端口可以看 CentOS 开放、关闭和查看端口 。
客户端配置
因为我用的是 Win10,所以就以 Windows 的 v2rayN-Core 为例,其它系统的配置应该也差不多。
在 https://github.com/2dust/v2rayN/releases 可以下载 v2rayN-Core 。
打开 v2rayN 选择 添加[VMess]服务器 ,按照下图的说明填写:

相关文章:
版权声明:本文为原创文章,版权归 Mr. Ma's Blog 所有,转载请联系博主获得授权。
本文地址:https://www.misterma.com/archives/856/
如果对本文有什么问题或疑问都可以在评论区留言,我看到后会尽量解答。
 51工具盒子


