什么是Mybatis?
Mybatis官网:https://mybatis.net.cn/index.html
mybatis是一个用Java编写的持久层框架,它使用ORM实现了结果集的封装。
ORM是Object Relational Mapping 对象关系映射。简单来说,就是把数据库表和实体类及实体类的属性对应起来,让开发者操作实体类就实现操作数据库表,它封装了jdbc操作的很多细节,使开发者只需要关注sql语句本身,而无需关注注册驱动,创建连接等复杂过程。
ORM:Object-Relation-Mapping,也就是对象关系映射,是一种程序设计思想,mybatis就是ORM的一种实现方式,简单来说就是将数据库中查询出的数据映射到对应的实体中。
数据库层框架
1.com.mayikt.servlet或者com.mayikt.controller--------控制层 springmvc
2.com.mayikt.service---业务逻辑层
3.com.mayikt.dao----数据库访问层 hibernate或者mybatis、jpa
Mybatis入门
1.首先,我们可以使用maven引入Mybatis所需要的依赖。下面是pom.xml中的引入代码:
<!--首先引入mybatis的依赖-->
<dependency>
            <groupId>org.mybatis</groupId>
            <artifactId>mybatis</artifactId>
            <version>3.4.5</version>
</dependency>
<!--然后再引入mysql的依赖包-->
<dependency>
            <groupId>mysql</groupId>
            <artifactId>mysql-connector-java</artifactId>
            <version>8.0.18</version>
</dependency>
2.mybatis-config.xml(该配置文件名称可以改) 存放我们数据库相关连接信息,该xml文件放在主文件目录中resources的目录下面(main/resources)。mybatis-config.xml文件内容
<?xml version="1.0" encoding="UTF-8" ?>
<!DOCTYPE configuration
        PUBLIC "-//mybatis.org//DTD Config 3.0//EN"
        "http://mybatis.org/dtd/mybatis-3-config.dtd">
<configuration>
    <environments default="development">
        <environment id="development">
            <transactionManager type="JDBC"/>
            <dataSource type="POOLED">
                <property name="driver" value="com.mysql.cj.jdbc.Driver"/>
                <property name="url" value="jdbc:mysql://127.0.0.1:3306/数据库名称?serverTimezone=GMT%2B8"/>
                <property name="username" value="root"/>
                <property name="password" value="root"/>
            </dataSource>
        </environment>
    </environments>
    <!--此处的mapper用于将需要用到的mybatis xml文件引入,便于mybatis扫描到并且执行,此处不填写会报错-->
    <mappers>
        <mapper resource="mybatis/userMaaper.xml"/>
    </mappers>
</configuration>
3.定义mapper ----编写我们mybatis 相关 sql语句 每个表 对应一个mapper 。同样是再resources目录下新建一个mapper的目录。
<?xml version="1.0" encoding="UTF-8" ?>
<!DOCTYPE mapper
        PUBLIC "-//mybatis.org//DTD Mapper 3.0//EN"
        "http://mybatis.org/dtd/mybatis-3-mapper.dtd">
<mapper namespace="userMapper">
    <!--在同一个namespce里面 id名字不允许重复 ,resultType是指返回类型,java中的对象,要用完整的路径用包名+类名-->
    <select id="getByUserAll" resultType="com.fish9.entity.UserEntity">
        select * from user
    </select>
</mapper>
在同一个namespce里面 id名字不允许重复 ,resultType是指返回类型,java中的对象。
4.我们需要新建java对象来储存从数据库中获取到的结果。可以在一个单独的package当中写这些属性。定义java对象--需要注意下 类中的 成员属性与数据库表中字段 映射 默认 类中的 成员属性数据库表中字段名称对应的。
若不对应,我们可以使用sql语句中的as语法。
举个例子:如果我们的java对象中的属性值为userName,但是我们数据库中的字段名是user我们向要将user和userName对应起来,可以将sql语句更改一下,改成:select user as userName from user 这样就可以解决名称不同的问题。
5.使用 mybatis api开始执行该 sql语句即可 得到结果。
下面是使用api 的代码示例:
public class Test01 {
    public static void main(String[] args) throws IOException {
        String resource = "mybatis-config.xml";
        // 1.读取加载mybatis-config.xml
        //解析mybatis-config.xml得到数据库相关的配置信息
        InputStream inputStream = Resources.getResourceAsStream(resource);
        //创建得到一个sqlSessionFactory
        SqlSessionFactory sqlSessionFactory = new SqlSessionFactoryBuilder().build(inputStream);
        // 2.获取到sqlSession
        SqlSession sqlSession = sqlSessionFactory.openSession();
        // 3.根据 mapper id=getByUsers 执行该sql 语句 通过  sql语句得到我们的对象 orm
        //第一个逗号前面的是namespace+idz
        List<UserEntity> userEntitys = sqlSession.selectList("userMapper.getByUserAll", UserEntity.class);
        System.out.println(userEntitys);
        sqlSession.close();
    }
}
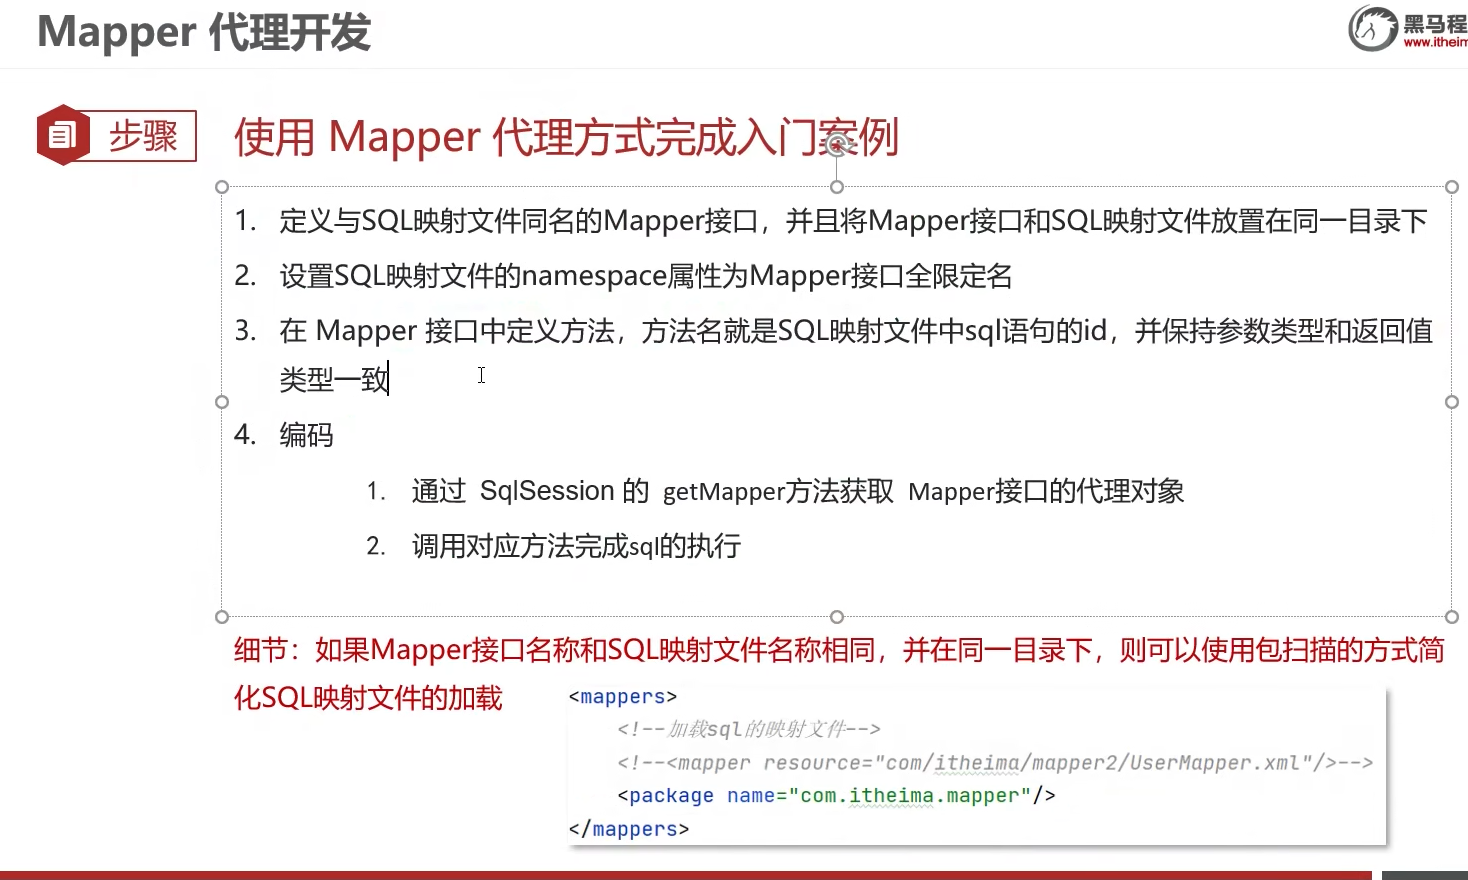
Mybatis代理开发模式

示例代码:
userMapper.xml
<?xml version="1.0" encoding="UTF-8" ?>
<!DOCTYPE mapper
        PUBLIC "-//mybatis.org//DTD Mapper 3.0//EN"
        "http://mybatis.org/dtd/mybatis-3-mapper.dtd">
<mapper namespace="com.fish9.mapper.userMapper">
    <!--在同一个namespce里面 id名字不允许重复 ,resultType是指返回类型,java中的对象,要用完整的路径用包名+类名-->
    <select id="getByUserAll" resultType="com.fish9.entity.UserEntity">
        select * from user
    </select>
</mapper>
userMapper.java
public interface userMapper {
    List<UserEntity> getByUserAll();
}
Test01.java
public static void main(String[] args) throws IOException {
        // 1.读取加载mybatis-config.xml
        String resource = "mybatis-config.xml";
        //解析mybatis-config.xml得到数据库相关的配置信息
        InputStream inputStream = Resources.getResourceAsStream(resource);
        //创建得到一个sqlSessionFactory
        SqlSessionFactory sqlSessionFactory = new SqlSessionFactoryBuilder().build(inputStream);
        // 2.获取到sqlSession
        SqlSession sqlSession = sqlSessionFactory.openSession();
        // 3.根据 mapper id=getByUsers 执行该s  ql 语句 通过  sql语句得到我们的对象 orm
        userMapper mapper = sqlSession.getMapper(userMapper.class);
        System.out.println(mapper.getByUserAll());
        sqlSession.close();
    }
解决数据库与类中成员属性不一致性
第一种方法是从sql语句中入手,将查询到的表的字段改成对象的属性,使用as方法。这种方式会导致写sql语句的时候非常的麻烦,因此一般使用第二种方式。
第二种方式:
resultMap 定义数据库表中字段名称与类中成员属性名称 关联映射。
数据库字段:flight_id----类中成员名称 flightId
只需要在mapper映射文件当中添加一个resultMap标签添加对应指向代码即可实现(在mapper标签中添加)
    <resultMap id="flightEntityMap" type="com.fish9.FlightEntity">
        <!-- 数据库中字段名称 column="" property="id"  类中成员属性名称-->
        <id column="id" property="id"></id>
        <result column="flight_id" property="flightId"></result>
        <result column="departure_airport" property="departureAirport"></result>
        <result column="departure_time" property="departureTime"></result>
        <result column="arrive_time" property="arriveTime"></result>
        <result column="model" property="model"></result>
        <result column="is_delete" property="isDelete"></result>
    </resultMap>
    <!--  定义数据库中字段名称与我们 类中成员属性值 关联映射-->
<!--下方的resultMap填写的是对应映射关系的上方resultMap中的id,实现关联映射-->
    <select id="getByFlightAll2" resultMap="flightEntityMap">
            select * from flight where  id=10;
  </select>
根据id查询数据
在需要根据id查询数据的映射mapper当中的<select>标签当中添加parameterType="int",用于防止sql注入危险。然后用#{id}来表示传入的变量id。
    <select id="getByUserAll" parameterType="int" resultType="com.fish9.entity.UserEntity">
        select * from user where id=#{id};
    </select>
然后是接口处的相关代码写法:只需要在传入值地方,像调用方法的时候传参那样在括号中添加一个id值即可。
List<UserEntity> getByUserAll(Integer id);
然后是关于接口调用的代码示例。
前面都没什么变化,但是调用mapper.getByUserAll方法的时候,需要在括号内添加一个参数值,用于传递到sql查询语句当中。
public static void main(String[] args) throws IOException {
        // 1.读取加载mybatis-config.xml
        String resource = "mybatis-config.xml";
        //解析mybatis-config.xml得到数据库相关的配置信息
        InputStream inputStream = Resources.getResourceAsStream(resource);
        //创建得到一个sqlSessionFactory
        SqlSessionFactory sqlSessionFactory = new SqlSessionFactoryBuilder().build(inputStream);
        // 2.获取到sqlSession
        SqlSession sqlSession = sqlSessionFactory.openSession();
        // 3.根据 mapper id=getByUsers 执行该s  ql 语句 通过  sql语句得到我们的对象 orm
//        List<UserEntity> userEntitys = sqlSession.selectList("com.fish9.mapper.userMapper.getByUserAll", UserEntity.class);
//        System.out.println(userEntitys.get(1).getPassword());
        userMapper mapper = sqlSession.getMapper(userMapper.class);
        System.out.println(mapper.getByUserAll(2));
        sqlSession.close();
    }
Mybatis 将接口集成进service类
开发模式就是用将所有执行数据库操作的接口集合在一个类当中,便于后期的调用操作,免除了许多不相关的操作,将繁琐的创建map等操作集成进去。
接下来演示一下我自己学习中写的关于对用户信息的读写操作的代码(采用接口的方式调用)
userMapper.xml
<?xml version="1.0" encoding="UTF-8" ?>
<!DOCTYPE mapper
PUBLIC "-//mybatis.org//DTD Mapper 3.0//EN"
"http://mybatis.org/dtd/mybatis-3-mapper.dtd">
<mapper namespace="com.fish9.mapper.userMapper">
<!--在同一个namespce里面 id名字不允许重复 ,resultType是指返回类型,java中的对象,要用完整的路径用包名+类名-->
<select id="getByUserAll" resultType="com.fish9.entity.UserEntity">
select * from user ;
</select>
&lt;!--下面是根据用户的id查询用户的信息--&gt;
&lt;select id="getByUserId" parameterType="int" resultType="com.fish9.entity.UserEntity"&gt;
select * from user where id = #{id};
&lt;/select&gt;
&lt;insert id="insertUser" parameterType="com.fish9.entity.UserEntity" &gt;
INSERT INTO `fish9_login`.`user` ( `username`, `password`) VALUES ( #{username}, #{password});
&lt;/insert&gt;
</mapper>
userMapper.java
package com.fish9.mapper;
import com.fish9.entity.UserEntity;
import java.util.List;
public interface userMapper {
//获取所有用户信息的查询
List<UserEntity> getByUserAll();
List&lt;UserEntity&gt; getByUserId(Integer id);
int insertUser(UserEntity userEntity);
}
userServvice.java
package com.fish9.service;
import com.fish9.entity.UserEntity;
import com.fish9.mapper.userMapper;
import org.apache.ibatis.io.Resources;
import org.apache.ibatis.session.SqlSession;
import org.apache.ibatis.session.SqlSessionFactory;
import org.apache.ibatis.session.SqlSessionFactoryBuilder;
import java.io.IOException;
import java.io.InputStream;
import java.util.List;
public class UserService {
private userMapper mapper;
private SqlSession sqlSession;
public UserService() throws IOException{
// 1.读取加载mybatis-config.xml
String resource = "mybatis-config.xml";
//解析mybatis-config.xml得到数据库相关的配置信息
InputStream inputStream = Resources.getResourceAsStream(resource);
//创建得到一个sqlSessionFactory
SqlSessionFactory sqlSessionFactory = new SqlSessionFactoryBuilder().build(inputStream);
// 2.获取到sqlSession
sqlSession = sqlSessionFactory.openSession();
// 3.根据 mapper id=getByUsers 执行该sql 语句 通过 sql语句得到我们的对象 orm
mapper = sqlSession.getMapper(userMapper.class);
}
public List&lt;UserEntity&gt; getUserAll(){
return mapper.getByUserAll();
}
public List&lt;UserEntity&gt; getByUserId(Integer id){
return mapper.getByUserId(id);
}
public int insertUser(UserEntity userEntity){ //插入数据
int result = mapper.insertUser(userEntity);
//提交事务
sqlSession.commit();
return result;
}
}
Test01.java
package com.fish9.test;
import com.fish9.entity.UserEntity;
import com.fish9.mapper.userMapper;
import com.fish9.service.UserService;
import org.apache.ibatis.io.Resources;
import org.apache.ibatis.session.SqlSession;
import org.apache.ibatis.session.SqlSessionFactory;
import org.apache.ibatis.session.SqlSessionFactoryBuilder;
import java.io.IOException;
import java.io.InputStream;
import java.util.List;
public class Test01 {
public static void main(String[] args) throws IOException {
//首先新建服务对象,便于后期引入对象
UserService user = new UserService();
//先来查询所有数据
System.out.println(user.getUserAll());
//然后查询id为2的数据
System.out.println(user.getByUserId(2));
//接下来开始实现插入数据
UserEntity userEntity = new UserEntity();
userEntity.setUsername("Xiaoming");
userEntity.setPasssword("123456");
int insertResult = user.insertUser(userEntity);
if(insertResult==1){
System.out.println(&quot;数据插入成功!&quot;);
}
}
}
Mybatis插入数据
Mybatis插入数据在xml文件中用的是<insert>标签。parameterType中的是插入的数据的对象类型,需要类的完整地址。
    <insert id="insertUser" parameterType="com.fish9.entity.UserEntity" >
        INSERT INTO `fish9_login`.`user` ( `username`, `password`) VALUES ( #{username}, #{password});
    </insert>
返回的值是int类型,因此在接口中,设置的返回数据类型也需要是int。
int insertUser(UserEntity userEntity);
在写插入数据的java方法的时候需要写提交事务,数据库才能实现插入操作。注意:在调用该方法的时候传入的参数是一个对象,而非单个基本数据类型!调用的时候需要新建对象然后设置对象的参数,然后再传入,返回的值是执行 成功的sql语句,也就是插入的数据数量。
    public int insertUser(UserEntity userEntity){          //插入数据
        int result = mapper.insertUser(userEntity);
        //提交事务
        sqlSession.commit();
        return result;
    }
Mybatis修改数据
使用的是<update>标签,操作基本和插入数据没什么区别。
xml
    <update id="updateUser" parameterType="com.fish9.entity.UserEntity">
        UPDATE `fish9_login`.`user` SET `username` = #{username}, `password` = #{password} WHERE `id` = #{id};
    </update>
接口
int updateUser(UserEntity userEntity);
service方法集
    public int updateUser(UserEntity userEntity){
        int result = mapper.updateUser(userEntity);
        sqlSession.commit();
        return result;
    }
调用方法
        UserEntity userEntity1 = new UserEntity();
        userEntity1.setId(10);
        userEntity1.setUsername("qaq");
        userEntity1.setPasssword("654321");
        System.out.println(user.updateUser(userEntity1));
Mybatis删除数据
使用的是<delete>标签,操作基本和插入数据没什么区别。
xml
    <delete id="deleteUser" parameterType="int">
        delete from user where id=#{id};
    </delete>
接口
int deleteUser(Integer id);
service方法集
    public int deleteUser(int id){              //删除用户的方法
        int result = mapper.deleteUser(id);
        sqlSession.commit();
        return result;
    }
调用
int deleteResult = user.deleteUser(12);
Mybatis实现多条件查询语句
实现多条件查询语句总共有三种方式。
第一种方式,传递map型。将需要执行的参数以map集合的方式传参过去,然后在写sql语句的时候只需要写对应的key,就可以获取到传过来的value值,实现多条件查询。
下面是示例代码:
xml
    <select id="selectMoreUser" resultType="com.fish9.entity.UserEntity">
        select * from user where username=#{username} and password=#{password};
    </select>
接口
List<UserEntity> selectMoreUser(Map<String,String> map);
service方法集
    public List<UserEntity> selectMoreUser(Map<String,String> map){
        List<UserEntity> result = mapper.selectMoreUser(map);
        return result;
    }
调用
        Map<String,String> map = new HashMap<>();
        map.put("username","qaq");
        map.put("password","654321");
        List<UserEntity> userEntity2 = user.selectMoreUser(map);
        System.out.println(userEntity2);
第二种方法:在接口传参的时候添加@Param("参数名")对传入的数据进行绑定,让底层知道传入的数据哪个对应哪个,"参数名"中的字符串就是写sql语句的时候需要引用的数据变量。
接下来是代码示例:
xml
    <select id="selectMoreUser2" resultType="com.fish9.entity.UserEntity">
        select * from user where username=#{username} and password=#{password};
    </select>
接口
    List<UserEntity> selectMoreUser2(@Param("username") String username,
                                     @Param("password") String password);
service方法集
    public List<UserEntity> selectMoreUser2(String username,String password){
        List<UserEntity> result = mapper.selectMoreUser2(username,password);
        return result;
    }
调用
System.out.println(user.selectMoreUser2("qaq","654321"));
接下来是第三种方法:传递对象查询相关数据。sql语句中获取参数值名称 与对象成员属性名称需要保持一致
下面是实例代码:
xml
    <select id="selectMoreUser3" parameterType="com.fish9.entity.UserEntity" resultType="com.fish9.entity.UserEntity">
        select * from user where username=#{username} and password=#{password};
    </select>
接口
List<UserEntity> selectMoreUser3(UserEntity userEntity);
service方法集
    public List<UserEntity> selectMoreUser3(UserEntity userEntity){
        List<UserEntity> result = mapper.selectMoreUser3(userEntity);
        return result;
    }
调用
        //多条件查询语句3
        UserEntity userSelect3 = new UserEntity();
        userSelect3.setUsername("qaq");
        userSelect3.setPasssword("654321");
        System.out.println(user.selectMoreUser3(userSelect3));
mybatis动态条件查询
动态 SQL 是 MyBatis 的强大特性之一。如果你使用过 JDBC 或其它类似的框架,你应该能理解根据不同条件拼接 SQL 语句有多痛苦,例如拼接时要确保不能忘记添加必要的空格,还要注意去掉列表最后一个列名的逗号。利用动态 SQL,可以彻底摆脱这种痛苦。
使用动态 SQL 并非一件易事,但借助可用于任何 SQL 映射语句中的强大的动态 SQL 语言,MyBatis 显著地提升了这一特性的易用性。
简单来说就是有时候需要多个条件进行对数据进行查询,但是有时候又不需要那么多条件进行查询,类似于数据的筛选条件,有时候会使用这个条件筛选,有时候又不会使用这个条件筛选。这个时候就可以使用mybatis动态条件查询了。使用 标签下增加 标签就会自动检测对应的逻辑操作了。
实例代码:
xml
    <!--动态条件查询-->
    <select id="selectCondition" parameterType="com.fish9.entity.UserEntity" resultType="com.fish9.entity.UserEntity">
        select * from user
                 <where>
                     <if test="username!=null and username!=''">
                         and username=#{usernamne}
                     </if>
                     <if test="password!=null and password!=''">
                         and password=#{password};
                     </if>
                 </where>
    </select>
接口
List<UserEntity> selectCondition(UserEntity userEntity);
service方法集
    public List<UserEntity> selectCondition(UserEntity userEntity){
        List<UserEntity> result = mapper.selectCondition(userEntity);
        return  result;
    }
调用
        //动态条件查询
        UserEntity userCondition = new UserEntity();
        userCondition.setPasssword("654321");
        System.out.println(user.selectCondition(userCondition));
mybatis注解开发
修改MyBatis的核心配置文件,我们使用了注解替代的映射文件,所以我们只需要加载使用了注解的Mapper接口即可。(建议简单的数据操作用注解,复杂的用xml配置)
<mappers>
    <!--扫描使用注解的类-->
    <mapper class="com.itheima.mapper.UserMapper"></mapper>
</mappers>
或者指定扫描包含映射关系的接口所在的包也可以
<mappers>
    <!--扫描使用注解的类所在的包-->
    <package name="com.itheima.mapper"></package>
</mappers>
直接在接口上加上注注解即可,所填写的注解和xml中的文件相同。
public interface UserMapper {
    @Select("select * from user")
    List<User> getUsers();
}
在mybatis-config.xml文件中直接引入mapper类即可
    <mappers>
        <mapper class="com.nav.dao.ClassifyDao"></mapper><!--这里填写的是类(注解开发)-->
        <mapper resource="com/nav/dao/nav.xml"/><!--这里填写的是资源的xml(非注解开发)-->
    </mappers>
总结
以上就是关于Mybatis的学习相关记录,学习了Mybatis后,我认为Mybatis确实是比原生jdbc更加方便,也更加利于大的项目开发,特别是企业级的项目开发的时候,多人协作项目的时候写sql语句的时候会灵活更多,操作起来也更加简便,让代码不会那么冗余。
2023年1月15日
 51工具盒子


