在当今的计算环境中,各种异构计算设备和平台层出不穷,如何保证应用程序能够在不同的平台和设备上顺利运行,已成为亟待解决的问题。
以一款应用程序为例,它可能需要在 ARM、x86 或 s390x 等不同架构的设备上运行。由于这些设备所使用的处理器和操作系统存在差异,因此如何构建一个能够跨平台运行的应用程序已经成为了不可避免的趋势。
写在前面
Support 对于研发来说是不可避免的,最近就碰到这么一件事情,有同事反馈在集群内的 Pod 一直处于 CrashLoopBackOff 状态,我们检查日志后发现以下错误信息:
➜ kubectl logs -f [PODNAME]
exec /bin/sh: exec format error
这个是 Linux 中的一个常见错误,一般来说是因为镜像所运行的架构与宿主机的架构不兼容所导致的,我们集群内 Pod 所在的宿主机是 amd64 的。
通常我们可以执行 docker 命令
➜ docker image inspect [REPOSITORY[:TAG]]
在输出中,我们可以快速找到当前镜像的架构信息,例如:
...
    "Architecture": "arm64",
    "Variant": "v8",
    "Os": "linux",
...
这个问题的根本原因实际上蛮有趣的,是因为那位同事在本地的 M1 芯片(arm64 架构)上构建了镜像,然后将其推送到内部的镜像仓库进行测试的。
实际上这个是大多数人都会犯的错。
那么,我们是否能够实现通过 Single Repository 的方式,为用户提供多个不同架构的镜像服务呢?这样就可以有效地避免再次出现类似的问题了。
答案是肯定的。接下来,我将会和大家一起探讨如何解决这类多架构镜像构建的问题,以及一些实践和方法论。
什么是 Docker Manifest?
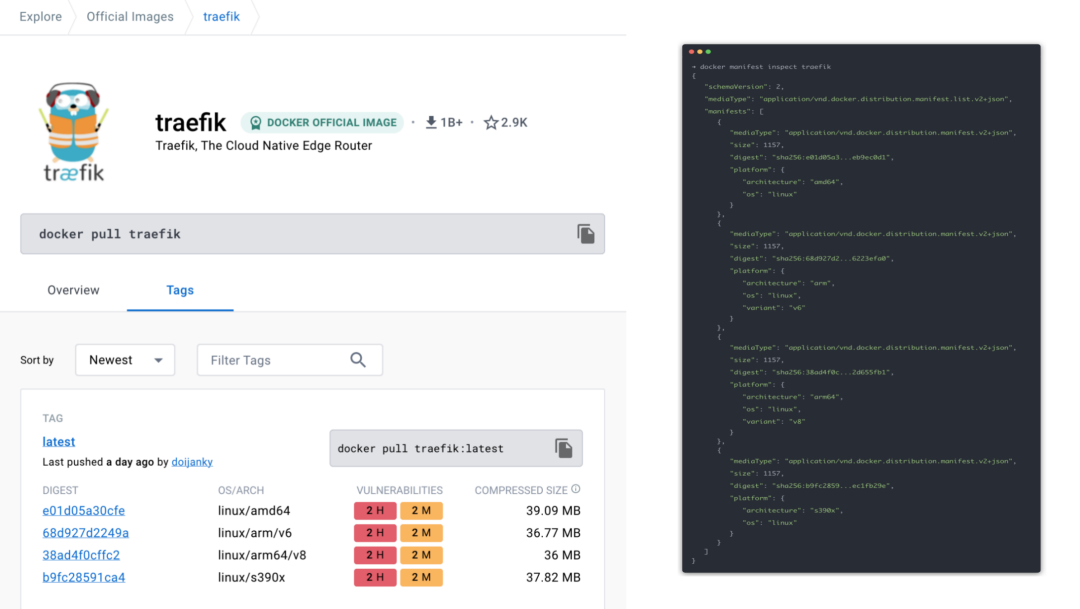
或许有人会好奇,为什么 Docker Hub 上官方提供的镜像能够同时支持不同的处理器架构呢?我们找个镜像来看下,比如 Traefik。
正如大家所看到的,Traefik 的 latest 它默认支持了不同的 OS/ARCH,在右侧清单列表里,每个清单对应到不同的架构,它是怎么做到的?
 Traefik
这是因为 Docker 提供了 Docker Manifest 来解决跨平台镜像构建的问题,它是一种用于描述不同 CPU 架构、操作系统和操作系统版本的多平台 Docker 镜像的格式。
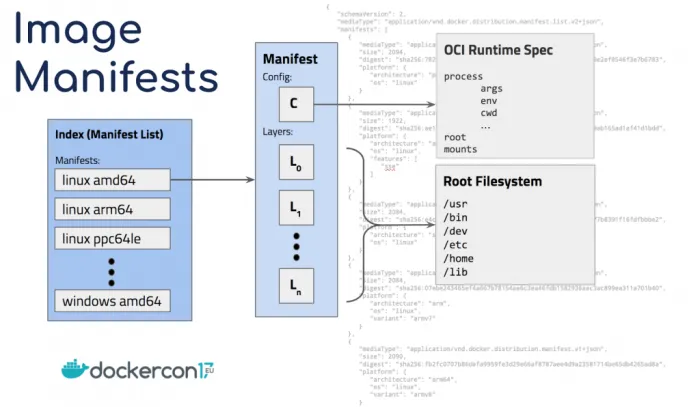
我们可以将不同平台的镜像打包成一个 Image Manifests,并将其上传到 Docker Registry 上。
Manifest list 为不同的架构指向不同的镜像,这样当我们在特定的架构上使用镜像时,Docker 会快速检测与当前平台兼容的镜像版本,并且自动从镜像仓库中下载相应的镜像,我们可以将其想象成拉取请求的路由器。
这种方式使得在不同的架构上运行 Docker 容器时更加的方便和灵活,而且多架构镜像本身也是遵循 Build Once, Deploy Anywhere 的原则。
 Multi-Architecture Manifests
我们可以通过以下命令,先来查看一个仅包含 amd64 架构的 Docker Manifest,如果加入 --verbose flag,可以查看更详细的信息:
➜ docker manifest inspect lqshow/busybox-curl:1.28
{
  "schemaVersion": 2,
  "mediaType": "application/vnd.docker.distribution.manifest.v2+json",
  "config": {
    "mediaType": "application/vnd.docker.container.image.v1+json",
    "size": 2226,
    "digest": "sha256:0e40d664...ca765bb4"
  },
  "layers": [
    {
      "mediaType": "application/vnd.docker.image.rootfs.diff.tar.gzip",
      "size": 723146,
      "digest": "sha256:07a15248...689ee548"
    },
    {
      "mediaType": "application/vnd.docker.image.rootfs.diff.tar.gzip",
      "size": 93,
      "digest": "sha256:3cb3ad14...10f66b8e"
    },
    {
      "mediaType": "application/vnd.docker.image.rootfs.diff.tar.gzip",
      "size": 4437347,
      "digest": "sha256:f7f4b69a...2e1efbf7"
    }
  ]
}
当我尝试使用指定 --platform linux/arm64 运行时,会遇到运行失败的情况,显然是因为当前镜像缺少了 arm64 架构的支持。
➜ docker run -it --rm --platform linux/arm64 lqshow/busybox-curl:1.28 sh
Unable to find image 'lqshow/busybox-curl:1.28' locally
1.28: Pulling from lqshow/busybox-curl
Digest: sha256:55e5f0c01e8e6371889e9c1a2d10996f5b88970d51b169f47457c24be4d8eb54
Status: Image is up to date for lqshow/busybox-curl:1.28
docker: Error response from daemon: image with reference lqshow/busybox-curl:1.28 \
was found but does not match the specified platform: wanted linux/arm64, \
actual: linux/amd64.
我们再来查看一个多架构镜像的 Manifest:
➜ docker manifest inspect ghcr.io/lqshow/multi-arch-build/app-2:v0.0.1
{
   "schemaVersion": 2,
   "mediaType": "application/vnd.oci.image.index.v1+json",
   "manifests": [
      {
         "mediaType": "application/vnd.oci.image.manifest.v1+json",
         "size": 1051,
         "digest": "sha256:6c00b0c2...bb0e4a97",
         "platform": {
            "architecture": "amd64",
            "os": "linux"
         }
      },
      {
         "mediaType": "application/vnd.oci.image.manifest.v1+json",
         "size": 1051,
         "digest": "sha256:fbccb08e...962c9e3e",
         "platform": {
            "architecture": "arm64",
            "os": "linux"
         }
      }
   ]
}
在输出中,可以看到 ghcr.io/lqshow/multi-arch-build/app-2:v0.0.1 的 Manifest 包含了一个 manifest list,正因为如此,当用户在不同平台上拉取该镜像时,Docker 会自动根据当前系统架构和操作系统版本来选择并下载相应的镜像层。
不知道大家有没注意到,两者的 mediaType 是不同的,它们其实是不同的标准和实现:
一个是 Docker Media Type 定义:application/vnd.docker.distribution.manifest.v2+json
另外一个是 OCI Media Type 定义:application/vnd.oci.image.index.v1+json
那么 OCI Media Types 和 Docker Media Types 的区别是什么?以下是 ChatGPT 给出的答案:
OCI Media Types:
它是 Open Container Initiative 的规范,用于定义容器镜像的格式和组成,包括镜像索引、镜像配置和镜像层等。这些媒体类型通常以 "application/vnd.oci.image." 开头,例如
application/vnd.oci.image.manifest.v1+json。Docker Media Types:
它是 Docker 镜像格式的一部分,用于定义 Docker 容器镜像的格式和组成,包括镜像索引、镜像配置和镜像层等。这些媒体类型通常以 "application/vnd.docker." 开头,例如
application/vnd.docker.distribution.manifest.v2+json。两者之间的区别在于 OCI 是一个通用容器规范,可以和其他容器运行时协作使用,而 Docker 是基于 Docker 引擎的容器规范,主要用于 Docker 专用容器运行时的操作。
关于 OCI Media Types 和 Docker Media Types 的更多信息,请参阅以下链接:
- OCI Media Types: https://github.com/opencontainers/image-spec/blob/main/media-types.md^[1]^
- Docker Media Types: https://docs.docker.com/registry/spec/manifest-v2-2/#media-types^[2]^
#1. Building Multi-Arch Images with Docker manifest
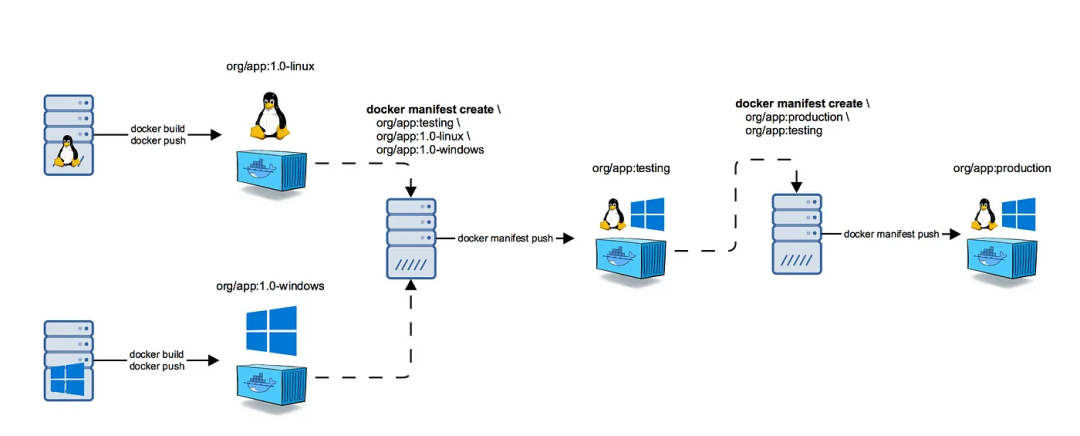
通过初步了解 Docker Manifest 后, 我们尝试直接使用 Docker Manifest 来创建一个支持多架构的镜像,以下是大致的步骤:
 Multi-Architecture Manifests
#Step 1. 编译不同架构的 Docker 镜像
# on an arm machine
➜ docker build -t myapp:latest-arm64 .
on an amd64 machine
➜ docker build -t myapp:latest-amd64 .
#Step 2. 合并不同架构的镜像到一个 manifest 中
# 创建一个支持 x86 和 arm 的 manifest
➜ docker manifest create --amend myapp:latest \
      myapp:latest-amd64 \
      myapp:latest-arm64
Push manifest 到 Docker Registry
➜ docker manifest push myapp:latest
校验合并后的 manifest,确保创建成功
➜ docker manifest inspect myapp:latest
可以查看官方的文档: https://docs.docker.com/engine/reference/commandline/manifest/ ,以深入了解有关自定义 Docker 镜像清单的内容。
在理解了构建多架构镜像的流程后,如果我们需要将一个项目同时支持 amd64 和 arm64 两种架构,可以使用以下的 Makefile:
# Output type of docker buildx build
OUTPUT_TYPE := registry
TARGETARCHS := amd64 arm64
ALL_OS_ARCH := linux-arm64 linux-amd64
GOLANG_VERSION	?= 1.17-buster
.PHONY: docker-build
docker-build: ## Build docker image.
docker buildx build

--output=type=$(OUTPUT_TYPE)

--platform linux/$(TARGETARCH)

--build-arg GOLANG_VERSION=${GOLANG_VERSION}

--build-arg TARGETARCH=$(TARGETARCH)

-t $(IMAGE_TAG)-linux-$(TARGETARCH)

-f Dockerfile .
@$(OK)
.PHONY: publish
publish: ## Push docker image.
docker manifest create --amend $(IMAGE_TAG)

$(foreach osarch, $(ALL_OS_ARCH), $(IMAGE_TAG)-${osarch})
docker manifest push --purge $(IMAGE_TAG)
docker manifest inspect $(IMAGE_TAG)
.PHONY: multi-arch-builder
multi-arch-builder: ## Build multi-arch docker image.
for arch in $(TARGETARCHS); do

TARGETARCH=$${arch} $(MAKE) docker-build;

done
为了方便分别编译不同架构的 Docker 镜像,这里我直接使用 docker buildx 工具进行处理,后续有一个章节会介绍什么是
Docker Buildx。
在上面的 Makefile 中,multi-arch-builder 用来同时构建 x86 和 ARM 架构的 Docker 镜像,publish 创建并发布了一个支持多架构的 Manifest。
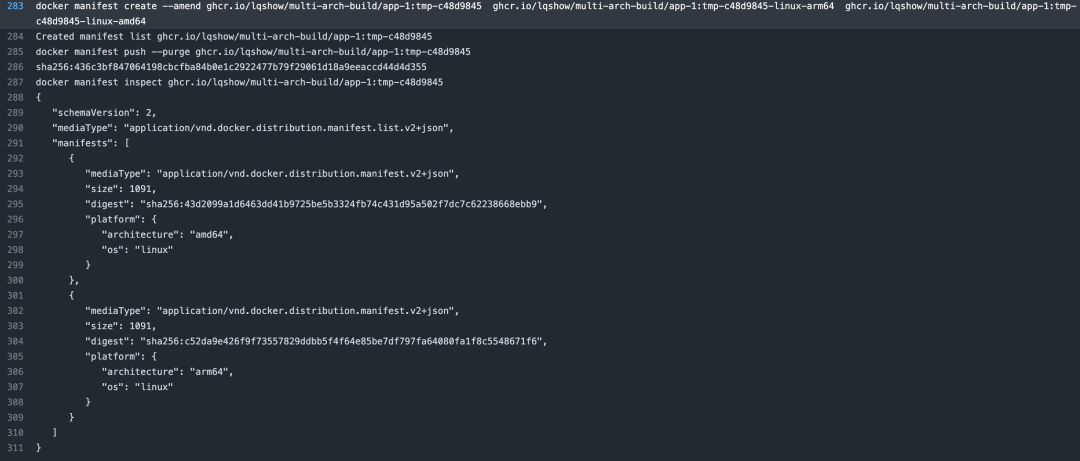
但是,我将脚本放到 Github Action 中运行时,遇到了一个奇怪的问题。在合并 Manifest 时,报了以下错误:提示 ghcr.io/lqshow/multi-arch-build/app-1:tmp-22a53c61-linux-arm64 是一个 manifest list,这完全不是我预期的结果。
docker manifest create --amend \
  ghcr.io/lqshow/multi-arch-build/app-1:tmp-22a53c61 \
  ghcr.io/lqshow/multi-arch-build/app-1:tmp-22a53c61-linux-arm64 \
  ghcr.io/lqshow/multi-arch-build/app-1:tmp-22a53c61-linux-amd64
ghcr.io/lqshow/multi-arch-build/app-1:tmp-22a53c61-linux-arm64 is a manifest list
为什么会这样子?
我们先来确认下它的 Manifest,从输出来看,它确实是一个数组,而且索引 1的 platform 竟然是一个 unknown,什么鬼?
➜ skopeo inspect --raw \
    docker://ghcr.io/lqshow/multi-arch-build/app-1:tmp-22a53c61-linux-arm64
{
  "mediaType": "application/vnd.oci.image.index.v1+json",
  "schemaVersion": 2,
  "manifests": [
    {
      "mediaType": "application/vnd.oci.image.manifest.v1+json",
      "digest": "sha256:e05e9e7e...24529deb",
      "size": 1051,
      "platform": {
        "architecture": "arm64",
        "os": "linux"
      }
    },
    {
      "mediaType": "application/vnd.oci.image.manifest.v1+json",
      "digest": "sha256:87de5d9e...f1d201f3",
      "size": 566,
      "annotations": {
        "vnd.docker.reference.digest": "sha256:e05e9e7e...24529deb",
        "vnd.docker.reference.type": "attestation-manifest"
      },
      "platform": {
        "architecture": "unknown",
        "os": "unknown"
      }
    }
  ]
}
我们再来看它的字段,发现多出了一个 attestation-manifest 相关的 annotations。
搜索后发现,这个字段是在 Buildx version >=0.10 版本中新增的默认支持的功能,可以用来鉴定镜像清单(manifest)的真实性和来源。
Buildkit supports creating and attaching attestations to build artifacts. These attestations can provide valuable information from the build process, including, but not limited to: SBOMs, SLSA Provenance, build logs, etc.
Attestation manifests are attached to the root image index, in the manifests key, after all the original runnable manifests. All properties of standard OCI and Docker manifest descriptors continue to apply.
To prevent container runtimes from accidentally pulling or running the image described in the manifest, the platform property of the attestation manifest will be set to unknown/unknown, as follows:
"platform": {
 "architecture": "unknown",
 "os": "unknown"
}
Ref: Attestation storage^[3]^
我们需要查看 workflow 运行的日志,确认 Docker Buildx 的版本和相关信息。从日志中,我们可以发现当前的 Buildx 版本为 0.10.4+azure-1,并且默认启用了 Attestations 功能。
Buildx version
  /usr/bin/docker buildx version
  github.com/docker/buildx 0.10.4+azure-1 c513d34049e499c53468deac6c4267ee72948f02
为了解决这个问题,我们可以通过设置环境变量 BUILDX_NO_DEFAULT_ATTESTATIONS=1 来禁用默认的 Attestations 功能。具体的操作方式是在运行脚本之前,先设置环境变量:
# https://docs.docker.com/build/building/env-vars/#buildx_no_default_attestations
export BUILDX_NO_DEFAULT_ATTESTATIONS=1
这样,Docker Buildx 就会禁用默认的 Attestations 功能,从而避免在合并镜像清单时出现错误。
让我们来看看这个 jobs 的构成吧,除去前置步骤,就是这么的简单。。。
jobs:
  combine-multi-arch:
    runs-on: ubuntu-latest
    steps:
    - ...
    - name: Build and push docker images
      run: |
        export BUILDX_NO_DEFAULT_ATTESTATIONS=1
        make multi-arch-builder
        make publish
最终,我们得到了正确的结果:
思考
docker manifest create 侧重于创建一个多架构镜像的 manifest 文件,执行流程上过于复杂,看起来也有那么一点笨拙。
下面我会介绍现在更常见的一种操作,通过 Buildx 自动化构建支持多种架构的镜像。
#2. 什么是 Docker Buildx?
Docker Buildx 是 Docker 官方提供的一个工具,它可以帮助用户在一个命令中构建多个架构的镜像。
在使用 Buildx 构建多架构镜像时,需要使用 QEMU^[4]^ 进行处理器架构的转换,QEMU 在其运行的主机处理器上模拟目标 CPU 指令集的所有指令。Docker Buildx 支持使用不同的构建器和平台,并且可以将这些镜像同时推送到多个 Registry 中。
#Step 1. Installing QEMU static binaries
Docker Desktop 默认提供了对 binfmt_misc^[5]^ 多架构支持,这使得在 Docker Desktop 上构建和运行多架构镜像非常的方便。
但是,如果在其他平台上安装,需要手动安装 tonistiigi/binfmt 才能获得类似的多架构支持。
tonistiigi/binfmt 是一个 Docker 镜像,它包含了一些工具和配置文件,用于在 Linux 上配置 binfmt_misc 以支持多种架构的容器镜像。通过运行该容器,我们可以轻松地配置 binfmt_misc 来支持多种架构的容器镜像。
➜ docker run --rm --privileged tonistiigi/binfmt:latest --install all
installing: s390x OK
installing: ppc64le OK
installing: riscv64 OK
installing: mips64 OK
installing: arm OK
installing: mips64le OK
{
  "supported": [
    "linux/amd64",
    "linux/arm64",
    "linux/riscv64",
    "linux/ppc64le",
    "linux/s390x",
    "linux/386",
    "linux/mips64le",
    "linux/mips64",
    "linux/arm/v7",
    "linux/arm/v6"
  ],
  "emulators": [
    "mac-macho-x86_64",
    "mac-universal-arm64",
    "mac-universal-x86_64",
    "qemu-aarch64",
    "qemu-arm",
    "qemu-mips64",
    "qemu-mips64el",
    "qemu-ppc64le",
    "qemu-riscv64",
    "qemu-s390x"
  ]
}
Linux 环境可以通过以下方式验证 binfmt_misc 是否开启:
➜ ls -lh /proc/sys/fs/binfmt_misc
total 0
-rw-r--r-- 1 root root 0 May  1 03:12 qemu-aarch64
-rw-r--r-- 1 root root 0 May  1 03:12 qemu-arm
-rw-r--r-- 1 root root 0 May  1 03:12 qemu-mips64
-rw-r--r-- 1 root root 0 May  1 03:12 qemu-mips64el
-rw-r--r-- 1 root root 0 May  1 03:12 qemu-ppc64le
-rw-r--r-- 1 root root 0 May  1 03:12 qemu-riscv64
-rw-r--r-- 1 root root 0 May  1 03:12 qemu-s390x
--w------- 1 root root 0 Dec 21 07:00 register
-rw-r--r-- 1 root root 0 Dec 21 07:00 status
➜ cat /proc/sys/fs/binfmt_misc/qemu-arm
enabled
interpreter /usr/bin/qemu-arm
flags: POCF
offset 0
magic 7f454c4601010100000000000000000002002800
mask ffffffffffffff00fffffffffffffffffeffffff
#Step 2. Creating a new builder instance
使用
docker-container驱动创建一个新的构建器,并使用单个命令,从默认的构建器切换到当前构建器上
docker buildx create --name multi-arch-builder \
  --driver docker-container \
  --bootstrap --use
我们可以使用 inspect 查看新创建的实例
➜ docker buildx inspect multi-arch-builder
Name:          multi-arch-builder
Driver:        docker-container
Last Activity: 2023-05-01 05:40:09 +0000 UTC
Nodes:
Name:      multi-arch-builder0
Endpoint:  orbstack
Status:    running
Buildkit:  v0.11.5
Platforms: linux/amd64, linux/amd64/v2, linux/amd64/v3, linux/amd64/v4, linux/arm64...
#Step 3. Build a multi-platform image
以上两步其实都是环境 setup 相关的工作,真正构建镜像的命令非常的简单。它的神奇之处在于上面的整个过程可以仅用一条命令来完成:
docker buildx build \
  --platform linux/amd64,linux/arm64 \
  -t <username>/<image>:latest --push .
--platformflag 表示将通知 buildx 构建 amd64 和 arm64 架构的镜像--pushflag 表示构建完成之后,并 push 到镜像仓库当中
#3. Building Multi-Arch Images on GitHub Actions with Buildx
实话实说,我们第一个方案 docker manifest create 虽然用 Makefile 脚本将一系列命令做了封装,但确实过于复杂了。
既然咱们已经用了 Github Actions 走自动化构建流程了,就应该利用它的生态库,进一步的自动化和简化,提高构建流程的效率和可靠性。
 https://github.com/marketplace/actions/build-and-push-docker-images
我们只需要将原来 Makefile 相关的步骤替换成以下 Github Actions 步骤,即可从繁琐的操作中解放出来,是不是非常的简单。
- name: Build and push docker images
  uses: docker/build-push-action@v4
  with:
    # 要构建的上下文路径
    context: .
    # 指定的 Dockerfile
    file: Dockerfile
    # 添加自定义标签
    labels: |-
      org.opencontainers.image.source=https://github.com/${{ github.repository }}
      org.opencontainers.image.revision=${{ github.sha }}
    # 是否推送 Docker 镜像
    push: true
    # 指定需要构建的 multi arch
    platforms: linux/amd64,linux/arm64
    # 传递给 docker build 命令的构建参数
    build-args: |
      GOLANG_VERSION=1.17-buster
    # 推送的标签名称
    tags: |-
      ghcr.io/${{ github.repository }}/app-2:${{ steps.get_version.outputs.VERSION }}
只要查看运行的日志,其实你就会发现,这里构建多架构镜像走的就是上面介绍的 docker buildx build 这个指令。
 Log about Build and push docker images
另外环境配置相关的操作,我们也不需要手动用命令来构建了,全部在各个 step 中自动完成,整个流程非常的优雅。
jobs:
docker-build-push:
runs-on: ubuntu-latest
steps:
- name: Check out code
uses: actions/checkout@master
# 配置 QEMU: https://github.com/marketplace/actions/docker-setup-qemu
- name: Set up QEMU
uses: docker/setup-qemu-action@v2
配置 Buildx: https://github.com/marketplace/actions/docker-setup-buildx
- name: Set up Docker buildx
uses: docker/setup-buildx-action@v2
配置 ghcr 登陆信息,Secret 在 Settings/Secrets and variables/Actions 中设置
- name: Login ghcr.io
uses: docker/login-action@v2
with:
registry: ghcr.io
username: ${{ github.actor }}
password: ${{ secrets.PASSWORD }}
至于每个 step 的操作详情,我们可以通过 action 的日志来查看,每一步大家都非常的熟悉,不存在任何的黑科技。
https://github.com/lqshow/multi-arch-build/actions/runs/4607469200/jobs/8142029673
下面是 GitHub 上这个 package 的 OS/Arch 详细信息:
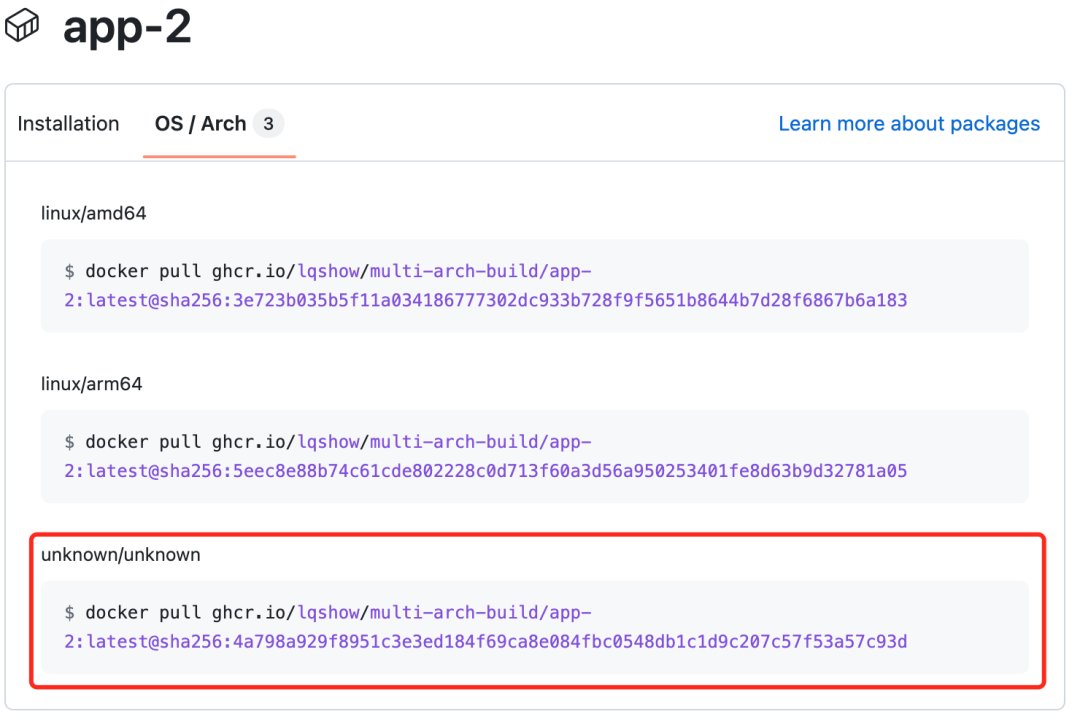
正如大家看到的,这里也会有一个 unknown/unknown,这个就是上面提到的 Build attestations^[6]^,其实完全不影响使用,不过如果觉得碍眼,可以在 with 里显示禁用 provenance 和 sbom 即可:
 - name: Build and push docker images
   uses: docker/build-push-action@v4
   with:
     provenance: false
     sbom: false
每个 step 的作用 GitHub Action to build and push Docker images with Buildx^[7]^ 已经写的非常清晰了,我这里就不再多做赘述了。
Github Actions 可参考项目:https://github.com/lqshow/multi-arch-build
#4. Building Multi-Arch Images on GitLab CI/CD with Buildx
除了 GitHub Action 外,相信大家还用过不少其他的 CI 系统,下面我以 GitLab CI/CD 为例,分享下我在使用 CI 流程构建镜像时碰到的一些问题。
#1. DockerHub rate limitations
自从 Dockerhub 对于免费和匿名用户实施了请求限制后,相信大家对 You have reached your pull rate limit 这个错误提示都比较熟悉吧?
failed to copy: httpReadSeeker: failed open: unexpected status code \
https://registry-1.docker.io/v2/library/golang/manifests/sha256:d464d...5ea3428: 429 \
Too Many Requests - Server message: ... You have reached your pull rate limit. \
You may increase the limit by authenticating and upgrading: \
https://www.docker.com/increase-rate-limit
如果我们不想因为这个原因中断 CI 流程,我们通常需要将公网镜像推送到内网私有镜像仓库中。
以迁移 GitHub 上的 Action 流程到 Gitlab CI 为例,其中的 Dockerfile 使用的基础镜像是 golang:1.17-buster。
按照以往的经验,通常我会使用以下步骤将镜像推送到私有镜像仓库:
# 1. 拉取官方 Golang 1.17-buster 镜像
➜ docker pull golang:1.17-buster
2. 为 Golang 1.17-buster 镜像打标签,准备上传到私有镜像仓库
➜ docker tag golang:1.17-buster my-registry.example.com/golang:1.17-buster
3. 将 Golang 1.17-buster 镜像推送到私有镜像仓库
➜ docker push my-registry.example.com/golang:1.17-buster
但是事实证明现实总是让人意外,当我使用 Docker Buildx 构建多架构镜像时,会遇到如下错误:
....
0.335 .buildkit_qemu_emulator: /bin/sh: Invalid ELF image for this architecture
....
--------------------
error: failed to solve: process "/dev/.buildkit_qemu_emulator .....
这通常是因为 Buildx 工具在创建临时 QEMU 仿真器时选择了错误的架构,导致创建的仿真器无法运行。事实上刚刚的操作,我们的 Base image 实际仅包含了 amd64 的架构:
➜ docker manifest inspect --verbose \
    my-registry.example.com/golang:1.17-buster|jq '.Descriptor.platform'
{
  "architecture": "amd64",
  "os": "linux"
}
要创建多架构镜像,我们必须确保所使用的基础镜像适用于我们的目标架构 ,为了解决这个问题,我们需要采取以下步骤:
# 步骤 一:
# 拉取 Golang 1.17-buster 镜像的 amd64 平台版本
➜ docker pull golang:1.17-buster --platform amd64
# 标记 amd64 平台版本的镜像,并推送到 my-registry.example.com
➜ docker tag golang:1.17-buster my-registry.example.com/golang:1.17-buster-amd64
➜ docker push my-registry.example.com/golang:1.17-buster-amd64
步骤 二:
拉取 Golang 1.17-buster 镜像的 arm64 平台版本
➜ docker pull golang:1.17-buster --platform arm64
标记 arm64 平台版本的镜像,并推送到 my-registry.example.com
➜ docker tag golang:1.17-buster my-registry.example.com/golang:1.17-buster-arm64
➜ docker push my-registry.example.com/golang:1.17-buster-arm64
步骤 三:
创建支持多平台的 manifest,并推送到 my-registry.example.com
➜ docker manifest create my-registry.example.com/golang:1.17-buster

my-registry.example.com/golang:1.17-buster-amd64

my-registry.example.com/golang:1.17-buster-arm64
来,让我们最后验证一下吧:
➜ docker manifest inspect \
    my-registry.example.com/golang:1.17-buster|jq '.manifests[].platform'
{
  "architecture": "amd64",
  "os": "linux"
}
{
  "architecture": "arm64",
  "os": "linux",
  "variant": "v8"
}
思考
此时有同学可能会这样问:当前只需要构建 amd64 和 arm64 两个 arch,假如还需要支持 ppc64le、s390x 又或者是更多的 arch,我们怎么办?
非常好的一个问题。
按照惯性思维,你是不是准备要再加几条命令,反正很简单嘛,复制粘贴改一下就行,又不是不能用?大不了写成脚本适配一下嘛。
我觉得你说的很有道理。。。
Amazon 上有篇文章就是这样的思路:Introducing multi-architecture container images for Amazon ECR^[8]^
其实我们还有更简单的办法,一条命令搞定。
➜ skopeo copy --multi-arch=all \
    docker://docker.io/golang:1.17-buster \
    docker://my-registry.example.com/golang:1.17-buster
#2. Multi-stage builds^[9]^
多阶段构建对于优化 Dockerfile 有极大的好处,但是在构建多架构镜像时往往会存在一些陷阱,因为你依赖的镜像可能对 multi-arch 并未做支持。
此时,我们应该对依赖的 base image 优先做多架构镜像的处理。
#3. Sidecar container
事实上这点已经和构建镜像无关了,但这往往也是大家比较容易忽略的一点。
当我们部署一个复杂应用时,Pod 内会依赖一些三方提供的 sidecar container,如果需要对这些 sidecar image 做搬运的话,建议优先使用 skopeo^[10]^。
Example
接下来我们看个样例,使用 Gitlab CI pipeline 构建一个同时包含 amd64 和 arm64 的镜像,.gitlab-ci.yml 相关代码如下:
stages:
  - build
.setup_docker_buildx:
before_script:
- apk add curl make bash git
- |
echo "Setup QEMU..."
docker run --privileged --rm tonistiigi/binfmt:latest --install all
- |
echo "Install buildx..."
mkdir -vp ~/.docker/cli-plugins/ ~/dockercache
curl --silent -L "https://github.com/docker/buildx/releases/download/${BUILDX_VER}/buildx-${BUILDX_VER}.linux-amd64" > ~/.docker/cli-plugins/docker-buildx
chmod a+x ~/.docker/cli-plugins/docker-buildx
- |
echo "Creating a new builder instance..."
docker buildx create --name multi-arch-builder-$CI_JOB_ID --driver docker-container --bootstrap --use
- |
echo "Inspect builder instance..."
docker buildx inspect multi-arch-builder-$CI_JOB_ID
- |
echo "Login to Docker Hub..."
echo $DOCKER_PASSWORD | docker login --username $DOCKER_USERNAME --password-stdin
build-push-docker-hub-with-buildx:
stage: build
image: docker:stable
when: manual
extends: .setup_docker_buildx
services:
- docker:dind
variables:
GOLANG_VERSION: 1.17-buster
CI_REGISTRY: https://index.docker.io/v1/
CI_REGISTRY_IMAGE: lqshow/gitlab-ci-using-buildx
BUILDX_VER: v0.10.4
script:
- export BUILDX_NO_DEFAULT_ATTESTATIONS=1
- export DOCKER_CLI_EXPERIMENTAL=enabled
- make docker-build
以上自定义了一个相对简单的 Job,为了方便演示,环境配置相关的我没有做封装,当前只是一个 Demo 项目,整个构建 pipeline 只需 3 分钟,对于复杂的项目,这里还是有很大的优化空间的。
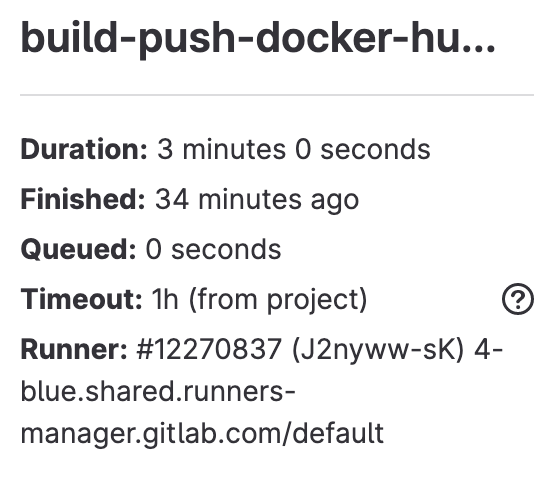 Job
Job
登陆到 Docker Hub ,可以查看当前构建镜像的详情
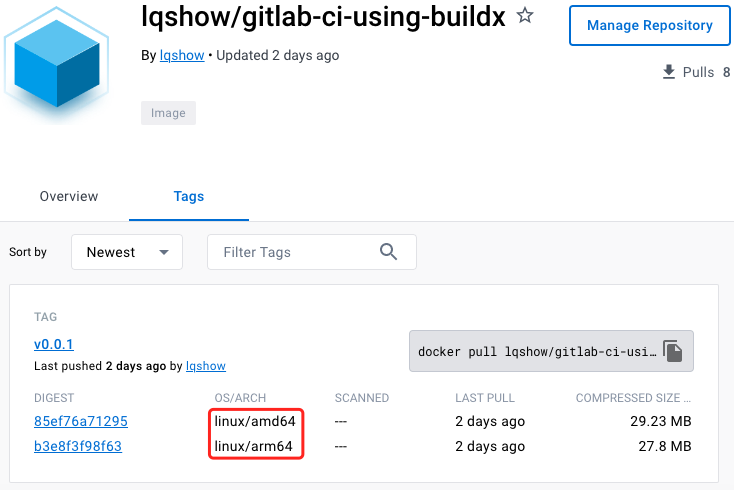
Gitlab CI 流程可参考项目:https://gitlab.com/lqshow/build-multi-arch-with-buildx
思考
虽然使用 Buildx 只需一条命令就可以完成构建多种架构的镜像,但不可否认的是,它的构建速度缓慢确实也是一个事实,特别是对于一些复杂应用,它通常比本地构建慢上很多。
那么,有没一些优化方案呢?这里就不得不提一下 kaniko^[11]^ 了。
#5. Building Multi-Arch Images on GitLab CI/CD with Kaniko
Kaniko 是 Google 推出的开源工具,它可以在容器或 Kubernetes 集群中使用 Dockerfile 构建镜像。kaniko 不依赖于 Docker 守护进程,而是完全在用户空间中执行 Dockerfile 中的每个命令。这使得能够在无法轻松或安全地运行 Docker 守护程序的环境中构建容器映像,比如 Kubernetes 集群。
与 Docker Build 相比较而言,Kaniko 具有更高的安全性和弹性,它解决了使用 Docker-in-Docker 构建镜像遇到的两个问题:
- Docker-in-Docker 需要特权模式才能正常运行,这带来了很大的安全隐患;
- 使用 Docker 构建镜像通常会影响性能,速度较慢。
Example
下面是一个构建 arm64 架构镜像并推送到 Docker Hub 的一个例子。
大家可以看下 Job 中的 script 部分,它主要接受三个参数:构建上下文(context)、指定 Dockerfile 文件(dockerfile) 以及镜像的目标地址(destination),不论使用哪种方式来运行 kaniko,以上三个参数是主要需要关注的。
customPlatform 这个参数,它好比 docker build 中的 --platform 参数,不同点在于它只能支持一种 platform,所以构建不同的架构需要我们自己额外做下处理。
另外值得一提的是 Kaniko 解决了层缓存的问题,样例中增加了 --cache-repo 参数,我特意使用了一个不同的远程 repo 来说明其能力。在构建过程中,Kaniko 会检查指定的 repo 中是否存在缓存层,若不存在,会将缓存层推送到该远程仓库上,待 Job 再次被执行的时候,会使用缓存层,能节省非常多的构建时间。
kaniko-build-push-docker-hub:
  stage: build
  when: manual
  variables:
    GOLANG_VERSION: 1.17-buster
    CI_REGISTRY: https://index.docker.io/v1/
    CI_REGISTRY_USER: $DOCKER_USERNAME
    CI_REGISTRY_PASSWORD: $DOCKER_PASSWORD
    CI_REGISTRY_IMAGE: lqshow/gitlab-ci-using-kaniko
    CI_CACHE_REPO: lqshow/kaniko_caches
    TARGETARCH: arm64
  image:
    name: gcr.io/kaniko-project/executor:v1.9.0-debug
    entrypoint: [""]
  script:
    - /kaniko/executor
      --context "${CI_PROJECT_DIR}"
      --customPlatform linux/$TARGETARCH
      --build-arg GOLANG_VERSION=$GOLANG_VERSION
      --build-arg TARGETARCH=$TARGETARCH
      --dockerfile "${CI_PROJECT_DIR}/Dockerfile"
      --destination "${CI_REGISTRY_IMAGE}:${CI_COMMIT_SHORT_SHA}"
      --cache=true --cache-ttl=24h --cache-repo=${CI_CACHE_REPO}
  before_script:
    - mkdir -p /kaniko/.docker
    - |
      cat <<JSON > /kaniko/.docker/config.json
          {
            "auths": {
              "${CI_REGISTRY}": {
                "username": "${CI_REGISTRY_USER}",
                "password": "${CI_REGISTRY_PASSWORD}"
              }
            }
          }
      JSON
至于 Kaniko 是如何工作的,它的工作原理是什么,大家可以查看官网或者直接使用 ChatGPT 来获得知识点。
Build a multi-arch image
Kaniko 本身是无法创建多架构镜像的,第一个方案我们采用的是 docker manifest create 来合并一个多架构镜像。这里介绍一种新的方式,通过 manifest-tool^[12]^ 来构建多架构镜像。
下面我给出了一个示例,参考了 Building a multi-arch container image in unprivileged containers^[13]^ ,我在整合 Gitlab CI 时稍微做了调整。
manifest-tool 它提供了两种 push manifest 的方式,样例中使用的是 from-spec,需要事先生成一个注册表清单的 YAML 文件,另外还有一种 from-args 相对简单些,大家可以自己试一试 。
deploy-multi-arch:
  image:
    name: curlimages/curl:latest
    entrypoint: [""]
  stage: deploy
  when: manual
  before_script:
    - GHPRJ="https://github.com/estesp/manifest-tool"
    - VERSION="v1.0.3"
    - ARTIFACT="manifest-tool-linux-amd64"
    - URL="$GHPRJ/releases/download/$VERSION/$ARTIFACT"
    - curl -L -o manifest-tool $URL
    - chmod +x manifest-tool
script:
- |
cat <<EOF > manifest.yml
image: ${CI_REGISTRY_IMAGE}:${CI_COMMIT_SHORT_SHA}
manifests:
- image: ${CI_REGISTRY_IMAGE}:${CI_COMMIT_SHORT_SHA}-arm64
platform:
architecture: arm64
os: linux
- image: ${CI_REGISTRY_IMAGE}:${CI_COMMIT_SHORT_SHA}-amd64
platform:
architecture: amd64
os: linux
EOF
- |
./manifest-tool

--username "${CI_REGISTRY_USER}"

--password "${CI_REGISTRY_PASSWORD}"

push from-spec manifest.yml
登陆到 Docker Hub ,可以查看当前构建镜像的详情
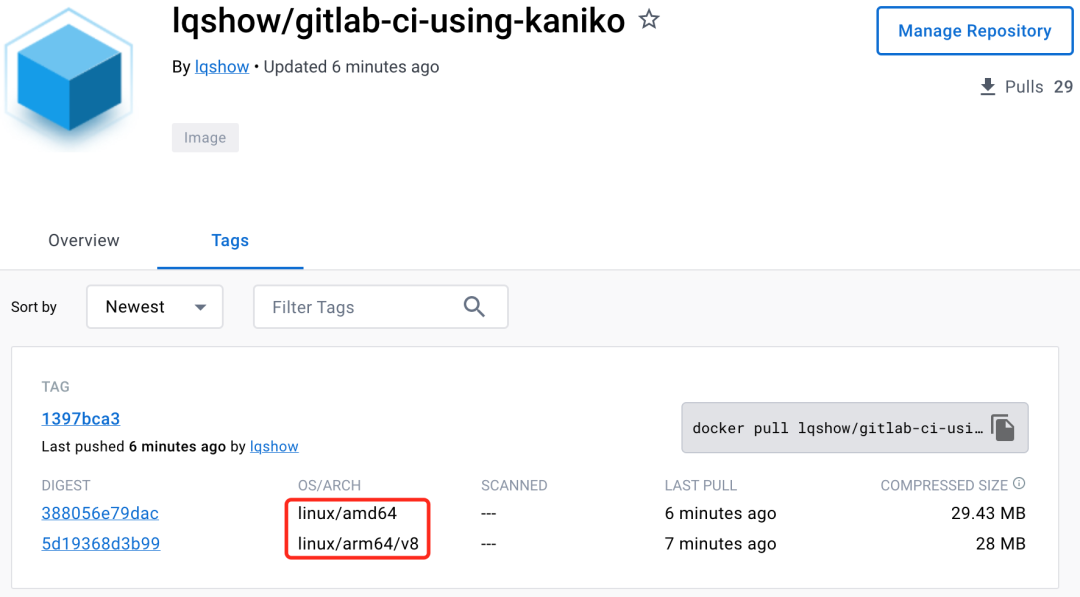
Gitlab CI 流程可参考项目:https://gitlab.com/lqshow/build-multi-arch-with-kaniko
写在最后
本文介绍了多架构镜像在异构计算环境中的重要性和常见问题,并探讨了一些常用的构建方法。
对于正在寻求解决方案的开发者和 DevOps 团队而言,本文提供了有价值的信息和建议,帮助您更好地应对异构计算挑战。
总之,希望本文能够为您提供有益的帮助,让您在异构计算环境中更加游刃有余。
参考资料
[1]
https://github.com/opencontainers/image-spec/blob/main/media-types.md: https://github.com/opencontainers/image-spec/blob/main/media-types.md [2]
https://docs.docker.com/registry/spec/manifest-v2-2/#media-types: https://docs.docker.com/registry/spec/manifest-v2-2/#media-types [3]
Attestation storage: https://docs.docker.com/build/attestations/attestation-storage/#attestation-manifest-descriptor [4]
QEMU: https://zh.wikipedia.org/wiki/QEMU [5]
binfmt_misc: https://zh.wikipedia.org/wiki/Binfmt_misc [6]
Build attestations: https://docs.docker.com/build/attestations/ [7]
GitHub Action to build and push Docker images with Buildx: https://github.com/docker/build-push-action [8]
Introducing multi-architecture container images for Amazon ECR: https://aws.amazon.com/blogs/containers/introducing-multi-architecture-container-images-for-amazon-ecr/ [9]
Multi-stage builds: https://docs.docker.com/build/building/multi-stage/ [10]
skopeo: https://github.com/containers/skopeo [11]
kaniko: https://github.com/GoogleContainerTools/kaniko [12]
manifest-tool: https://github.com/estesp/manifest-tool [13]
Building a multi-arch container image in unprivileged containers: https://blog.siemens.com/2022/07/building-a-multi-arch-container-image-in-unprivileged-containers/ [14]
Multi-platform images: https://docs.docker.com/build/building/multi-platform/
END
 51工具盒子

