应 Zero 童靴需求,杜老师更新一篇通过 Gitea 部署 Hexo 的教程,可以实现通过 git 命令自动部署 Hexo 博客,并支持 VS Code 或者网页编辑器等形式更新站点内容。其部署思路同样适用于 Hugo 等静态博客框架。
写在前面 {#写在前面}
近年来静态博客框架占比越来越高了,其一大特性是可以托管到 Vercel 这类的免费平台上,进一步减少了博主运营成本。
但随着免费的资源越发紧俏,加上越来越严峻的网络限制,很多小伙伴开始将站点,迁移至境内平台上。
奈何境内的免费资源非常少,很多功能需要自行购买主机搭建,无疑增加了我们的使用成本以及学习成本。
本篇教程主要说明如何通过 Gitea 实现类似 GitHub Actions 那种自动部署功能,实现在主机上博客的更新和部署。
准备工作 {#准备工作}
-
需要在服务器上安装 Gitea,可以参考《使用 Docker 部署 Gitea 新一代的代码托管平台》一文部署;
-
需要在服务器上安装 Act Runner,可以参考《使用 Docker 部署 Gitea Actions 的 Runner》一文部署;
-
需要在服务器上安装 Hexo,可以参考《运行在云主机的 Hexo》一文部署;
-
需要在服务器上安装 Web 引擎,可选项非常多,杜老师使用 OpenResty,这里不多说部署方式了。
部署过程 {#部署过程}
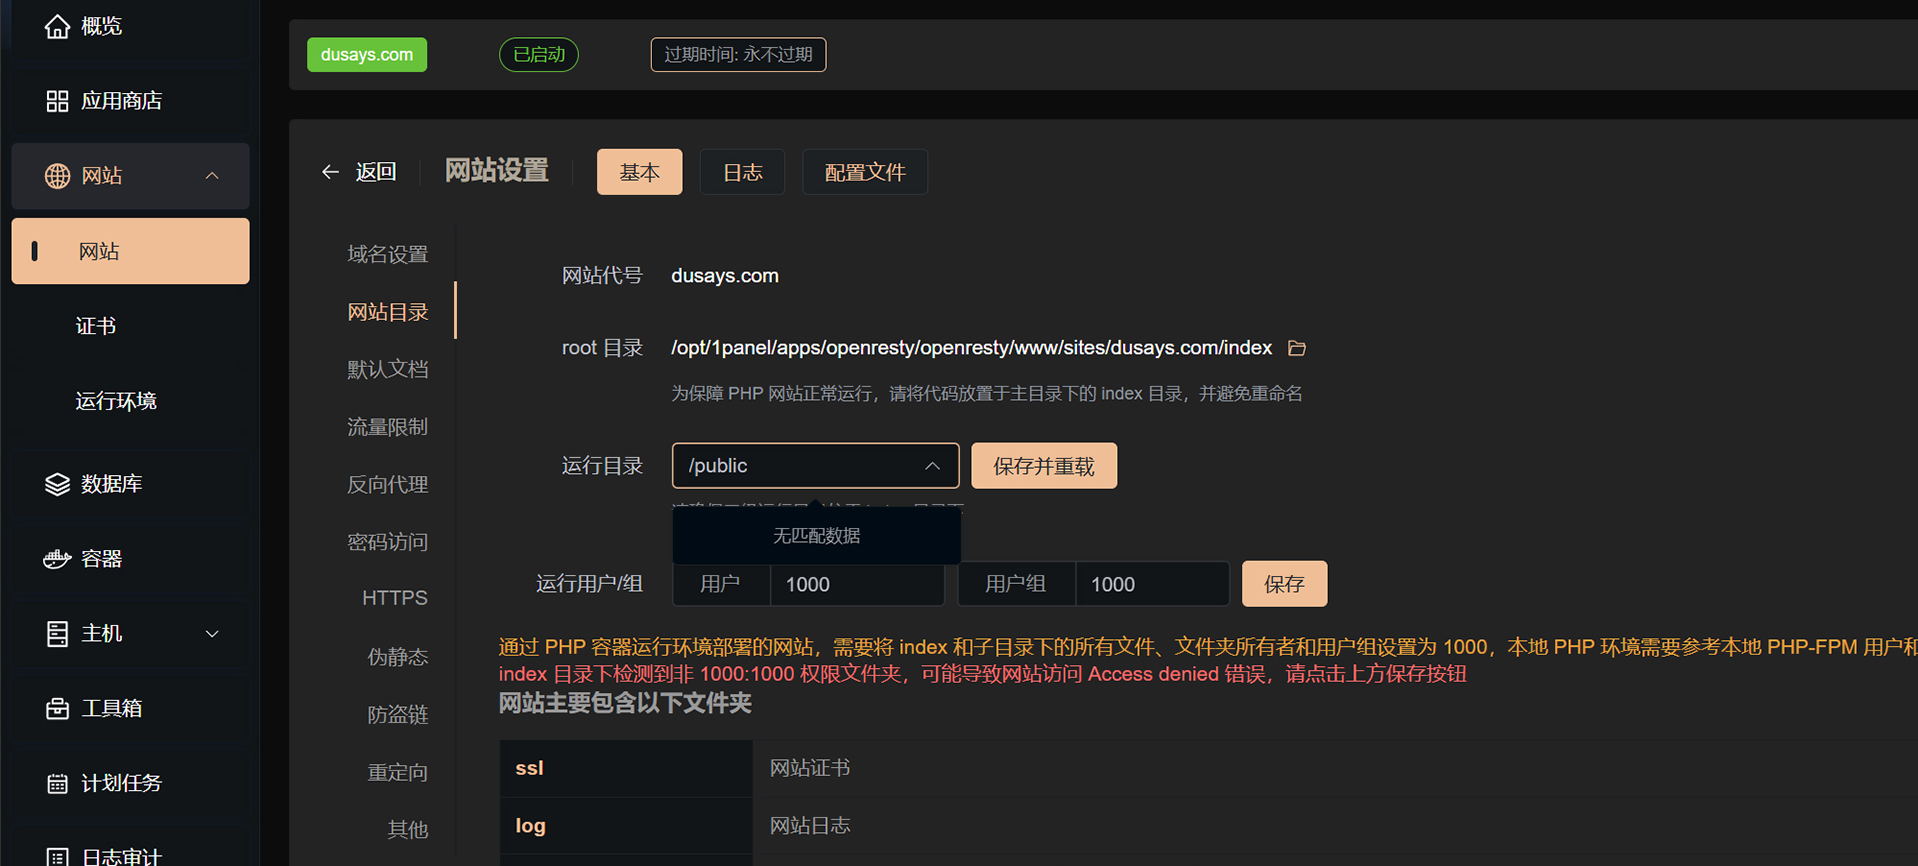
- 新建站点目录。这里以 1Panel 面板为例,添加一个域名为
dusays.com站点:

- 使用终端程序登录该服务器,并切换到站点目录,以刚刚的域名为例,命令如下:
|-----------|-----------------------------------------------------------------------------|
| 1 | cd /opt/1panel/apps/openresty/openresty/www/sites/dusays.com/index/ |
- 删除站点目录下的所有文件,并通过 Hexo 创建站点数据,命令如下:
|-------------|----------------------------|
| 1 2 | rm -rf * hexo init |
- 创建 Act Runner 部署文件
.gitea/workflows/deploy.yml,添加以下内容:
|------------------------------|------------------------------------------------------------------------------------------------------------------------------------------------------------------------------------------------------------------------------------------------------------------------------------------------------------------------------------------------------------------|
| 1 2 3 4 5 6 7 8 9 10 | name: Gitea Actions Demo run-name: ${{ gitea.actor }} is testing out Gitea Actions ? on: [push] jobs: Explore-Gitea-Actions: runs-on: self-hosted steps: - run: cd /opt/1panel/apps/openresty/openresty/www/sites/dusays.com/index/ && git pull origin main - run: cd /opt/1panel/apps/openresty/openresty/www/sites/dusays.com/index/ && hexo generate |
- 配置
git上传的用户名和邮箱:
|-------------|---------------------------------------------------------------------------------------------------------|
| 1 2 | git config --global user.name "TeacherDu" git config --global user.email "teacherdu@dusays.com" |
- 生成 SSH 密钥并添加公钥到 Gitea,执行下面命令,然后一直回车,会生成
id_rsa和id_rsa.pub。复制id_rsa.pub文件的内容并登录 Gitea,进入个人设置,添加到 SSH 公钥:
|-------------|-------------------------------------------------|
| 1 2 | ssh-keygen -t rsa cat ~/.ssh/id_rsa.pub |
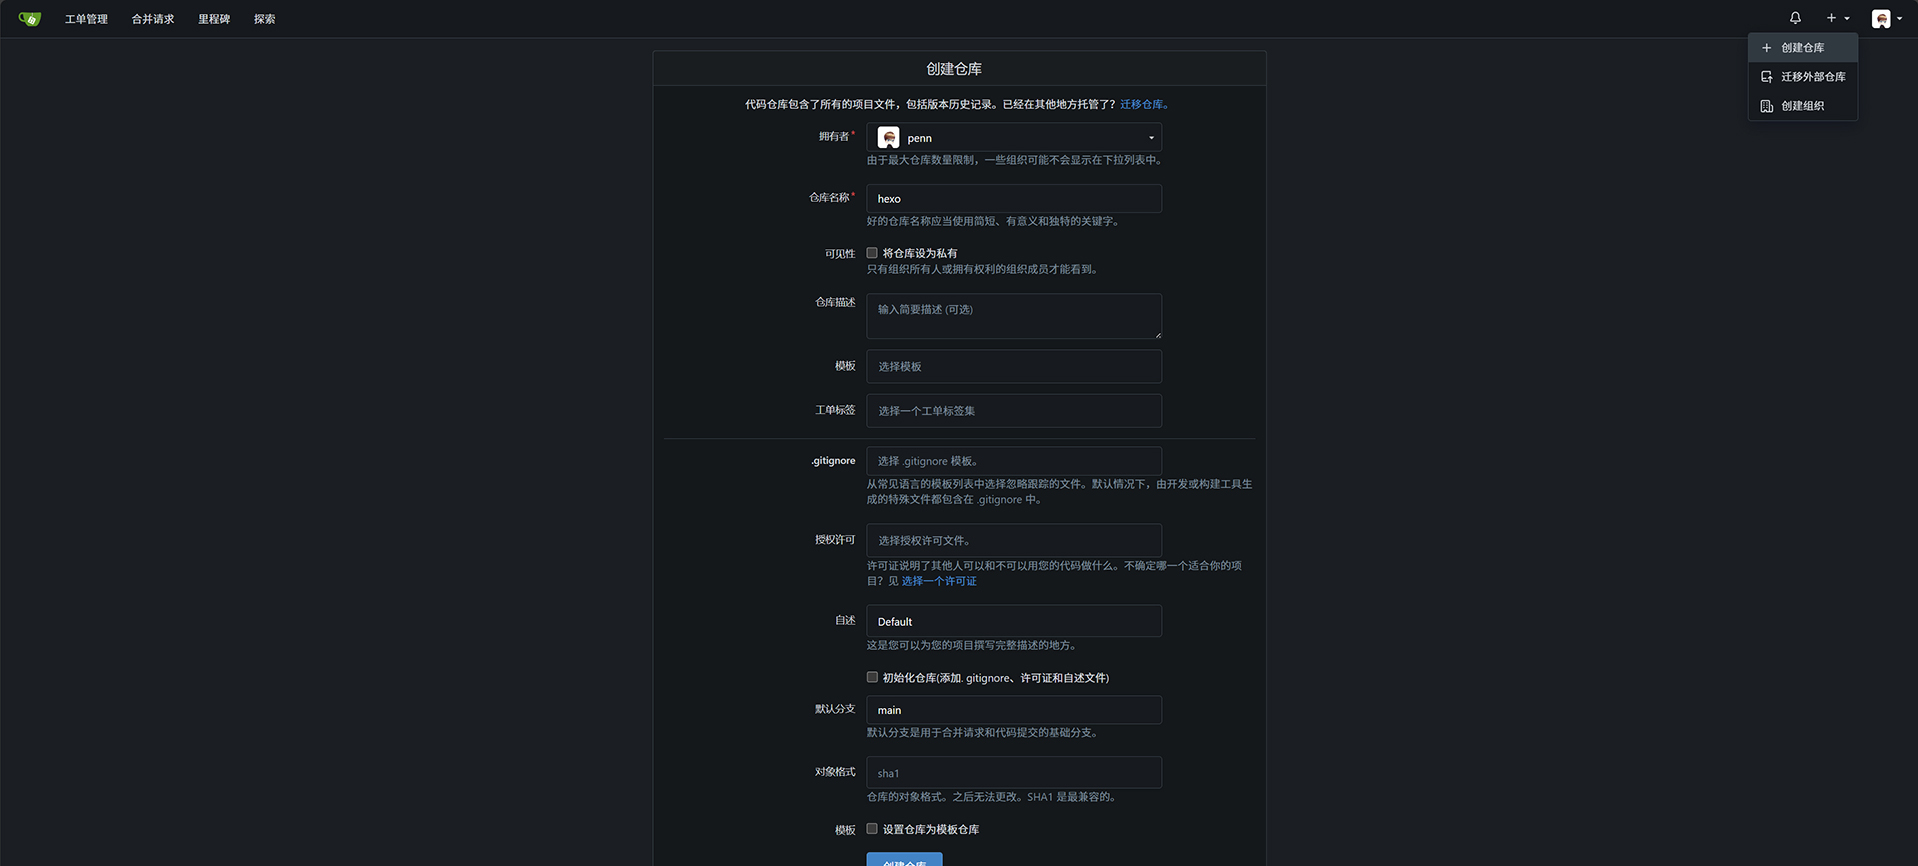
- 在 Gitea 上创建一个新仓库:
- 新建
.gitignore文件避免同步易变动文件,添加以下内容:
|-------------------------|--------------------------------------------------------------------------------------------|
| 1 2 3 4 5 6 7 8 | .DS_Store Thumbs.db db.json *.log node_modules/ public/ .deploy*/ _multiconfig.yml |
- 提交并推送到远程仓库:
|---------------------|-------------------------------------------------------------------------------------------------------------------------------------------------------------------|
| 1 2 3 4 5 6 | git init git checkout -b main git add . git commit -m "first commit" git remote add origin https://gitea.dusays.com/penn/hexo.git git push -u origin main |
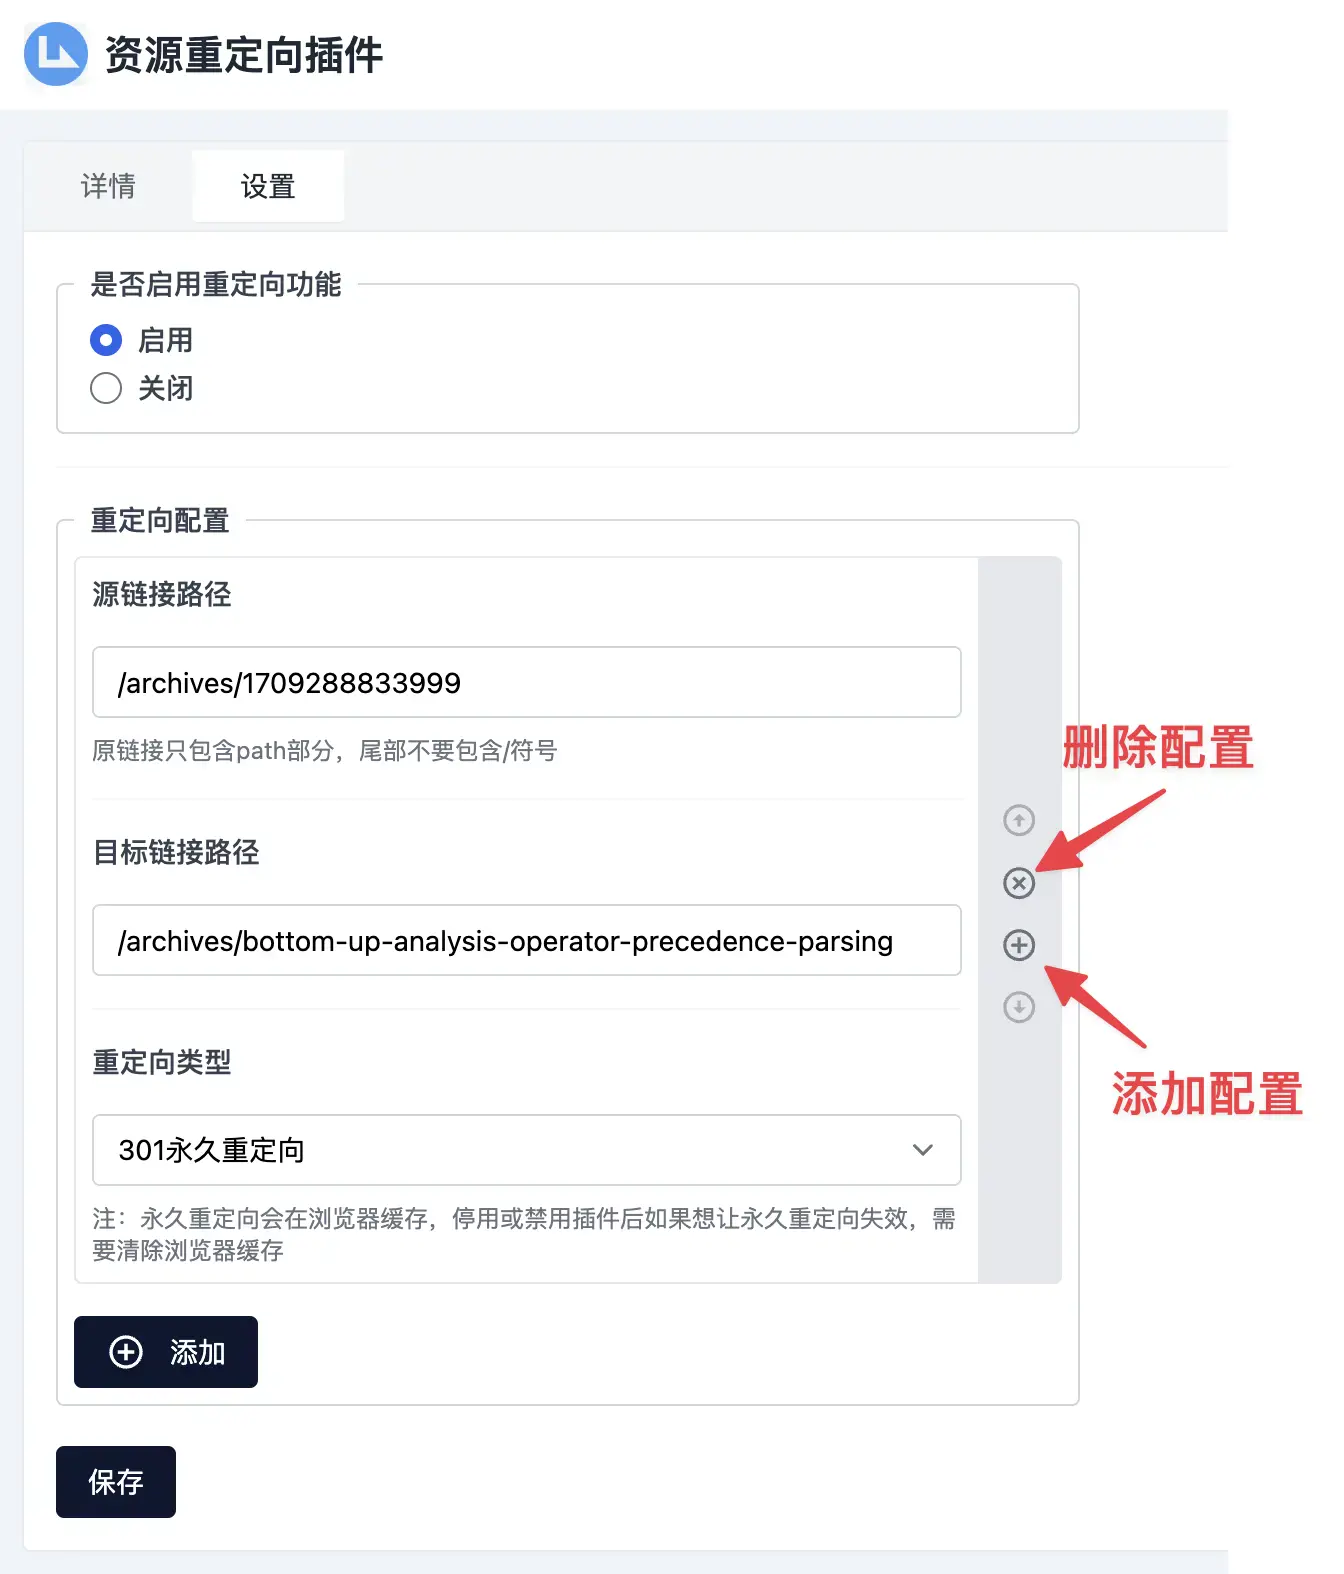
- 将站点的运行目录设置为
public:
注意事项 {#注意事项}
可以直接在 Gitea 修改站点内容,或者通过 VS Code 等工具接入进行编辑。
不要直接修改服务器中站点文件,如果出现内容冲突导致无法自动部署,可以从 Gitea 中重新拉取数据解决该问题。