# 前言 {#前言}
我平常是一个比较容易纠结的人,每次遇到那种比较难取的方法名或类名的时候就会很纠结,于是一个IDEA插件的思路就出来了。做一个取名神器的插件,能很完美解决我现在遇到的问题。
项目的git地址如下:https://github.com/OliverLiy/NameGenius (opens new window)
# 效果演示 {#效果演示}
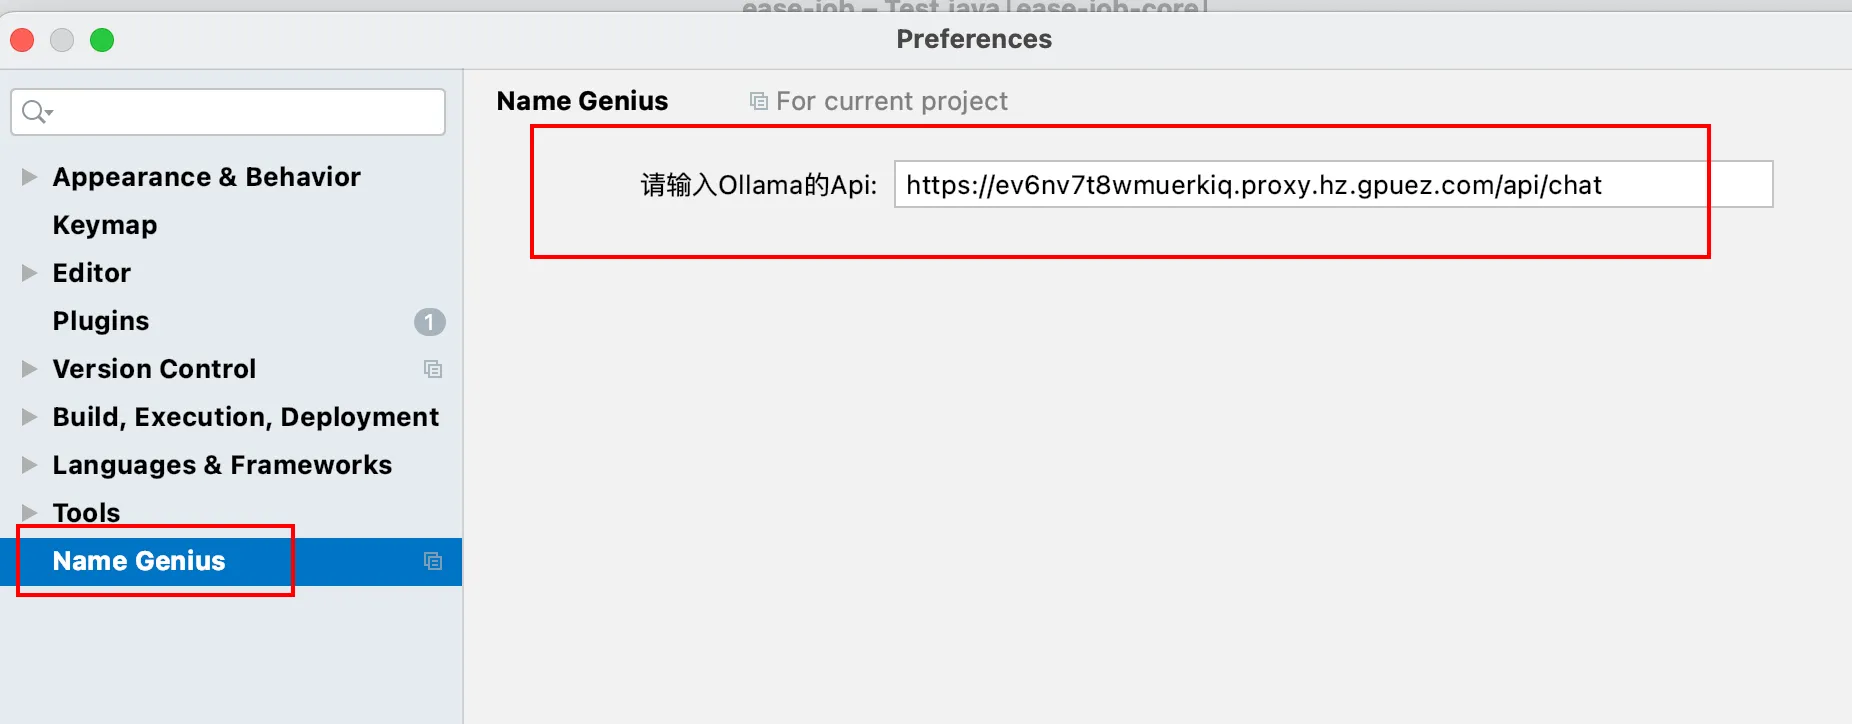
本插件基于开源大模型+Ollama部署框架实现,因此首先需要在设置中配置对应的API地址
插件的效果是这样的,你只需要在不知道如何取的方法名和属性名上写上中文,然后直接右键选择Name Genius
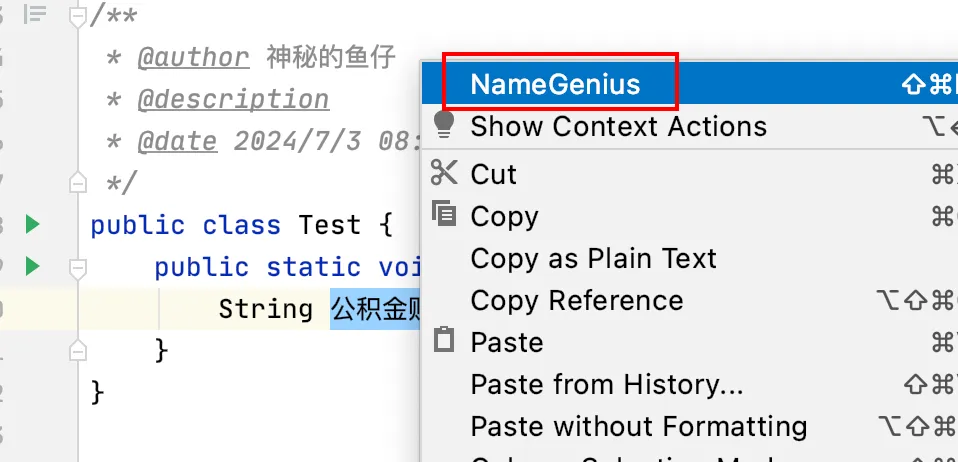
接着选择要转换的类名是方法名和类名
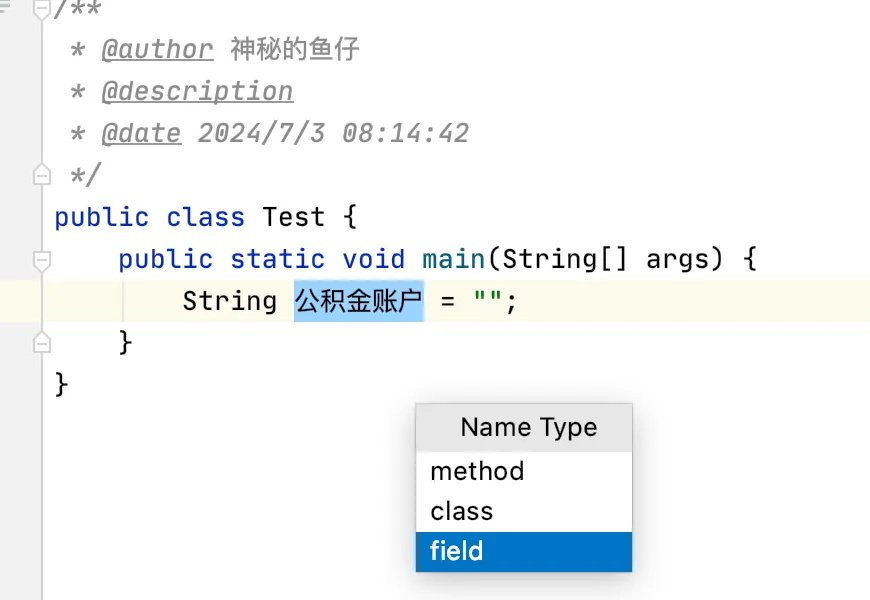
点击之后就会变成对应的英文名称了。
# 大模型部署教程 {#大模型部署教程}
因为基于开源的大模型实现了翻译的功能,因此首先演示如何在本地部署一个大模型。我因为本地就一台mac笔记本,大模型我都是租云算力的:https://gpuez.com/ (opens new window),有多种服务器资源可供选择,另外近期也有活动:8.1-10.31日,平台所有用户消费打八折,有需要的可以看看。
使用ollama这个开源框架实现大模型的快速部署,这是ollama的地址:https://github.com/ollama/ollama (opens new window)
首先执行第一行命令安装ollama
curl -fsSL https://ollama.com/install.sh | sh
接着设置一下环境变量使得所有ip都可以访问
export OLLAMA_HOST=0.0.0.0
然后开启ollama的服务
nohup ollama serve &
接着启动一个大模型,我这里就用llama3来完成这个插件
ollama run llama3
然后就可以通过ollama的11434端口进行api的调用了。
我用的是云算力,通过代理映射的方式将11434端口映射到了这个域名上,现在就可以在任何地方AI的接口了。
# 如何调教AI {#如何调教ai}
因为这个翻译的功能最终只希望让他返回方法名或类型,因此在prompt的描述上需要做一些控制,比如有一个"楼间距"的变量名称需要取,接口入参就可以这样配:
{
    "model": "llama3",
    "stream": false,
    "messages": [
        {
            "role": "system",
            "content": "你是一个Java的变量名翻译机器人,你只需要将接收到的中文翻译为对应的Java的变量名。不需要添加任何其他的说明文字及字符"
        },
        {
            "role": "user",
            "content": "楼间距"
        }
    ]
}
得到的结果就是下面这样,message中的content就是返回的具体内容
{
    "model": "llama3",
    "created_at": "2024-07-21T10:05:46.92441256Z",
    "message": {
        "role": "assistant",
        "content": "floorSpacing"
    },
    "done_reason": "stop",
    "done": true,
    "total_duration": 228328484,
    "load_duration": 43350040,
    "prompt_eval_count": 59,
    "prompt_eval_duration": 25422000,
    "eval_count": 3,
    "eval_duration": 27690000
}
# 开始写插件 {#开始写插件}
# 编写配置页面 {#编写配置页面}
这已经是插件开发系列的第三个插件案例了,如果这个系列前面几期都有看的话,对这个插件的开发应该已经熟门熟路了。首先编写一个配置页面,用户配置ollama的api接口地址:
/**
* @author by: 神秘的鱼仔
* @ClassName: ApiSettingState
* @Description: Api配置的持久化类
* @Date: 2024/7/20 下午11:53
*/
@State(
name = "com.codeease.name.genius.window.ApiSettingState",
storages = @Storage("ApiSettingState.xml")
)
public class ApiSettingState implements PersistentStateComponent<ApiSettingState> {
public String api = "";
public static ApiSettingState getInstance(){
return ServiceManager.getService(ApiSettingState.class);
}
@Nullable
@Override
public ApiSettingState getState() {
return this;
}
@Override
public void loadState(@NotNull ApiSettingState apiSettingState) {
this.api = apiSettingState.api;
}
}
/**
-
@author by: 神秘的鱼仔
-
@ClassName: ApiSettingsComponent
-
@Description: 设置组件类
-
@Date: 2024/7/20 下午11:56
*/
public class ApiSettingsComponent {
private JPanel panel;
private JTextField apiTestField;
public ApiSettingsComponent() {
panel = new JPanel();
apiTestField = new JTextField(40);
panel.add(new JLabel("请输入Ollama的Api:"));
panel.add(apiTestField);
}
public JPanel getPanel() {
return panel;
}
public String getApi() {
return apiTestField.getText();
}
public void setApi(String api) {
apiTestField.setText(api);
}
}
/**
-
@author by: 神秘的鱼仔
-
@ClassName: ApiConfigurable
-
@Description: API配置的最终实现
-
@Date: 2024/7/20 下午11:57
*/
public class ApiConfigurable implements Configurable {
private ApiSettingsComponent settingsComponent;
@Override
public @Nls(capitalization = Nls.Capitalization.Title) String getDisplayName() {
return "Name Genius";
}
@Override
public @Nullable
JComponent createComponent() {
settingsComponent = new ApiSettingsComponent();
return settingsComponent.getPanel();
}
@Override
public boolean isModified() {
ApiSettingState settings = ApiSettingState.getInstance();
return !settingsComponent.getApi().equals(settings.api);
}
@Override
public void apply() {
ApiSettingState settings = ApiSettingState.getInstance();
settings.api = settingsComponent.getApi();
}
@Override
public void reset() {
ApiSettingState settings = ApiSettingState.getInstance();
settingsComponent.setApi(settings.api);
}
}
这样一个简单的配置页面就完成了。
# 编写Action按钮 {#编写action按钮}
这个功能要实现的内容是右键之后的选择以及中文内容的替换。
点击按钮后在页面中间跳出一个列表框。
/**
 * @author by: 神秘的鱼仔
 * @ClassName: GenerateNameAction
 * @Description:
 * @Date: 2024/7/18 下午3:45
 */
public class GenerateNameAction extends AnAction {
    @Override
    public void actionPerformed(@NotNull AnActionEvent event) {
        Editor editor = (Editor) event.getDataContext().getData("editor");
        Project project = event.getProject();
    // 创建要展示的列表数据
    List<String> typeNameList = NameTypeEnum.getTypeNameList();
    // 创建列表弹出窗口
    ListPopup listPopup = JBPopupFactory.getInstance()
            .createListPopup(new NamePopupExecutor("Name Type",typeNameList,editor,project));
    // 在屏幕中间显示列表弹出窗口
    listPopup.showCenteredInCurrentWindow(Objects.requireNonNull(event.getProject()));
}

}
当点击列表框内的元素时,执行对应的替换逻辑
/**
* @author by: 神秘的鱼仔
* @ClassName: NamePopupExecutor
* @Description:
* @Date: 2024/7/18 下午4:15
*/
public class NamePopupExecutor extends BaseListPopupStep<String> {
private Editor editor;
private Project project;
public NamePopupExecutor(@NotNull String title, @NotNull List<String> values, Editor editor, Project project) {
super(title, values);
this.editor = editor;
this.project = project;
}
@Nullable
@Override
public PopupStep onChosen(String selectedValue, boolean finalChoice) {
// 处理选中的值
if (StringUtils.isNotBlank(selectedValue)) {
String selectedText = editor.getSelectionModel().getSelectedText();
if (StringUtils.isNotBlank(selectedText)){
NameConvertStrategy strategyInstance = NameTypeEnum.getStrategyInstance(selectedValue);
ReplaceProcess.replaceText(strategyInstance.execute(selectedText), editor, project);
}
}
// 如果是最终选择,则关闭弹出窗口
return finalChoice ? PopupStep.FINAL_CHOICE : super.onChosen(selectedValue, finalChoice);
}
@Override
public boolean hasSubstep(@Nullable String selectedValue) {
// 在这里可以定义是否有子步骤
return false;
}
@Nullable
@Override
public String getTextFor(String value) {
// 返回列表项的显示文本
return value;
}
@Nullable
@Override
public Icon getIconFor(String value) {
// 返回列表项的图标,如果不需要图标,则返回 null
return null;
}
}
以属性名生成的为例,实现的效果就是,传入的是中文的msg,返回的是AI给出的英文结果。
/**
 * @author by: 神秘的鱼仔
 * @ClassName: FieldNameConvert
 * @Description: 属性名转换
 * @Date: 2024/7/21 下午5:54
 */
public class FieldNameConvert implements NameConvertStrategy{
@Override
public String execute(String msg) {
    String prompt = "你是一个Java的变量名翻译机器人,你只需要将接收到的中文翻译为对应的Java的变量名,而不需要其他任何修饰词";
    AiExecutor aiExecutor = new AiExecutor();
    return aiExecutor.getMethodNameByOllama(msg,prompt);
}

}
AiExecutor是调用ollama接口的执行器,代码如下:
/**
 * @author by: 神秘的鱼仔
 * @ClassName: AiExecutor
 * @Description: 和AI相关的功能
 * @Date: 2024/7/20 下午11:51
 */
public class AiExecutor {
public String getMethodNameByOllama(String name,String prompt){
    OkHttpClient client = OkHttpClientSingleton.getInstance();
    ChatRoleModel chatRoleModel = new ChatRoleModel();
    chatRoleModel.setModel(LLAMA);
    chatRoleModel.setStream(false);
    chatRoleModel.setMessages(buildRoleContentModel(name,prompt));
    String api = ApiSettingState.getInstance().api;

    RequestBody requestBody = RequestBody.create(MediaType.parse("application/json"), JSON.toJSONString(chatRoleModel));
    Request request = new Request.Builder()
            .url(api)
            .post(requestBody)
            .build();
    try (Response response = client.newCall(request).execute()) {
        // 处理响应
        if (response.isSuccessful()) {
            ResponseBody responseBody = response.body();
            String string = responseBody.string();
            JSONObject jsonObject = JSON.parseObject(string);
            JSONObject messageJson = jsonObject.getJSONObject(MESSAGE);
            return messageJson.getString(CONTENT);
        } else {
            // 请求失败
            System.out.println("请求失败,响应码: " + response.code());
            return "请求失败,响应码: " + response.code();
        }
    } catch (IOException e) {
        // 发生异常
        e.printStackTrace();
    }
    return "请求失败";

}

public static List<RoleContentModel> buildRoleContentModel(String name,String prompt){
    List<RoleContentModel> modelList = new ArrayList<>(initRole(prompt));
    RoleContentModel model = new RoleContentModel();
    model.setRole(ModelConstant.USER_ROLE);
    model.setContent(name);
    modelList.add(model);
    return modelList;
}

private static List<RoleContentModel> initRole(String prompt) {
    List<RoleContentModel> initModelList = new ArrayList<>();
    RoleContentModel model = new RoleContentModel();
    model.setRole(ModelConstant.SYSTEM);
    model.setContent(prompt);
    initModelList.add(model);
    return initModelList;
}

}
更详细的代码大家可以直接看文章开头的Github仓库。
# 总结 {#总结}
这样一个好用的取名神器就开发完成了,大家有兴趣的话也可以去尝试一下。