支撑每秒数百万订单无压力,SpringBoot + Disruptor 太猛了!
在高并发系统中,传统的队列或锁机制往往无法满足极限情况下的性能需求。Disruptor 是由 LMAX 交易所开发的一种高性能并发框架,设计初衷就是为了解决高频金融交易中的并发处理问题。与传统的队列机制不同,Disruptor 采用环形缓冲区(RingBuffer)和无锁算法(Lock-Free Algorithm),最大程度地减少了线程上下文切换和内存屏障的开销,从而能够在高并发场景下提供极低的延迟和极高的吞吐量。
Disruptor 的核心特性包括:
-
无锁设计:通过使用无锁算法,Disruptor 避免了传统锁机制的竞争问题,从而大幅提升了系统的吞吐量。
-
低延迟:Disruptor 可以在纳秒级别处理事件,确保系统在高并发场景下的极低延迟。
-
高吞吐量:由于无锁设计和高效的缓存使用,Disruptor 能够轻松处理每秒数百万级别的事件。
-
环形缓冲区:通过环形缓冲区,Disruptor 能够高效利用内存,并且避免了垃圾回收机制带来的性能损耗。
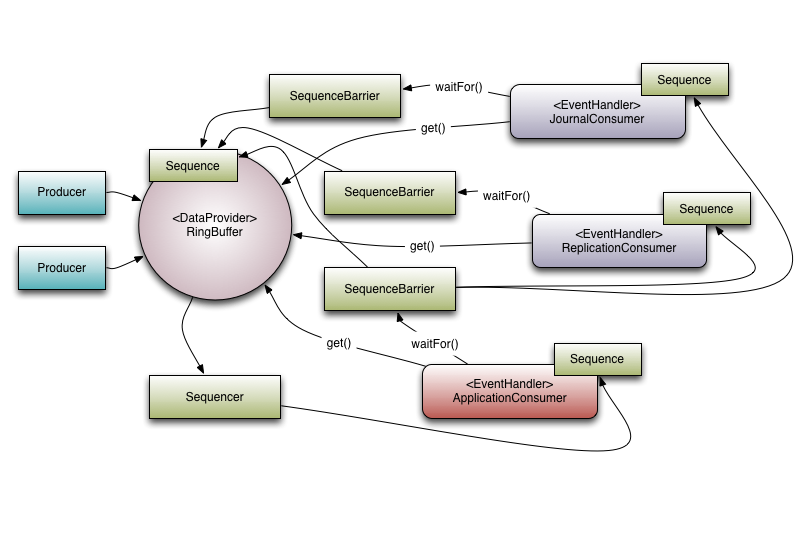
下面是 LMAX 如何在其高性能核心服务(例如交易所)中使用 Disruptor 的一个例子。
本文将详细讲解如何通过 Spring Boot 集成 Disruptor,实现每秒百万订单的无压力处理,并提供完整的代码示例,助你轻松应对高并发挑战。
项目环境配置
Maven 配置 (pom.xml)
首先,我们需要在 pom.xml 中引入必要的依赖项,包括 Spring Boot 和 Disruptor:
<dependencies>
    <!-- Spring Boot 相关依赖 -->
    <dependency>
        <groupId>org.springframework.boot</groupId>
        <artifactId>spring-boot-starter-web</artifactId>
    </dependency>
    <dependency>
        <groupId>org.springframework.boot</groupId>
        <artifactId>spring-boot-starter-thymeleaf</artifactId>
    </dependency>

    <!-- Disruptor 依赖 -->
    <dependency>
      <groupId>com.lmax</groupId>
      <artifactId>disruptor</artifactId>
      <version>4.0.0</version>
  </dependency>
    <!-- 其他依赖 -->
    <dependency>
        <groupId>org.projectlombok</groupId>
        <artifactId>lombok</artifactId>
        <optional>true</optional>
    </dependency>
</dependencies>
Yaml 配置 (application.yml)
在 application.yml 中,我们可以进行一些常规的 Spring Boot 配置,例如端口号设置等:
server:
  port: 8080
spring:
  thymeleaf:
    cache: false
    prefix: classpath:/templates/
    suffix: .html
Disruptor 的核心实现
定义订单事件(OrderEvent)
首先,我们定义一个简单的订单事件类 OrderEvent,它将存储订单的基本信息:
package com.icoderoad.disruptor.entity;
import lombok.Data;
@Data
public class OrderEvent {
    private String orderId;
    private String userId;
    private double price;
    private String status;
}
定义事件工厂(OrderEventFactory)
事件工厂用于生成 OrderEvent 对象:
package com.icoderoad.disruptor.factory;
import com.lmax.disruptor.EventFactory;
import com.icoderoad.disruptor.entity.OrderEvent
public class OrderEventFactory implements EventFactory<OrderEvent> {
    @Override
    public OrderEvent newInstance() {
        return new OrderEvent();
    }
}
定义事件处理器(OrderEventHandler)
事件处理器是实际处理事件的地方。在这里,我们模拟订单处理的逻辑:
package com.icoderoad.disruptor.handler;
import com.icoderoad.disruptor.entity.OrderEvent
import com.lmax.disruptor.EventHandler;
public class OrderEventHandler implements EventHandler<OrderEvent> {
    @Override
    public void onEvent(OrderEvent event, long sequence, boolean endOfBatch) {
        // 处理订单的具体业务逻辑
        processOrder(event);
    }
    private void processOrder(OrderEvent orderEvent) {
        // 模拟订单支付逻辑
        System.out.println("处理订单: " + orderEvent.getOrderId() + ", 用户: " + orderEvent.getUserId() + ", 金额: " + orderEvent.getPrice());
        // 假设订单处理通过后更新订单状态
        orderEvent.setStatus("已支付");
        // 模拟库存扣减逻辑
        reduceInventory(orderEvent);
        System.out.println("订单处理完成: " + orderEvent.getOrderId() + " 状态: " + orderEvent.getStatus());
    }
    private void reduceInventory(OrderEvent orderEvent) {
        // 模拟库存扣减逻辑
        System.out.println("扣减库存: 订单 " + orderEvent.getOrderId());
        // 假设库存扣减成功
    }
}
定义生产者(OrderEventProducer)
生产者负责将订单事件发布到 Disruptor 的 RingBuffer 中:
package com.icoderoad.disruptor.producer;
import com.icoderoad.disruptor.entity.OrderEvent
import com.lmax.disruptor.RingBuffer;
import java.util.UUID;
public class OrderEventProducer {
    private final RingBuffer<OrderEvent> ringBuffer;
    public OrderEventProducer(RingBuffer<OrderEvent> ringBuffer) {
        this.ringBuffer = ringBuffer;
    }
    public void onData(String userId, double price) {
        long sequence = ringBuffer.next();  // 获取下一个序列号
        try {
            OrderEvent orderEvent = ringBuffer.get(sequence); // 获取事件对象
            orderEvent.setOrderId(UUID.randomUUID().toString());
            orderEvent.setUserId(userId);
            orderEvent.setPrice(price);
            orderEvent.setStatus("未支付");
        } finally {
            ringBuffer.publish(sequence);  // 发布事件
        }
    }
}
配置 Disruptor
在 Spring Boot 中配置 Disruptor 并启动它:
package com.icoderoad.disruptor.config;
import com.lmax.disruptor.dsl.Disruptor;
import org.springframework.context.annotation.Bean;
import org.springframework.context.annotation.Configuration;
import com.icoderoad.disruptor.entity.OrderEvent
  import com.icoderoad.disruptor.factory.OrderEventFactory
import java.util.concurrent.Executors;
@Configuration
public class DisruptorConfig {
    @Bean
    public Disruptor<OrderEvent> disruptor() {
        OrderEventFactory factory = new OrderEventFactory();
        int bufferSize = 1024; // RingBuffer 大小
        Disruptor<OrderEvent> disruptor = new Disruptor<>(factory, bufferSize, Executors.defaultThreadFactory());
        // 绑定事件处理器
        disruptor.handleEventsWith(new OrderEventHandler());
        disruptor.start();
        return disruptor;
    }
    @Bean
    public OrderEventProducer orderEventProducer(Disruptor<OrderEvent> disruptor) {
        return new OrderEventProducer(disruptor.getRingBuffer());
    }
}
生产订单事件
通过 REST API 接收订单请求,并将订单事件发布到 Disruptor:
package com.icoderoad.disruptor.controller;
import org.springframework.beans.factory.annotation.Autowired;
import org.springframework.http.ResponseEntity;
import org.springframework.web.bind.annotation.*;
import com.icoderoad.disruptor.producer.OrderEventProducer;
@RestController
@RequestMapping("/orders")
public class OrderController {
    @Autowired
    private OrderEventProducer orderEventProducer;
    @PostMapping("/create")
    public ResponseEntity<String> createOrder(@RequestBody OrderRequest orderRequest) {
        orderEventProducer.onData(orderRequest.getUserId(), orderRequest.getPrice());
        return ResponseEntity.ok("订单创建成功,正在处理!");
    }
}
class OrderRequest {
    private String userId;
    private double price;
    // Getters and Setters
    public String getUserId() {
        return userId;
    }
    public void setUserId(String userId) {
        this.userId = userId;
    }
    public double getPrice() {
        return price;
    }
    public void setPrice(double price) {
        this.price = price;
    }
}
前端页面展示
为了更直观地展示订单的创建,我们使用 Thymeleaf 模板引擎,配合 Bootstrap 构建一个简单的订单创建页面。
Thymeleaf 模板 (order.html)
<!DOCTYPE html>
<html xmlns:th="http://www.thymeleaf.org">
<head>
    <meta charset="UTF-8">
    <title>创建订单</title>
    <link href="https://cdn.jsdelivr.net/npm/bootstrap@5.3.0/dist/css/bootstrap.min.css" rel="stylesheet">
</head>
<body>
<div class="container">
    <h1>创建订单</h1>
    <form id="orderForm">
        <div class="mb-3">
            <label for="price" class="form-label">价格</label>
            <input type="number" class="form-control" id="price" name="price" required>
        </div>
        <button type="submit" class="btn btn-primary">提交</button>
    </form>
</div>
<script src="https://cdn.jsdelivr.net/npm/bootstrap@5.3.0/dist/js/bootstrap.bundle.min.js"></script>
<script>
    document.getElementById('orderForm').addEventListener('submit', function (e) {
        e.preventDefault();
        const price = document.getElementById('price').value;
        fetch('/orders/create', {
            method: 'POST',
            headers: {
                'Content-Type': 'application/json',
            },
            body: JSON.stringify({price: price}),
        })
        .then(response => response.text())
        .then(data => alert(data))
        .catch(error => console.error('Error:', error));
    });
</script>
</body>
</html>
运行流程说明
-
当用户通过前端页面提交订单请求时,
OrderController接收到请求并调用OrderEventProducer发布订单事件。 -
订单事件发布到 Disruptor 的
RingBuffer中,并自动触发OrderEventHandler的消费逻辑。 -
OrderEventHandler处理订单的业务逻辑,包括支付处理、库存扣减等操作,并更新订单状态。 -
订单处理完成后,控制台输出相关处理信息。
总结
本文通过一个具体的订单处理场景,展示了如何结合 Spring Boot 与 Disruptor 实现高性能的并发处理。通过无锁的设计和高效的事件处理机制,Disruptor 能够轻松应对每秒数百万订单的处理需求。在高并发场景下,Disruptor 是一种非常值得考虑的解决方案。