安装编译命令: yum install -y gcc glibc gcc-c++ pcre-devel openssl-devel patch
第一种情况:
服务器没有安装Nginx的时候可以直接编译安装
第二种情况: 已经安装了nginx服务 在进行编译安装(添加模块)
1.下载源码包
[root@lb01 ~]# nginx -v
nginx version: nginx/1.22.1
[root@lb01 ~]# wget http://nginx.org/download/nginx-1.22.1.tar.gz
解压nginx
[root@lb01 ~]# tar xf nginx-1.22.1.tar.gz
[root@lb01 ~]# ll
total 1056
-rw-------. 1 root root 1522 Feb 22 16:41 anaconda-ks.cfg
drwxr-xr-x 8 1001 1001 158 Oct 19 16:02 nginx-1.22.1
2.配置参数(安装路径 安装模块 参数....)
[root@lb01 ~]# cd nginx-1.22.1/
[root@lb01 nginx-1.22.1]#
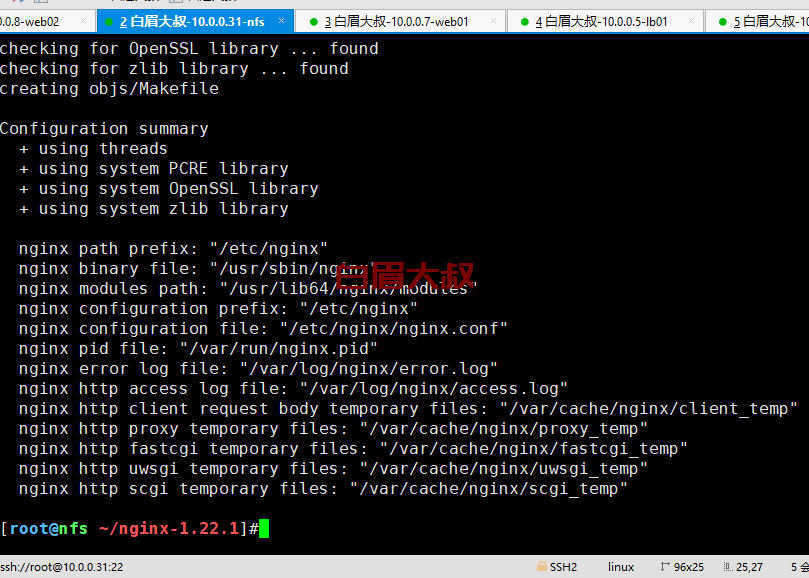
./configure --prefix=/etc/nginx --sbin-path=/usr/sbin/nginx --modules-path=/usr/lib64/nginx/modules --conf-path=/etc/nginx/nginx.conf --error-log-path=/var/log/nginx/error.log --http-log-path=/var/log/nginx/access.log --pid-path=/var/run/nginx.pid --lock-path=/var/run/nginx.lock --http-client-body-temp-path=/var/cache/nginx/client_temp --http-proxy-temp-path=/var/cache/nginx/proxy_temp --http-fastcgi-temp-path=/var/cache/nginx/fastcgi_temp --http-uwsgi-temp-path=/var/cache/nginx/uwsgi_temp --http-scgi-temp-path=/var/cache/nginx/scgi_temp --user=nginx --group=nginx --with-compat --with-file-aio --with-threads --with-http_addition_module --with-http_auth_request_module --with-http_dav_module --with-http_flv_module --with-http_gunzip_module --with-http_gzip_static_module --with-http_mp4_module --with-http_random_index_module --with-http_realip_module --with-http_secure_link_module --with-http_slice_module --with-http_ssl_module --with-http_stub_status_module --with-http_sub_module --with-http_v2_module --with-mail --with-mail_ssl_module --with-stream --with-stream_realip_module --with-stream_ssl_module --with-stream_ssl_preread_module --with-cc-opt='-O2 -g -pipe -Wall -Wp,-D_FORTIFY_SOURCE=2 -fexceptions -fstack-protector-strong --param=ssp-buffer-size=4 -grecord-gcc-switches -m64 -mtune=generic -fPIC' --with-ld-opt='-Wl,-z,relro -Wl,-z,now -pie'
3.make
4.make install
添加模块编译方法:
1.下载源码包 和上面相同
2.下载模块包 wget https://github.com/yaoweibin/nginx_upstream_check_module/archive/master.zip
[root@lb01 ~]# ll -h
total 1.3M
-rw-------. 1 root root 1.5K Feb 22 16:41 anaconda-ks.cfg
-rw-r--r-- 1 root root 173K Apr 7 10:58 master.zip
解压模块:
[root@lb01 ~]# unzip master.zip
[root@lb01 ~]# ll
drwxr-xr-x 6 root root 4096 Nov 6 12:37 nginx_upstream_check_module-master
3.将新的模块配置到nginx模块中
[root@lb01 ~]# cd nginx-1.22.1/
打补丁: 添加新的模块到nginx中
[root@lb01 nginx-1.22.1]#
patch -p1 < ../nginx_upstream_check_module-master/check_1.20.1+.patch
p表示跳过几级目录,因为是在demo目录下使用的patch命令,看看是否有绝对路径,如果是绝对路径就是用 p0.
所以此时使用的是p0。
4.配置参数:
在配置参数中添加:
--add-module=/root/nginx_upstream_check_module-master
如下:
./configure --prefix=/etc/nginx --sbin-path=/usr/sbin/nginx --modules-path=/usr/lib64/nginx/modules --conf-path=/etc/nginx/nginx.conf --error-log-path=/var/log/nginx/error.log --http-log-path=/var/log/nginx/access.log --pid-path=/var/run/nginx.pid --lock-path=/var/run/nginx.lock --http-client-body-temp-path=/var/cache/nginx/client_temp --http-proxy-temp-path=/var/cache/nginx/proxy_temp --http-fastcgi-temp-path=/var/cache/nginx/fastcgi_temp --http-uwsgi-temp-path=/var/cache/nginx/uwsgi_temp --http-scgi-temp-path=/var/cache/nginx/scgi_temp --user=nginx --group=nginx --with-compat --with-file-aio --with-threads --with-http_addition_module --with-http_auth_request_module --with-http_dav_module --with-http_flv_module --with-http_gunzip_module --with-http_gzip_static_module --with-http_mp4_module --with-http_random_index_module --with-http_realip_module --with-http_secure_link_module --with-http_slice_module --with-http_ssl_module --with-http_stub_status_module --with-http_sub_module --with-http_v2_module --with-mail --with-mail_ssl_module --with-stream --with-stream_realip_module --with-stream_ssl_module --with-stream_ssl_preread_module --add-module=/root/nginx_upstream_check_module-master --with-cc-opt='-O2 -g -pipe -Wall -Wp,-D_FORTIFY_SOURCE=2 -fexceptions -fstack-protector-strong --param=ssp-buffer-size=4 -grecord-gcc-switches -m64 -mtune=generic -fPIC' --with-ld-opt='-Wl,-z,relro -Wl,-z,now -pie'
5.编译安装
make && make install
使用健康状态检查模块:
代理服务器配置:
|------------------------------------------------------------------------------------------------------------------------------------------------------------------------------------------------------------------------------------------------------------------------------------------------------------------------------------------------------------------------------------------------------------------------------------------------------------------------| | upstream web { server 172.16.1.7:80 max_fails=2 fail_timeout=10s; server 172.16.1.8:80 max_fails=2 fail_timeout=10s; check interval=3000 rise=2 fall=3 timeout=1000 type=tcp; #interval 检测间隔时间,单位为毫秒 #rise 表示请求2次正常,标记此后端的状态为up #fall 表示请求3次失败,标记此后端的状态为down #type 类型为tcp #timeout 超时时间,单位为毫秒 } server { listen 80; server_name test.baimei.com; location / { proxy_pass http://webs; #请求时携带的参数配置 include proxy_params; } location /upstream_check { check_status; } } |
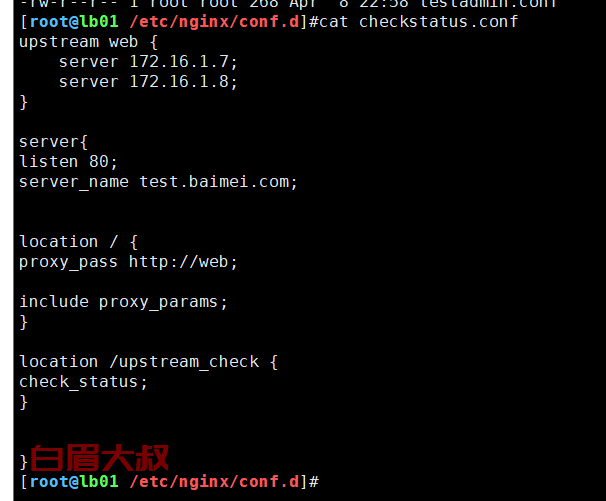
注意这个地方要有 配置文件:
include proxy_params;
vim /etc/nginx/proxy_params
|----------------------------------------------------------------------------------------------------------------------------------------------------------------------------------------------------------------------------------------------------------------------------------| | proxy_set_header Host $http_host; proxy_set_header X-Real-IP $remote_addr; proxy_set_header X-Forwarded-For $proxy_add_x_forwarded_for; proxy_connect_timeout 30; proxy_send_timeout 60; proxy_read_timeout 60; proxy_buffering on; proxy_buffer_size 32k; proxy_buffers 4 128k; |
[root@lb01 conf.d]# nginx -t
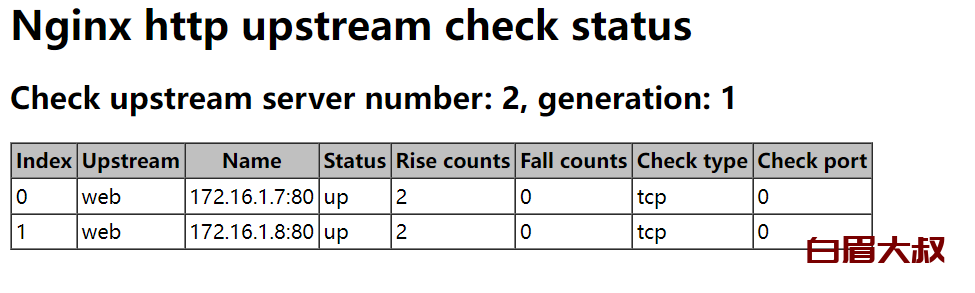
访问: test.baimei.com/upstream_check
(要配置hosts)
如下图所示: