一、前言 {#一、前言}
随着业务的扩展,为了方便开发和维护项目,我们通常会将大项目拆分成多个小项目做成微服务,每个微服务都会有各自配置文件,管理和修改文件起来也会变得繁琐。而且,当我们需要修改正在运行的项目的配置时,通常需要重启项目后配置才能生效。
上述的问题将是本篇需要解决的问题。
二、介绍 {#二、介绍}
2.1 简单介绍 {#2.1-简单介绍}
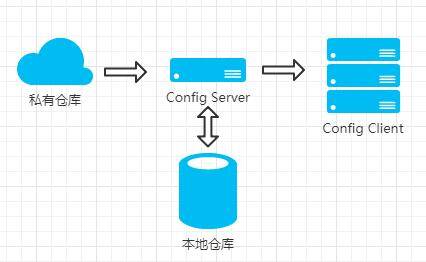
Spring Cloud Config 用于为分布式系统中的基础设施和微服务应用提供集中化的外部配置支持,它分为服务端和客户端两部分。服务端(config server)也称为分布式配置中心,是一个独立的微服务应用,用来连接配置仓库并为客户端提供获取配置信息,加密/解密信息等访问接口。而客户端(config client)则是微服务架构中各微服务应用或基础设施,通过指定的配置中心来管理应用资源与业务相关的配置内容,并在启动的时候从配置中心获取和加载配置信息。
2.2 运行原理 {#2.2-运行原理}
如上图,当 Config Client 首次启动时会向 Config Server 获取配置信息,Config Server 接收到请求再从远程私有仓库获取配置(连接不上项目会报错),并保存到本地仓库中。
当 Config Client 再次启动时会向 Config Server 获取配置信息,Config Server 还是会先从远程私有仓库拉去数据。如果网络问题或认证问题导致无法连接远程私有库,Config Server 才会从本地仓库获取配置信息返回给 Config Client。
三、Config 实战 {#三、Config-实战}
本次实战基于 Eureka 篇的项目进行扩展演练。不清楚的读者请先转移至 《Spring Cloud 入门 之 Eureka 篇(一)》 进行浏览。
我们使用配置中心来维护 order-server 的配置数据(application.yml)。
测试场景:由于配置中心服务本身也是一个微服务,因此我们需要将配置中心注册到 Eureka 上,当 order-server 启动时先向 Eureka 获取配置中心的访问地址,然后从配置中心获取相应的配置信息进行正常启动。
本篇实战用到的项目列表:
| 服务实例 | 端口 | 描述 | |---------------|-------|-----------------------------| | eureka-server | 9000 | 注册中心(Eureka 服务端) | | config-server | 10000 | 配置中心(Eureka 客户端、Config 服务端) | | order-server | 8100 | 订单服务(Eureka 客户端、Config 客户端) |
3.1 上传配置 {#3.1-上传配置}
在 GitHub 上新建一个私有仓库,名为 spring-cloud-config。
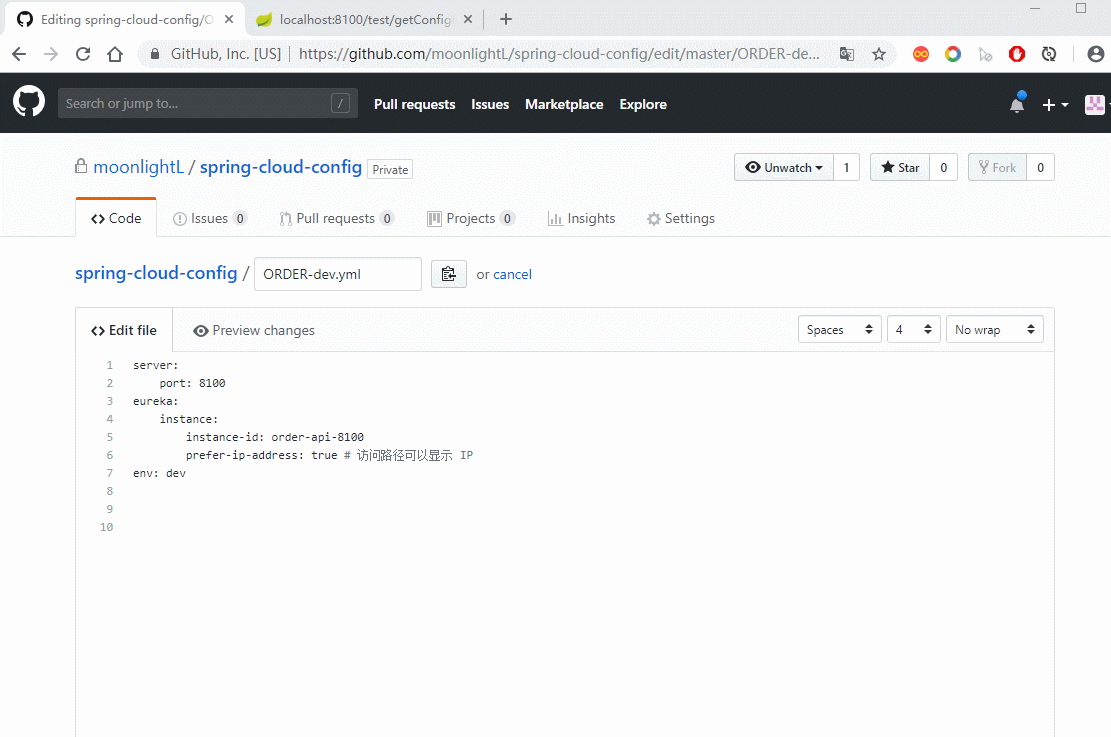
我们将 order-server 项目的配置文件放到改仓库中,如下图:
新建 2 个 yml 文件,内容为:
|-----------------------|-------------------------------------------------------------------------------------------------------------------------|
| 1 2 3 4 5 6 7 | server: port: 8100 eureka: instance: instance-id: order-api-8100 prefer-ip-address: true # 访问路径可以显示 IP env: dev |
ORDER-dev.yml 和 ORDER-test.yml 不同之处在于 env 的值,其中一个是 dev ,另一个是 test。
3.2 config 服务端 {#3.2-config-服务端}
新建一个 spring boot 项目,名为 config-server(任意名字)。
- 添加依赖:
|---------------------------------------|--------------------------------------------------------------------------------------------------------------------------------------------------------------------------------------------------------------------------------------------------------------------------------------------------------------------------------------------------------|
| 1 2 3 4 5 6 7 8 9 10 11 12 13 | <dependencies> <!-- eureka 客户端 --> <dependency> <groupId>org.springframework.cloud</groupId> <artifactId>spring-cloud-starter-netflix-eureka-client</artifactId> </dependency> <!-- config 服务端 --> <dependency> <groupId>org.springframework.cloud</groupId> <artifactId>spring-cloud-config-server</artifactId> </dependency> </dependencies> |
- application.yml
|------------------------------------------------------------|----------------------------------------------------------------------------------------------------------------------------------------------------------------------------------------------------------------------------------------------------------------------------------------------------------------------------------------|
| 1 2 3 4 5 6 7 8 9 10 11 12 13 14 15 16 17 18 19 20 | server: port: 10000 spring: application: name: CONFIG cloud: config: server: git: uri: https://github.com/moonlightL/spring-cloud-config.git username: moonlightL password: xxx basedir: d:/data # 本地库目录 eureka: instance: instance-id: config-api client: service-url: defaultZone: http://localhost:9000/eureka/ # 注册中心访问地址 |
- 启动类添加 @EnableConfigServer:
|---------------------------|------------------------------------------------------------------------------------------------------------------------------------------------------------------------------------------------------------|
| 1 2 3 4 5 6 7 8 9 | @EnableConfigServer @EnableEurekaClient @SpringBootApplication public class ConfigApplication { public static void main(String[] args) { SpringApplication.run(ConfigApplication.class, args); } } |
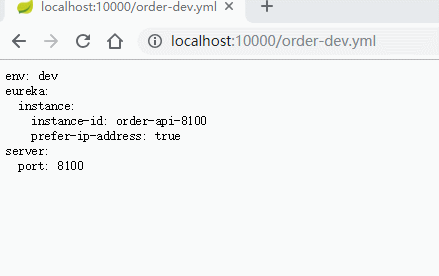
启动成功后,我们打开浏览器访问 http://localhost:10000/order-dev.yml 和 http://localhost:10000/order-test.yml ,结果如下图:
config-server 服务成功拉去远程私有仓库的配置数据。
其中,访问规则如下:
|-------------|---------------------------------------------------------------------------------|
| 1 2 | <IP:PORT>/{name}-{profiles}.yml <IP:PORT>/{label}/{name}-{profiles}.yml |
name:文件名,可当作服务名称
profiles: 环境,如:dev,test,pro
lable: 分支,指定访问某分支下的配置文件,默认拉去 master 分支。
3.3 config 客户端 {#3.3-config-客户端}
在 order-server 项目中。
- 添加依赖:
|-------------------|---------------------------------------------------------------------------------------------------------------------------------------------------------|
| 1 2 3 4 5 | <!-- config 客户端 --> <dependency> <groupId>org.springframework.cloud</groupId> <artifactId>spring-cloud-config-client</artifactId> </dependency> |
- 删除 application.yml,并新建 bootstrap.yml,保存如下内容:
|---------------------------------------|---------------------------------------------------------------------------------------------------------------------------------------------------------------------------------------------------------------------------------------------|
| 1 2 3 4 5 6 7 8 9 10 11 12 13 | spring: application: name: ORDER cloud: config: discovery: enabled: true service-id: CONFIG # config-server 在注册中心的名称 profile: dev # 指定配置文件的环境 eureka: client: service-url: defaultZone: http://localhost:9000/eureka/ # 注册中心访问地址 |
配置中,通过 spring.cloud.config.discovery.service-id 确定配置中心,再通过 spring.application.name 的值拼接 spring.cloud.config.profile 的值,从而确定需要拉去从配置中心获取的配置文件。(如:ORDER-dev)
注意:必须保留 eureka 注册中心的配置,否则 order-server 无法连接注册中心,也就无法获取配置中心(config-server)的访问信息。
- 测试
新建一个测试类:
|------------------------------------|------------------------------------------------------------------------------------------------------------------------------------------------------------------------------------------------------------------|
| 1 2 3 4 5 6 7 8 9 10 11 12 | @RestController @RequestMapping("/test") public class TestController { @Value("${env}") private String env; // 从配置中心获取 @RequestMapping("/getConfigInfo") public String getConfigInfo() { return env; } } |
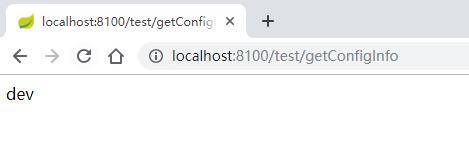
打开浏览器访问 http://localhost:8100/test/getConfigInfo ,结果如下图:
成功获取 config-server 从远程私有仓库拉去的数据,由于在 bootstrap.yml 中配置了 spring.cloud.config.profile=dev,因此拉取到的数据就是 ORDER-dev.yml 中的数据。
引申问题:
当我们修改远程私有仓库的配置文件时,Config Server 如何知道是否该重新获取远程仓库数据呢?
现在已知唯一的解决方式就是重启 Config Client 项目,在项目启动时会请求 Config Server 重新拉去远程私有仓库数据。但是,如果是在生产环境下随便重启项目必定会影响系统的正常运行,那有没有更好的方式解决上述的问题呢?请读者继续阅读下文。
四、整合 Bus {#四、整合-Bus}
Spring Cloud Bus 是 Spring Cloud 家族中的一个子项目,用于实现微服务之间的通信。它整合 Java 的事件处理机制和消息中间件消息的发送和接受,主要由发送端、接收端和事件组成。针对不同的业务需求,可以设置不同的事件,发送端发送事件,接收端接受相应的事件,并进行相应的处理。
4.1 配置中心 {#4.1-配置中心}
在 config-server 项目中:
- 添加依赖:
|-------------------|-----------------------------------------------------------------------------------------------------------------------------------------------------|
| 1 2 3 4 5 | <!-- bus --> <dependency> <groupId>org.springframework.cloud</groupId> <artifactId>spring-cloud-starter-bus-amqp</artifactId> </dependency> |
- 修改 application.yml,添加如下配置:
|---------------------------------------------------------------------------------------------|-------------------------------------------------------------------------------------------------------------------------------------------------------------------------------------------------------------------------------------------------------------------------------------------------------------------------------------------------------------------------------------------------------------------------------------------------|
| 1 2 3 4 5 6 7 8 9 10 11 12 13 14 15 16 17 18 19 20 21 22 23 24 25 26 27 28 29 30 31 | server: port: 10000 spring: application: name: CONFIG cloud: config: server: git: uri: https://github.com/moonlightL/spring-cloud-config.git username: moonlightL password: xxx rabbitmq: host: 192.168.2.13 port: 5672 username: light password: light eureka: instance: instance-id: config-api client: service-url: defaultZone: http://localhost:9000/eureka/ # 注册中心访问地址 management: endpoints: web: exposure: include: "*" # 暴露接口 |
添加了 rabbitmq 配置和 management 的配置。
4.2 订单服务 {#4.2-订单服务}
在 order-server 项目中:
- 添加依赖:
|-------------------|-----------------------------------------------------------------------------------------------------------------------------------------------------|
| 1 2 3 4 5 | <!-- bus --> <dependency> <groupId>org.springframework.cloud</groupId> <artifactId>spring-cloud-starter-bus-amqp</artifactId> </dependency> |
- 修改 bootstrap.yml:
|------------------------------------------------------|---------------------------------------------------------------------------------------------------------------------------------------------------------------------------------------------------------------------------------------------------------------------------------------------------------------------|
| 1 2 3 4 5 6 7 8 9 10 11 12 13 14 15 16 17 18 | spring: application: name: ORDER cloud: config: discovery: enabled: true service-id: CONFIG # config-server 在注册中心的名称 profile: dev # 指定配置文件的环境 rabbitmq: host: 192.168.2.13 port: 5672 username: light password: light eureka: client: service-url: defaultZone: http://localhost:9000/eureka/ # 注册中心访问地址 |
添加 rabbitmq 配置。
- 获取数据的类上添加 @RefreshScope 注解:
|---------------------------------------|--------------------------------------------------------------------------------------------------------------------------------------------------------------------------------------------------------------------------------|
| 1 2 3 4 5 6 7 8 9 10 11 12 13 | @RestController @RequestMapping("/test") @RefreshScope public class TestController { @Value("${env}") private String env; // 从配置中心获取 @RequestMapping("/getConfigInfo") public String getConfigInfo() { return env; } } |
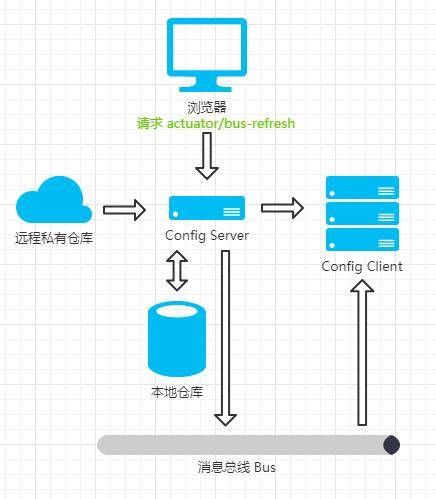
整合 Bus 后的原理图如下:
当我们修改远程私有仓库配置信息后,需要向 Config Server 发起 actuator/bus-refresh 请求。然后, Config Server 会通知消息总线 Bus,之后 Bus 接到消息并通知给其它连接到总线的 Config Client。最后,Config Client 接收到通知请求 Config Server 端重新访问远程私有仓库拉去最新数据。
- 测试:
修改远程私有仓库配置文件,使用 Postman 发起 POST 请求 http://localhost:10000/actuator/bus-refresh ,最终配置中心重新拉去数据,最后再访问 order-server http://localhost:8100/test/getConfigInfo 获取最新数据,运行结果如下图:
如上图,我们实现了在不重启项目的情况下,获取变更数据的功能。
引申问题:
每次更新私有仓库中的配置文件都需要手动请求 actuator/bus-refresh,还是不够自动化。
下边我们来解决该问题。
五、集成 WebHook {#五、集成-WebHook}
远程私有仓库的提供 WebHook 配置,我们将 actuator/bus-refresh 配置上去,当远程私有仓库中的配置信息发生变动时,就会自动调用该接口最终实现自动刷新目的。
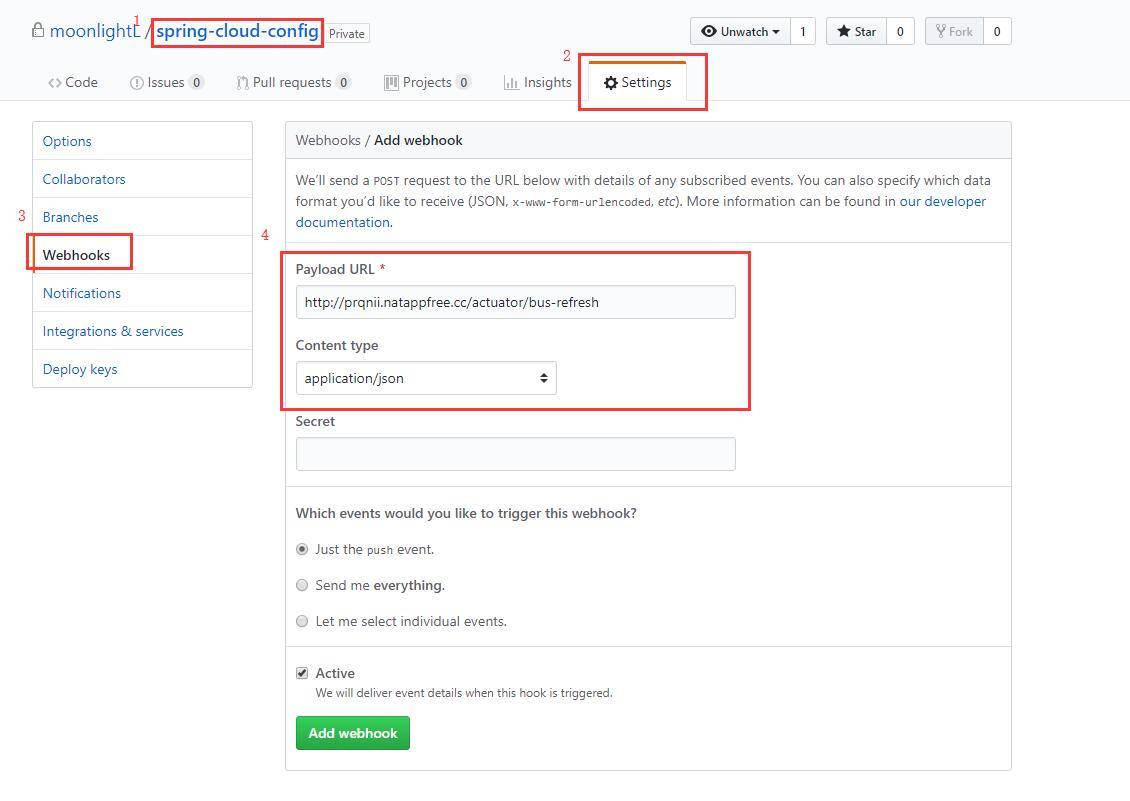
5.1 配置 WebHook 地址 {#5.1-配置-WebHook-地址}
登录 GitHub,点击 GitHub 的 WebHook 菜单,右侧面板中 Payload URL 填写 <配置中心 url>/actuator/bus-refresh, Content-type 选择 applicaton/json,保存即可。
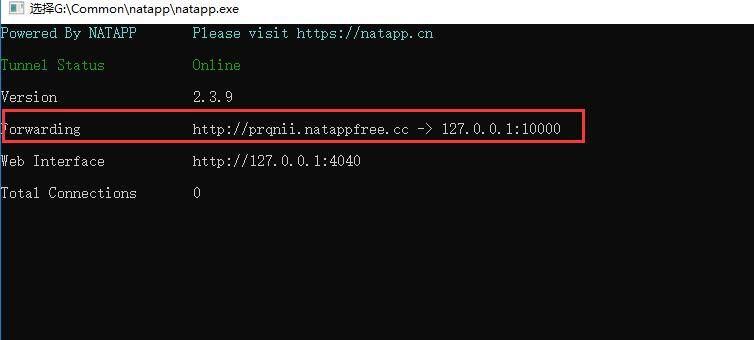
由于笔者是本地测试,没有外网域名,因此借助 https://natapp.cn 做外网映射(操作简单,详情看官网教程),以下是笔者的外网信息:
设置 WebHook 操作如下图:
5.2 测试 {#5.2-测试}
预期效果:当我们修改 GitHub 上私有仓库的配置数据后,我们再访问 http://localhost:8100/test/getConfigInfo 应该展示最新的数据。
但是结果失败了。
原因: 回到 config-server 控制台查看日志发现报错了:
|-------------|-----------------------------------------------------------------------------------------------------------------------------------------------------------------------------------------------------------------------------------------------------------------------------------------------------------------------------------------------------------------------------------------------------------------------------------------------------------------------|
| 1 2 | Resolved [org.springframework.http.converter.HttpMessageNotReadableException: JSON parse error: Cannot deserialize instance of `java.lang.String` out of START_OBJECT token; nested exception is com.fasterxml.jackson.databind.exc.MismatchedInputException: Cannot deserialize instance of `java.lang.String` out of START_OBJECT token at [Source: (PushbackInputStream); line: 1, column: 68] (through reference chain: java.util.LinkedHashMap["hook"])] |
这是因为,GitHub 在调用 <配置中心 url>/actuator/bus-refresh 时,往请求体添加了 payload 数据,但它不是一个标准的 JSON 数据。因此,config-server 在接收 GitHub 发送的请求获取,从请求体数据做转换时就报错了。
解决方案:
在 config-server 项目中,新建一个过滤器,用于过滤 actuator/bus-refresh 请求,将其请求体置空:
|------------------------------------------------------------------------------------------------------------------------------------------------------------------------------------------------------|-------------------------------------------------------------------------------------------------------------------------------------------------------------------------------------------------------------------------------------------------------------------------------------------------------------------------------------------------------------------------------------------------------------------------------------------------------------------------------------------------------------------------------------------------------------------------------------------------------------------------------------------------------------------------------------------------------------------------------------------------------------------------------------------------------------------------------------------------------------------------------------------------------------------------------------------------------------------------------------------------------------------------------------------------------------------------------------------------------------------------------------------------------------------------------------------------------------------------------------------------------------------------------------------------------------------------------------------------------------------------------------------------------------------------------------------------------------------------------------------------------|
| 1 2 3 4 5 6 7 8 9 10 11 12 13 14 15 16 17 18 19 20 21 22 23 24 25 26 27 28 29 30 31 32 33 34 35 36 37 38 39 40 41 42 43 44 45 46 47 48 49 50 51 52 53 54 55 56 57 58 59 60 61 62 63 64 65 66 | @Component public class WebHookFilter implements Filter { @Override public void init(FilterConfig filterConfig) throws ServletException { } @Override public void doFilter(ServletRequest request, ServletResponse response, FilterChain chain) throws IOException, ServletException { HttpServletRequest httpServletRequest = (HttpServletRequest) request; String url = new String(httpServletRequest.getRequestURI()); // 只过滤 /actuator/bus-refresh 请求 if (!url.endsWith("/actuator/bus-refresh")) { chain.doFilter(request, response); return; } // 使用 HttpServletRequest 包装原始请求达到修改 post 请求中 body 内容的目的 CustometRequestWrapper requestWrapper = new CustometRequestWrapper(httpServletRequest); chain.doFilter(requestWrapper, response); } @Override public void destroy() { } private class CustometRequestWrapper extends HttpServletRequestWrapper { public CustometRequestWrapper(HttpServletRequest request) { super(request); } @Override public ServletInputStream getInputStream() throws IOException { byte[] bytes = new byte[0]; ByteArrayInputStream byteArrayInputStream = new ByteArrayInputStream(bytes); return new ServletInputStream() { @Override public boolean isFinished() { return byteArrayInputStream.read() == -1 ? true : false; } @Override public boolean isReady() { return false; } @Override public void setReadListener(ReadListener readListener) { } @Override public int read() throws IOException { return byteArrayInputStream.read(); } }; } } } |
完成如上配置后,再次测试,结果如下:
搞定! 由于网络问题,拉去最新数据时有点慢,需要多刷新几次。。。


