**一、**Gitlab介绍
{#t2}Gitlab是一个开源的Git仓库管理系统,旨在为企业和开发者提供一个安全可靠且易于使用的代码管理平台;它提供了版本管理、代码审查、问题跟踪等协作功能,并通过易用的Web界面进行操作。Gitlab具有完善的权限系统,允许管理者对不同的用户和团队设置不同的访问权限、修改权限、下载权限等。
**二、**docker-compose安装
Linux上我们可以从Github上下载它的二进制包来使用,最新发行的版本地址:https://github.com/docker/compose/releases。
1、运行以下命令以下载Docker Compose的v2.11.0版本
[root@k8s-master ~]# wget -O /usr/bin/docker-compose https://github.com/docker/compose/releases/download/v2.11.0/docker-compose-linux-x86_64
2、授权可执行权限
[root@k8s-master ~]# chmod +x /usr/bin/docker-compose
3、测试是否安装成功
[root@k8s-master ~]# docker-compose -v
Docker Compose version v2.11.0
**三、**Docker安装
Docker支持以下的64位CentOS版本:
- CentOS 7
- CentOS 8
- 更高版本...
1)使用官方安装脚本自动安装
安装命令如下:
[root@localhost ~]# curl -fsSL https://get.docker.com | bash -s docker --mirror Aliyun
也可以使用国内daocloud一键安装命令:
[root@localhost ~]# curl -sSL https://get.daocloud.io/docker | sh
2)使用阿里云源安装
[root@localhost ~]# yum -y install yum-utils device-mapper-persistent-data lvm2
[root@localhost ~]# yum-config-manager --add-repo https://mirrors.aliyun.com/docker-ce/linux/centos/docker-ce.repo
[root@localhost ~]# yum -y install docker-ce docker-ce-cli containerd.io
3)配置镜像加速器
[root@localhost ~]# mkdir -p /etc/docker
[root@localhost ~]# vim /etc/docker/daemon.json
添加以下内容
{
	"registry-mirrors": [
	"https://hub-mirror.c.163.com",
	"https://reg-mirror.qiniu.com",
	"https://cr.console.aliyun.com",
	"https://docker.mirrors.ustc.edu.cn"
	]
}
4)启动Docker
[root@localhost ~]# systemctl enable docker
[root@localhost ~]# systemctl start docker
**四、**Gitlab安装
官方介绍地址:https://docs.gitlab.com/ee/install/docker.html
1)拉取Gitlab镜像
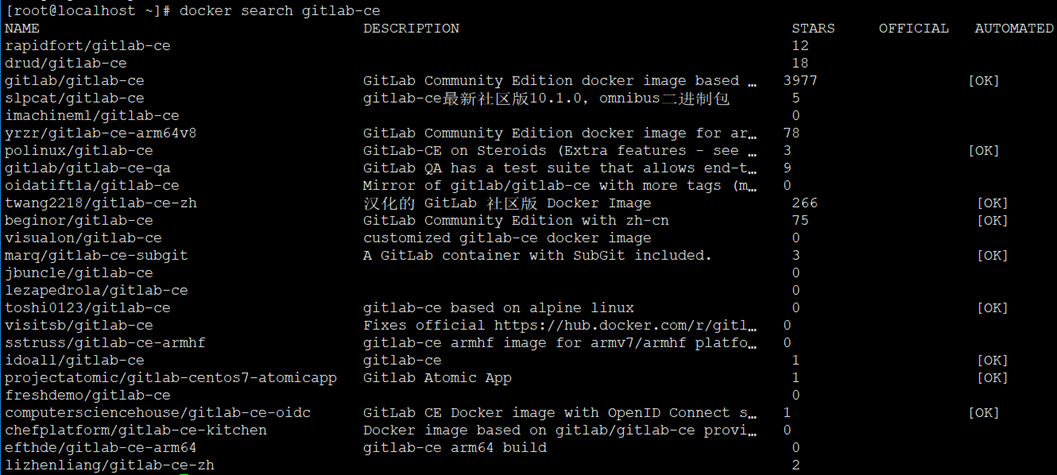
查询Gitlab镜像
[root@localhost ~]# docker search gitlab-ce
[root@localhost ~]# docker pull gitlab/gitlab-ce
Using default tag: latest
latest: Pulling from gitlab/gitlab-ce
9d19ee268e0d: Pull complete
06766d12e6cf: Pull complete
2e43b8eb6e99: Pull complete
e9ae4d7ff5f7: Pull complete
8c63d2dcbc6f: Pull complete
be5c6cbca024: Pull complete
4527731dffb3: Pull complete
3973d958e450: Pull complete
Digest: sha256:e37d40fda8623197d177be5af94466ba89d69e3d8c0e5f25df84b0c51620a635
Status: Downloaded newer image for gitlab/gitlab-ce:latest
docker.io/gitlab/gitlab-ce:latest
2)创建Gitlab数据持久化目录
[root@localhost ~]# mkdir -p /data/gitlab/{data,config,logs}
3)编写docker-compose.yml
[root@localhost ~]# mkdir -p /opt/gitlab
[root@localhost ~]# vim /opt/gitlab/docker-compose.yml
version: '3.3'
services:
    gitlab:
      image: 'gitlab/gitlab-ce'
      container_name: "gitlab"
      restart: unless-stopped
      privileged: true
      shm_size: 512m
      environment:
        TZ: 'Asia/Shanghai'
        GITLAB_OMNIBUS_CONFIG: |
          external_url 'http://192.168.36.198'
          gitlab_rails['time_zone'] = 'Asia/Shanghai'
      ports:
        - '80:80'
        - '443:443'
      volumes:
        - /data/gitlab/config:/etc/gitlab
        - /data/gitlab/data:/var/opt/gitlab
        - /data/gitlab/logs:/var/log/gitlab
4)启动Gitlab
[root@localhost ~]# docker-compose -f /opt/gitlab/docker-compose.yml up -d
5)查看Gitlab运行情况
[root@localhost ~]# docker-compose -f /opt/gitlab/docker-compose.yml ps -a
NAME IMAGE COMMAND SERVICE CREATED STATUS PORTS
gitlab gitlab/gitlab-ce "/assets/wrapper" gitlab 24 seconds ago Up 24 seconds (health: starting) 0.0.0.0:80->80/tcp, :::80->80/tcp, 22/tcp, 0.0.0.0:443->443/tcp, :::443->443/tcp
五、Gitlab使用
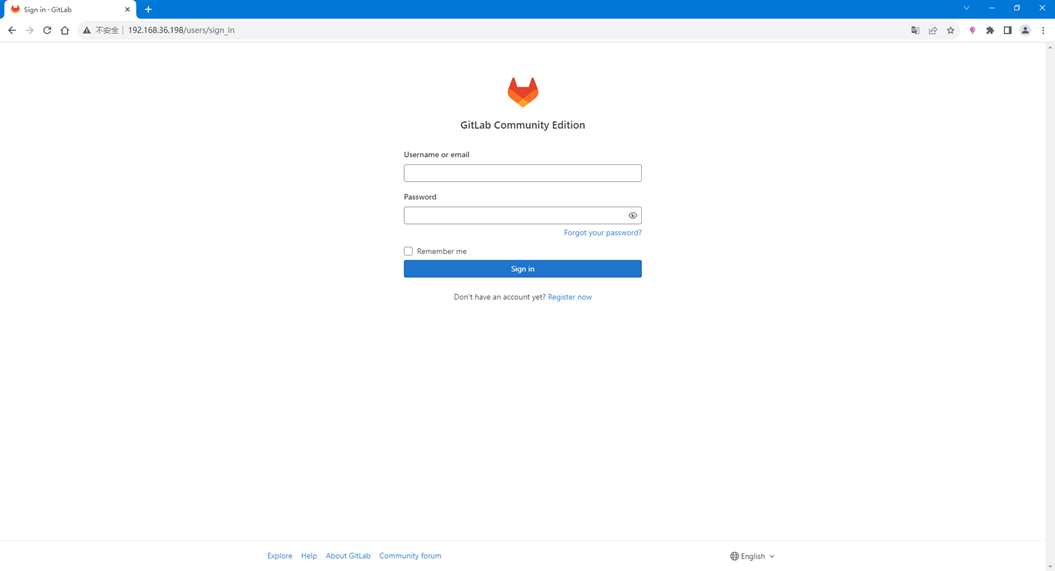
1)访问Gitlab
浏览器输入http://192.168.36.198,如下图所示
2)密码查看方式
[root@localhost ~]# grep "^Password" /data/gitlab/config/initial_root_password
Password: LGp5KOHIvkxugrBtFcMvCcrIi5rmxPyZIl3jQhnnGqY=
3)登录Gitlab
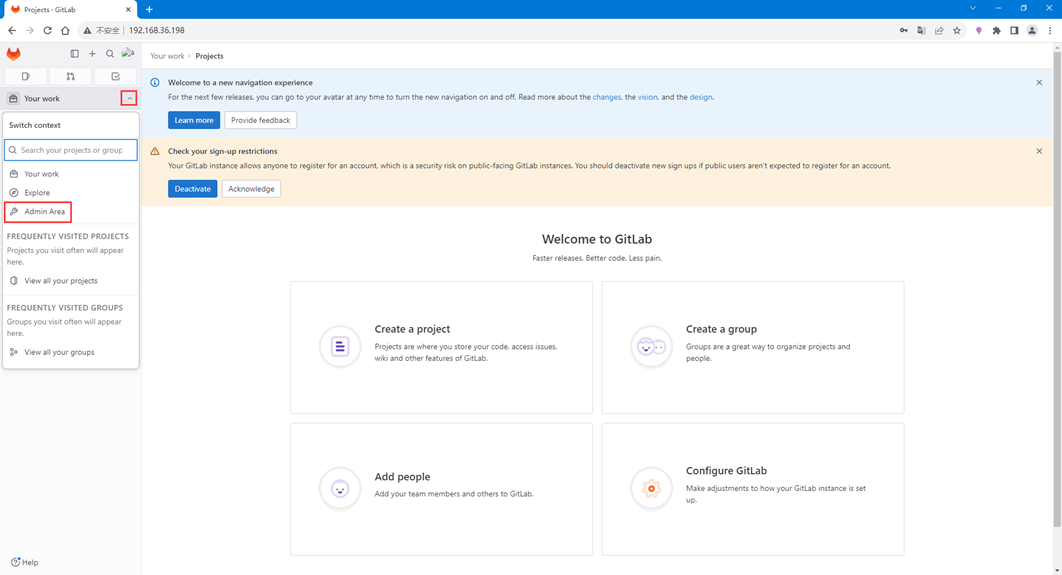
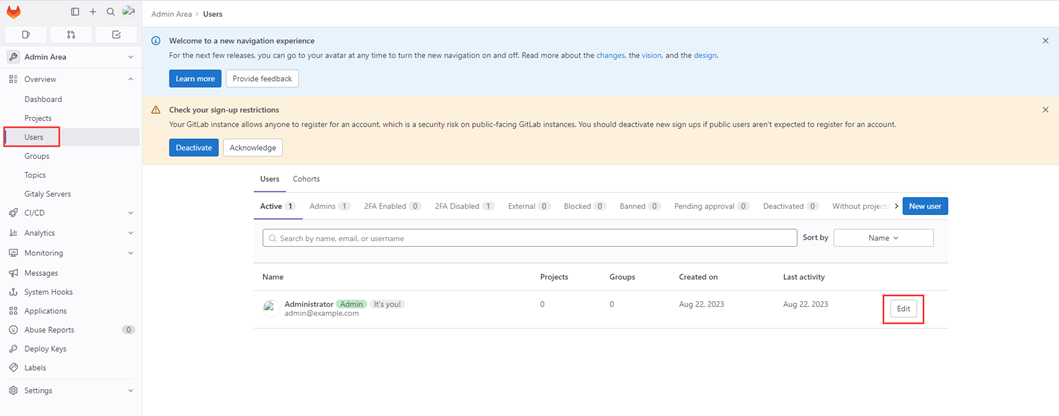
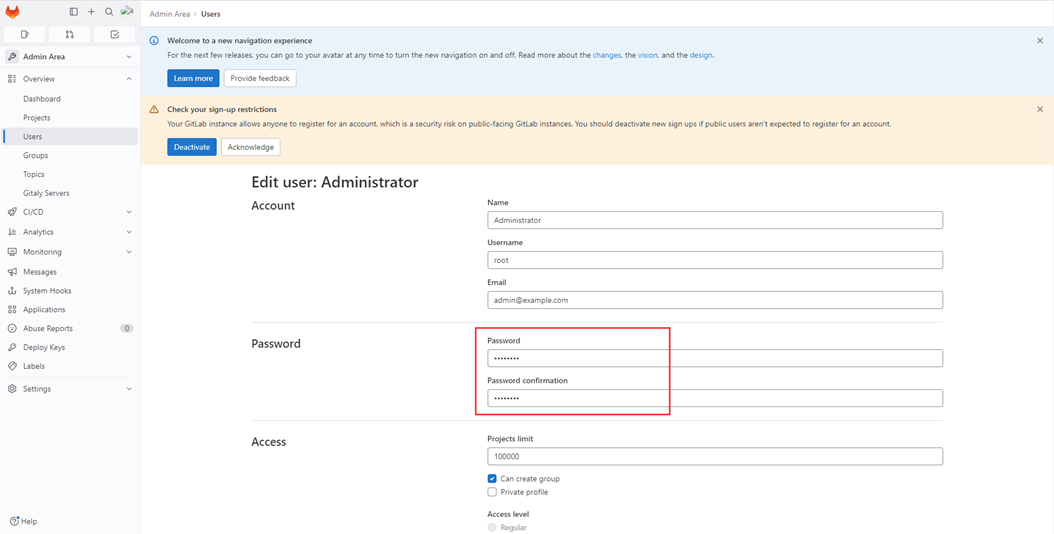
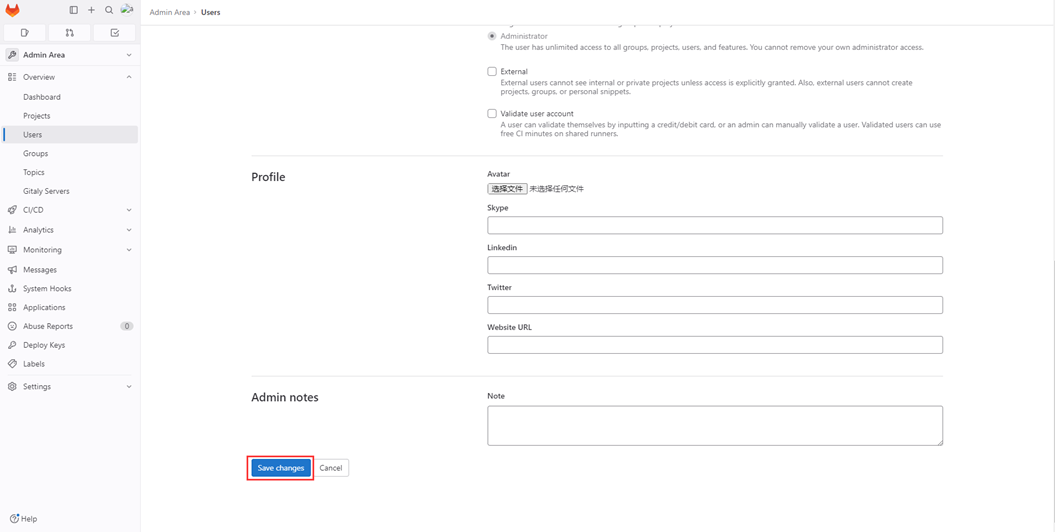
4)修改root管理员密码
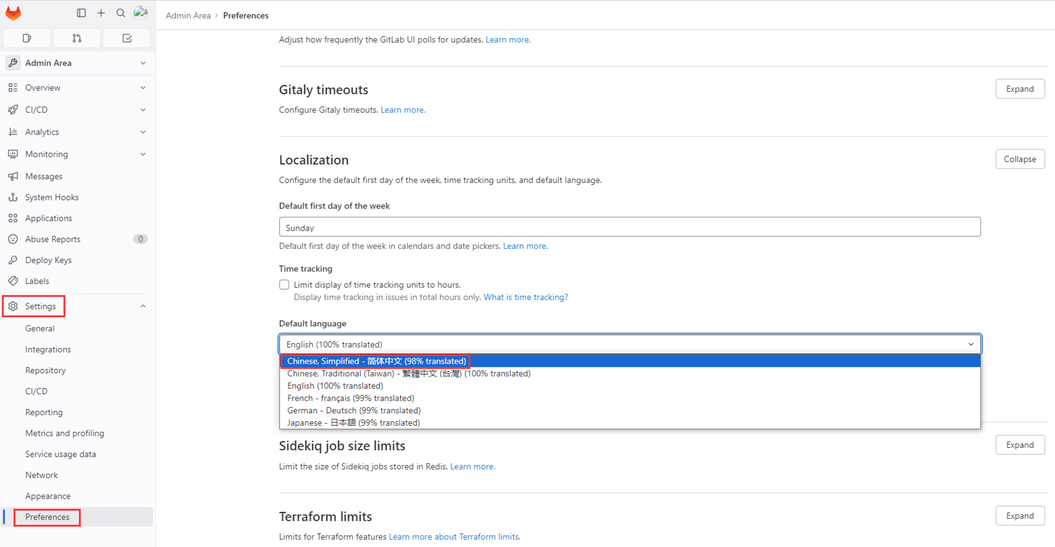
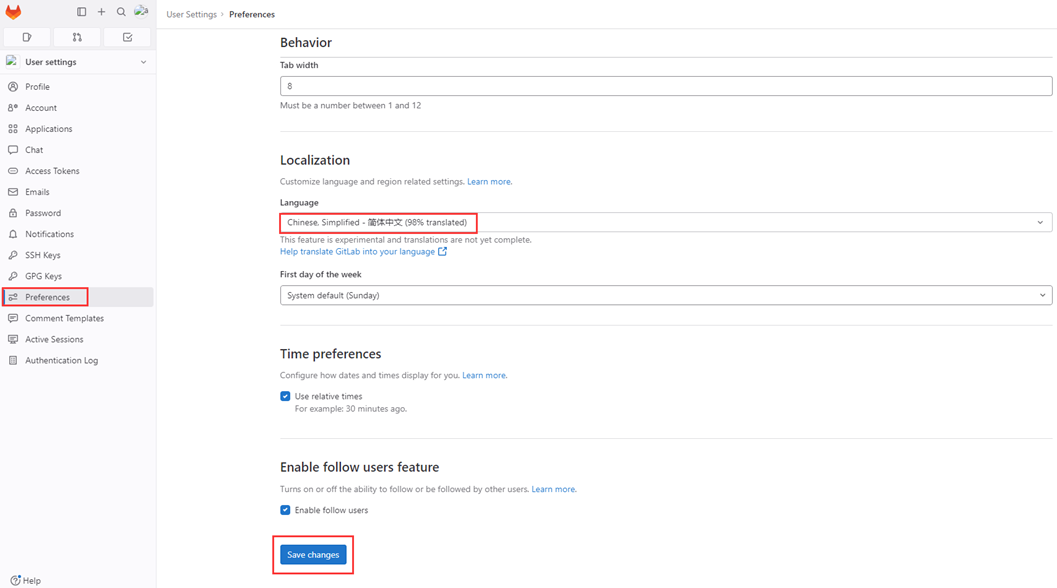
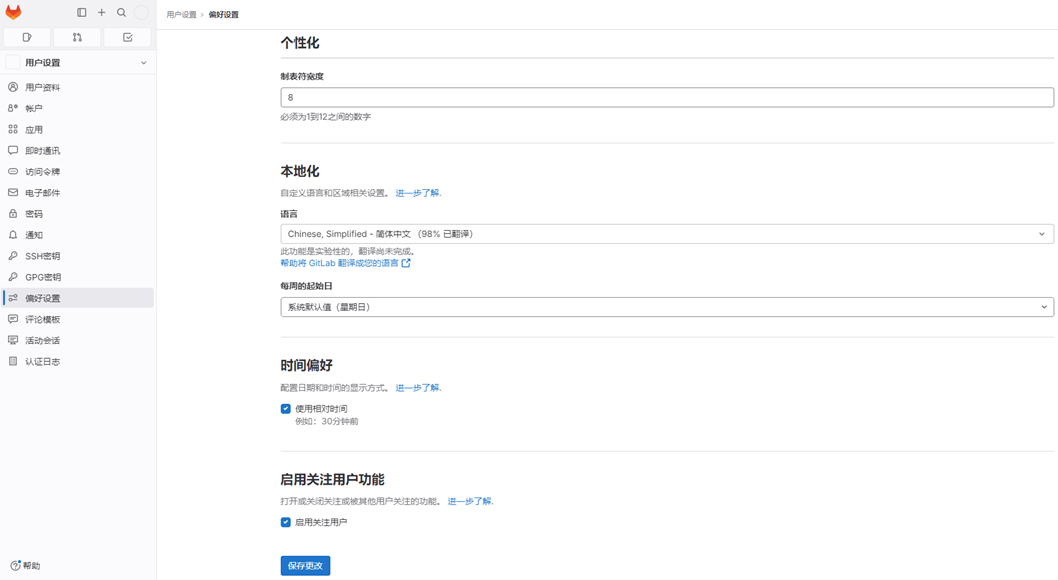
5)修改默认语言为中文
按F5刷新页面就变成中文了
继续阅读
Gitlab最后更新:2024-1-23
 51工具盒子