一、Nginx简介
Nginx(engine x)是一个高性能的HTTP和反向代理服务器,也是一个IMAP/POP3/SMTP服务器。Nginx是由伊戈尔·赛索耶夫为俄罗斯访问量第二的Rambler.ru站点(俄文:Рамблер)开发的,其特点是占有内存少,并发能力强,事实上nginx的并发能力确实在同类型的网页服务器中表现较好,中国大陆使用nginx网站用户有:百度、京东、新浪、网易、腾讯、淘宝等。
Nginx特点是占有内存少,并发能力强,事实上Nginx的并发能力确实在同类型的网页服务器中表现较好。
Nginx相对于Apache优点如下:
1)高并发响应性能非常好,官方Nginx处理静态文件并发5w/s;
2)负载均衡及反向代理性能非常强;
3)系统内存和CPU占用率低;
4)可对后端服务进行健康检查;
5)支持PHP cgi方式和FastCGI方式;
6)可以作为缓存服务器、邮件代理服务器;
7)配置代码简洁且容易上手;
8)支持 SSL 和 TLSSNI。
二、Nginx工作原理
Nginx WEB服务器最主要就是各种模块的工作,模块从结构上分为核心模块、基础模块和第三方模块,其中三类模块分别如下:
1、核心模块:HTTP模块、EVENT模块和MAIL模块等;
2、基础模块:HTTP Access模块、HTTP FastCGI模块、HTTP Proxy模块和HTTP Rewrite模块;
3、第三方模块:HTTP Upstream Request Hash模块、Notice模块和HTTP Access Key模块、Limit_req模块、Upstream check module等;
Nginx的模块从功能上分为如下三类。
1)Handlers(处理器模块):此类模块直接处理请求,并进行输出内容和修改headers信息等操作,Handlers处理器模块一般只能有一个;
2)Filters (过滤器模块):此类模块主要对其他处理器模块输出的内容进行修改操作,最后由Nginx输出;
3)Proxies (代理类模块):此类模块是Nginx的HTTP Upstream之类的模块,这些模块主要与后端一些服务比如FastCGI等进行交互,实现服务代理和负载均衡等功能。
Nginx由Nginx内核和模块组成,其中内核的设计非常微小和简洁,完成的工作也非常简单,仅仅通过查找配置文件将客户端的请求映射到一个location block,而location是Nginx配置中的一个指令,用于访问的URL匹配,而在这个location中所配置的每个指令将会启动不同的模块去完成相应的工作,如图所示:
三、安装Nginx
1 **、**服务器环境准备
|----|----------------|-----------------|------------| | 序号 | IP地址 | 操作系统 | 用途 | | 1 | 192.168.56.138 | CentOS 7.9.2009 | 代理服务器 | | 2 | 192.168.56.137 | CentOS 7.9.2009 | Linux客户端 | | 3 | 192.168.56.136 | Windows 10 | Windows客户端 |
2 **、**安装Nginx
1)安装依赖包
[root@localhost ~]# yum -y install pcre pcre-devel openssl openssl-devel gcc gcc-c++ wget zlib zlib-devel
2)下载Nginx源码包
[root@localhost ~]# wget -c http://nginx.org/download/nginx-1.18.0.tar.gz
3)解压Nginx源码包
[root@localhost ~]# tar zxf nginx-1.18.0.tar.gz
4)下载正向代理插件
[root@localhost ~]# yum -y install git patch
[root@localhost ~]# cd /opt
[root@localhost opt]# git clone https://gitee.com/web_design_of_web_frontend/ngx_http_proxy_connect_module.git
5)编译正向代理插件
[root@localhost opt]# cd ~/nginx-1.18.0
[root@localhost nginx-1.18.0]# patch -p1 < /opt/ngx_http_proxy_connect_module/patch/proxy_connect_rewrite_1018.patch
6)预编译Nginx
[root@localhost nginx-1.18.0]# useradd -s /sbin/nologin nginx
[root@localhost nginx-1.18.0]# ./configure --prefix=/usr/local/nginx --user=nginx --group=nginx --with-http_ssl_module --with-http_stub_status_module --with-stream --with-pcre --with-http_gzip_static_module --with-http_realip_module --add-module=/opt/ngx_http_proxy_connect_module
7)安装Nginx
[root@localhost nginx-1.18.0]# make && make install
8)配置正向代理
[root@localhost nginx-1.18.0]# cp /usr/local/nginx/conf/nginx.conf{,_bak}
[root@localhost nginx-1.18.0]# vim /usr/local/nginx/conf/nginx.conf
    user nginx nginx;
    worker_processes auto;
    pid /var/run/nginx.pid;
events {
    use epoll;
    worker_connections 10240;
    multi_accept on;
}
http {
    include mime.types;
    default_type application/octet-stream;
    log_format main '$remote_addr - $remote_user [$time_local] "$request" '
                    '$status $body_bytes_sent "$http_referer" '
                    '"$http_user_agent" "$http_x_forwarded_for"';
    access_log /usr/local/nginx/logs/access.log main;
    error_log /usr/local/nginx/logs/error.log warn;
    sendfile on;
    tcp_nopush on;
    keepalive_timeout 120;
    tcp_nodelay on;
    server_tokens off;
    gzip on;
    gzip_min_length 1k;
    gzip_buffers 4 64k;
    gzip_http_version 1.1;
    gzip_comp_level 4;
    gzip_types text/plain application/x-javascript text/css application/xml;
    gzip_vary on;
    client_max_body_size 10m;
    client_body_buffer_size 128k;
    proxy_connect_timeout 90;
    proxy_send_timeout 90;
    proxy_buffer_size 4k;
    proxy_buffers 4 32k;
    proxy_busy_buffers_size 64k;
    large_client_header_buffers 4 4k;
    client_header_buffer_size 4k;
    open_file_cache_valid 30s;
    open_file_cache_min_uses 1;
    server {
        listen 8080;
        resolver 114.114.114.114 8.8.8.8;
        proxy_connect;
        proxy_connect_allow 443 563;
        proxy_connect_timeout 30s;
        proxy_connect_send_timeout 60s;
        proxy_connect_read_timeout 60s;
        location / {
           proxy_pass http://$host;
           proxy_set_header Host $host;
        }
    }
}
9)创建systemctl管理配置文件
[root@localhost nginx-1.18.0]# vim /usr/lib/systemd/system/nginx.service
[Unit]
Description=Nginx Server
Documentation=http://nginx.org/en/docs/
After=network-online.target remote-fs.target nss-lookup.target
Wants=network-online.target

\[Service\]
Type=forking
PIDFile=/var/run/nginx.pid
ExecStart=/usr/local/nginx/sbin/nginx -c /usr/local/nginx/conf/nginx.conf
ExecReload=/bin/kill -s HUP $MAINPID
ExecStop=/bin/kill -s TERM $MAINPID


\[Install\]
WantedBy=multi-user.target
[root@localhost nginx-1.18.0]# systemctl daemon-reload
10)启动Nginx
[root@localhost nginx-1.18.0]# ln -sf /usr/local/nginx/sbin/nginx /usr/bin
[root@localhost nginx-1.18.0]# nginx -t
nginx: the configuration file /usr/local/nginx/conf/nginx.conf syntax is ok
nginx: configuration file /usr/local/nginx/conf/nginx.conf test is successful
[root@localhost nginx-1.18.0]# systemctl start nginx
11)查看Nginx进程和端口
[root@localhost nginx-1.18.0]# ps -ef | grep nginx
[root@localhost nginx-1.18.0]# netstat -lntup | grep nginx
四、Linux客户端验证
1、访问http网站
[root@localhost ~]# ping baidu.com
ping: baidu.com: Name or service not known
[root@localhost ~]# curl -I --proxy 192.168.56.138:8080 http://www.baidu.com
HTTP/1.1 200 OK
Server: nginx
Date: Tue, 11 Jul 2023 02:40:39 GMT
Content-Type: text/html
Content-Length: 277
Connection: keep-alive
Accept-Ranges: bytes
Cache-Control: private, no-cache, no-store, proxy-revalidate, no-transform
Etag: "575e1f72-115"
Last-Modified: Mon, 13 Jun 2016 02:50:26 GMT
Pragma: no-cache
2、访问https网站
[root@localhost ~]# curl -I --proxy 192.168.56.138:8080 https://www.baidu.com
HTTP/1.1 200 Connection Established
Proxy-agent: nginx
HTTP/1.1 200 OK
Accept-Ranges: bytes
Cache-Control: private, no-cache, no-store, proxy-revalidate, no-transform
Connection: keep-alive
Content-Length: 277
Content-Type: text/html
Date: Tue, 11 Jul 2023 03:19:59 GMT
Etag: "575e1f6d-115"
Last-Modified: Mon, 13 Jun 2016 02:50:21 GMT
Pragma: no-cache
Server: bfe/1.0.8.18
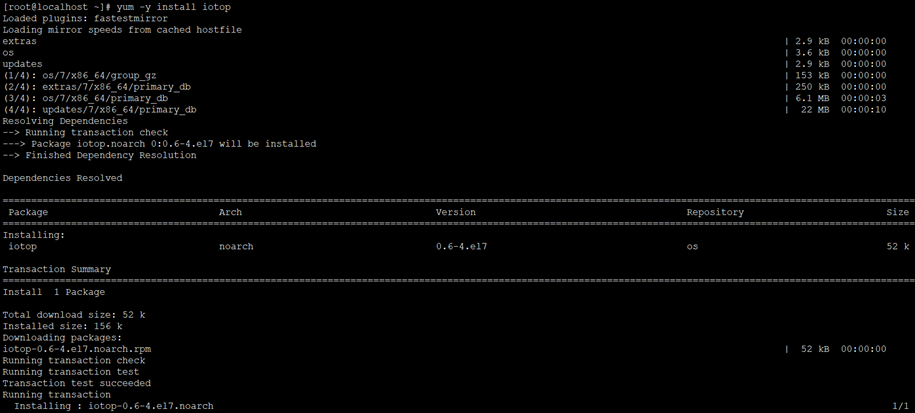
3、Yum设置代理
[root@localhost ~]# vim /etc/yum.conf
proxy=http://192.168.56.138:8080
[root@localhost ~]# yum -y install iotop
4、wget设置代理
[root@localhost ~]# vim /etc/wgetrc
proxy=http://192.168.56.138:8080
[root@localhost ~]# wget https://download.redis.io/releases/redis-6.2.13.tar.gz
5、全局配置代理
[root@localhost ~]# vim /etc/profile
http_proxy=http://192.168.56.138:8080
export http_proxy
[root@localhost ~]# source /etc/profile
[root@localhost ~]# curl -I http://www.baidu.com
HTTP/1.1 200 OK
Server: nginx
Date: Tue, 11 Jul 2023 03:00:23 GMT
Content-Type: text/html
Content-Length: 277
Connection: keep-alive
Accept-Ranges: bytes
Cache-Control: private, no-cache, no-store, proxy-revalidate, no-transform
Etag: "575e1f72-115"
Last-Modified: Mon, 13 Jun 2016 02:50:26 GMT
Pragma: no-cache
[root@localhost ~]# curl -I https://www.baidu.com
HTTP/1.1 200 Connection Established
Proxy-agent: nginx
HTTP/1.1 200 OK
Accept-Ranges: bytes
Cache-Control: private, no-cache, no-store, proxy-revalidate, no-transform
Connection: keep-alive
Content-Length: 277
Content-Type: text/html
Date: Tue, 11 Jul 2023 04:14:03 GMT
Etag: "575e1f72-115"
Last-Modified: Mon, 13 Jun 2016 02:50:26 GMT
Pragma: no-cache
Server: bfe/1.0.8.18
五、Windows客户端验证
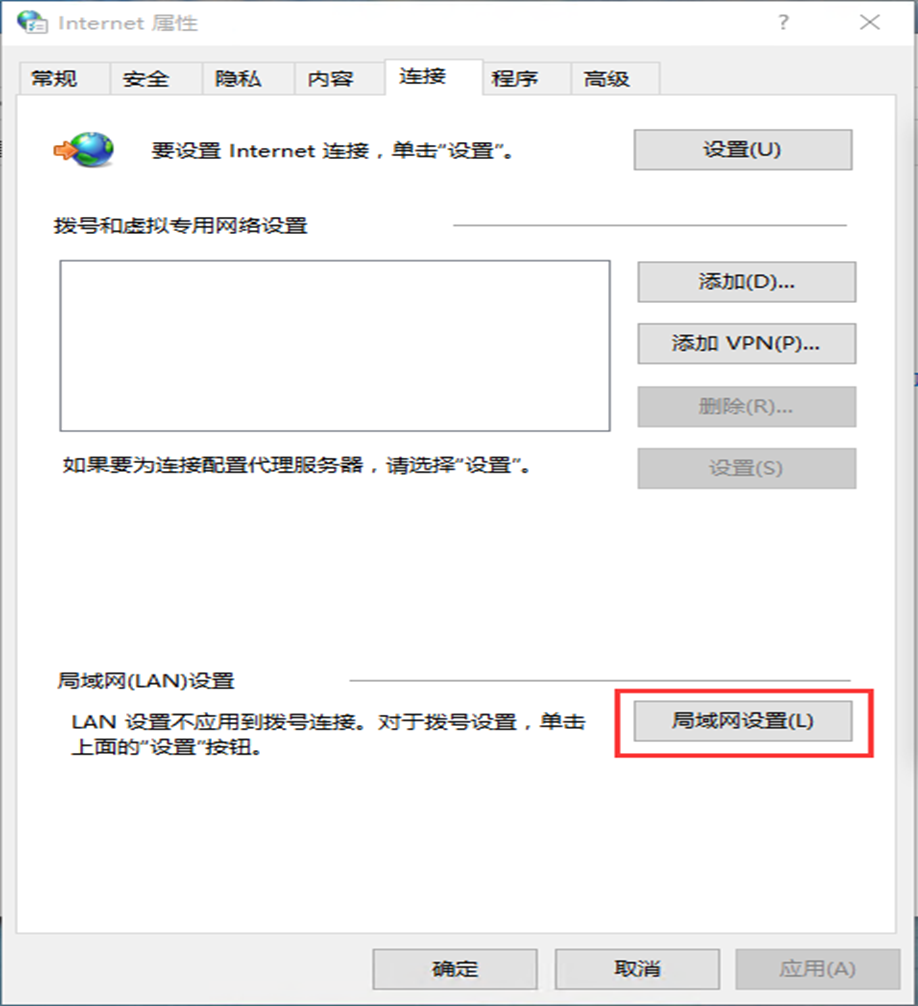
1、打开"控制面板"或"IE浏览器"-"Internet选项"-"连接"选项卡-"局域网设置"-"代理服务器",勾选"为LAN使用代理服务器",地址192.168.56.138,端口8080,确定。
历史上的今天
7 月
11
- 2019Linux搭建ELK日志分析平台并收集Nginx日志 Nginx最后更新:2024-8-15
 51工具盒子


