Nginx虚拟主机的概念
虚拟主机,就是把一台物理服务器划分成多个"虚拟"的服务器,每一个虚拟主机都可以有独立的域名和独立的目录。
Nginx虚拟主机的配置
Nginx的虚拟主机就是通过nginx.conf中server节点指定的,想要设置多个虚拟主机,配置多个server节点即可文章源自小柒网-https://www.yangxingzhen.cn/907.html
每台虚拟主机都可以是一个独立的网站,可以具有独立的域名,具有完整的Intemet服务器功能(WWW、FTP、Email等),同一台主机上的虚拟主机之间是完全独立的。从网站访问者来看,每一台虚拟主机和一台独立的主机完全一样。文章源自小柒网-https://www.yangxingzhen.cn/907.html
利用虚拟主机,不用为每个要运行的网站提供一台单独的Nginx服务器或单独运行一组Nginx进程。虚拟主机提供了在同一台服务器、同一组Nginx进程上运行多个网站的功能。文章源自小柒网-https://www.yangxingzhen.cn/907.html
Nginx基本配置
Nginx的主配置文件是:nginx.conf,nginx.conf主要组成如下:文章源自小柒网-https://www.yangxingzhen.cn/907.html
全局区,有一个工作子进程,一般设置为CPU数 * 核数文章源自小柒网-https://www.yangxingzhen.cn/907.html
worker_processes 1;
events {
        # 一般是配置nginx进程与连接的特性
        # 如1个word能同时允许多少连接,一个子进程最大允许连接1024个连接
        worker_connections  1024;
}
# 配置HTTP服务器配置段
http {
        # 配置虚拟主机段
        server {
        # 定位,把特殊的路径或文件再次定位。
        location  {
      }
 }
server {
  .......
}
}
虚拟主机名可以有4种格式:文章源自小柒网-https://www.yangxingzhen.cn/907.html
- 准确的名字,例如此例中的a.test.com
- *号开头的,例如 *.test.com
- *号结尾的,例如 mail.*
- 正则表达式形式,例如
server_name ~^www\d+\.abc\.com$;文章源自小柒网-https://www.yangxingzhen.cn/907.html
注意,使用正则表达式形式时,必须以'~'开头文章源自小柒网-https://www.yangxingzhen.cn/907.html
server_name也可以同时指定多个,例如:文章源自小柒网-https://www.yangxingzhen.cn/907.html
server_name abc.com www.abc.com *.abc.com;文章源自小柒网-https://www.yangxingzhen.cn/907.html
这时优先级为:
- 确切的名字
- 最长的以*起始的通配符名字
- 最长的以*结束的通配符名字
- 第一个匹配的正则表达式名字
NGINX虚拟主机方式有三种:基于域名、基于端口、基于IP,如下
1)基于域名的虚拟主机
1、在http模块下面新增以下内容
server {
        #监听端口 80
        listen 80;
        #监听域名abc.com;
        server_name abc.com;
        location / {
                # 相对路径,相对nginx根目录。
            root    /html/abc;
            # 默认跳转到index.html页面
        index index.html;
        }
}
2、创建发布目录
[root@localhost ~]# mkdir /usr/local/nginx/html/abc
3、创建index.html测试页面
[root@localhost ~]# vim /usr/local/nginx/html/abc/index.html,添加以下内容
<html>
        <head>
            <meta http-equiv="Content-Type" content="text/html; charset=UTF-8" />
        </head>
        <body>
            <h2>基于域名的虚拟主机-index</h2>
        </body>
</html>
4、平滑重启nginx服务
[root@localhost ~]# /usr/local/nginx/sbin/nginx -t
[root@localhost ~]# /usr/local/nginx/sbin/nginx -s reload
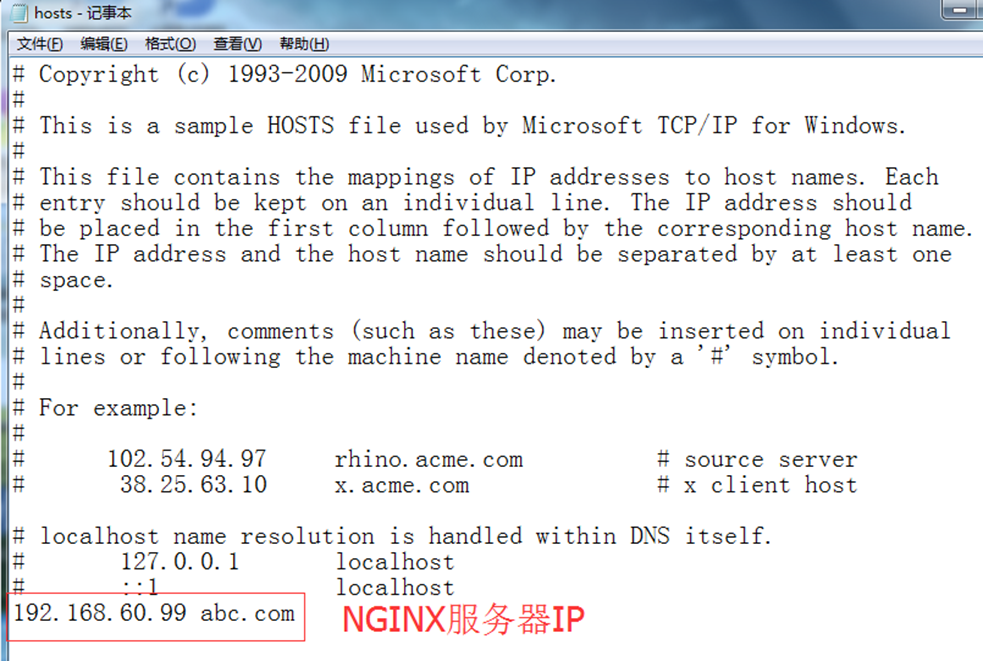
5、配置windows的hosts文件(C:\Windows\System32\drivers\etc\hosts)
2)基于端口的虚拟主机
1、编辑配置文件:vim /usr/local/nginx/conf/nginx.conf,修改为以下内容
server {
    listen 8080;
    server_name abc.com;
    location / {
    root html/abc;
    index index.html index.htm;
    }
}
2、编辑index.html文件,
[root@localhost ~]# vim /usr/local/nginx/html/abc/index.html
<html>
     <head>
        <meta http-equiv="Content-Type" content="text/html; charset=UTF-8" />
    </head>
    <body>
        <h2>基于端口的虚拟主机-index</h2>
    </body>
</html>
3、平滑重启nginx服务
[root@localhost ~]# /usr/local/nginx/sbin/nginx -t
[root@localhost ~]# /usr/local/nginx/sbin/nginx -s reload
4、浏览器访问http://abc.com:8080/
3)基于IP的虚拟主机
1、编辑配置文件:vim /usr/local/nginx/conf/nginx.conf,修改为以下内容
server {
    listen 80;
    server_name 192.168.60.99;
    location / {
    root html/abc;
    index index.html index.htm;
   }
}
2、编辑index.html文件
[root@localhost ~]# vim /usr/local/nginx/html/abc/index.html
<html>
     <head>
         <meta http-equiv="Content-Type" content="text/html; charset=UTF-8" />
     </head>
     <body>
         <h2>基于IP的虚拟主机-index</h2>
     </body>
</html>
3、平滑重启nginx服务
[root@localhost ~]# /usr/local/nginx/sbin/nginx -t
[root@localhost ~]# /usr/local/nginx/sbin/nginx -s reload
4、浏览器访问:http://192.168.60.99
继续阅读 Nginx最后更新:2022-11-22
 51工具盒子


