一、MySQL简介
MySQL是一个关系型数据库管理系统,由瑞典 MySQL AB 公司开发,属于 Oracle 旗下产品。MySQL是最流行的关系型数据库管理系统之一,在 WEB 应用方面,MySQL是最好的RDBMS (Relational Database Management System,关系数据库管理系统)应用软件之一。
二、Ubuntu 22.04安装MySQL
1、安装MySQL(apt)
1)安装MySQL
root@ubuntu:~# apt -y update
root@ubuntu:~# apt -y install mysql-server
2)登录MySQL
root@ubuntu:~# mysql
Welcome to the MySQL monitor. Commands end with ; or \g.
Your MySQL connection id is 8
Server version: 8.0.40-0ubuntu0.22.04.1 (Ubuntu)
Copyright (c) 2000, 2024, Oracle and/or its affiliates.
Oracle is a registered trademark of Oracle Corporation and/or its
affiliates. Other names may be trademarks of their respective
owners.
Type 'help;' or '\h' for help. Type '\c' to clear the current input statement.
mysql> select version();
+-------------------------+
| version() |
+-------------------------+
| 8.0.40-0ubuntu0.22.04.1 |
+-------------------------+
1 row in set (0.00 sec)
3)配置MySQL
root@ubuntu:~# sed -i '/pid-file/s/# //' /etc/mysql/mysql.conf.d/mysqld.cnf
root@ubuntu:~# sed -i '/socket/s/# //' /etc/mysql/mysql.conf.d/mysqld.cnf
root@ubuntu:~# sed -i '/3306/s/# //' /etc/mysql/mysql.conf.d/mysqld.cnf
root@ubuntu:~# sed -i '/bind-address/s/127.0.0.1/0.0.0.0/g' /etc/mysql/mysql.conf.d/mysqld.cnf
root@ubuntu:~# sed -i '/datadir/s/# //' /etc/mysql/mysql.conf.d/mysqld.cnf
root@ubuntu:~# sed -i -e '/max_connections/s/# //' -e '/max_connections/s/151/1000/' /etc/mysql/mysql.conf.d/mysqld.cnf
root@ubuntu:~# sed -i '/general_log/s/# //g' /etc/mysql/mysql.conf.d/mysqld.cnf
root@ubuntu:~# sed -i '/slow_query_log/s/# //g' /etc/mysql/mysql.conf.d/mysqld.cnf
root@ubuntu:~# sed -i '/server-id/s/# //' /etc/mysql/mysql.conf.d/mysqld.cnf
root@ubuntu:~# sed -i '/log_bin/s/# //' /etc/mysql/mysql.conf.d/mysqld.cnf
root@ubuntu:~# sed -i '/binlog_expire_logs_seconds/s/# //' /etc/mysql/mysql.conf.d/mysqld.cnf
root@ubuntu:~# sed -i '/max_binlog_size/s/100M/512M/' /etc/mysql/mysql.conf.d/mysqld.cnf
4)重启MySQL
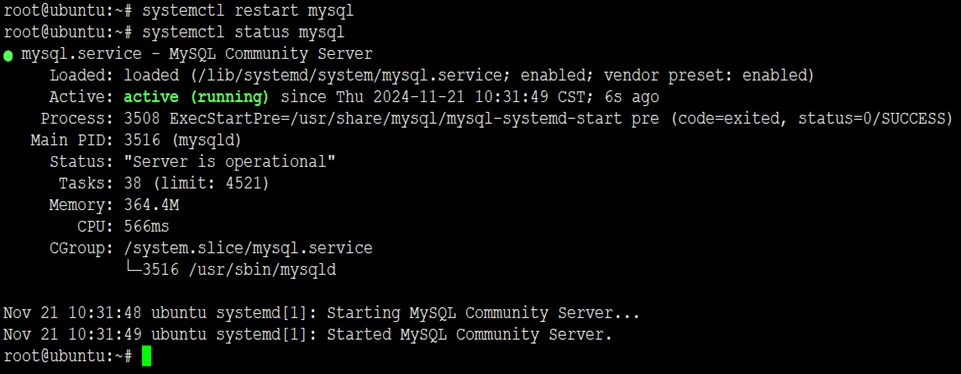
root@ubuntu:~# systemctl restart mysql
root@ubuntu:~# systemctl status mysql
5)配置root密码
root@ubuntu:~# mysql -u root 2>/dev/null -e "ALTER USER 'root'@'localhost' IDENTIFIED WITH mysql_native_password BY 'G7#Wv8eDQbwdEBCL';"
root@ubuntu:~# mysql -uroot -pG7#Wv8eDQbwdEBCL
mysql: [Warning] Using a password on the command line interface can be insecure.
Welcome to the MySQL monitor. Commands end with ; or \g.
Your MySQL connection id is 9
Server version: 8.0.40-0ubuntu0.22.04.1 (Ubuntu)
Copyright (c) 2000, 2024, Oracle and/or its affiliates.
Oracle is a registered trademark of Oracle Corporation and/or its
affiliates. Other names may be trademarks of their respective
owners.
Type 'help;' or '\h' for help. Type '\c' to clear the current input statement.
mysql>
6)常用基本操作
1、启动MySQL
root@ubuntu:~# systemctl start mysql
2、停止MySQL
root@ubuntu:~# systemctl stop mysql
3、重启MySQL
root@ubuntu:~# systemctl restart mysql
4、查询MySQL运行状态
root@ubuntu:~# systemctl status mysql
5、查询MySQL进程
root@ubuntu:~# ps -ef |grep mysql
6、查询MySQL监听端口
root@ubuntu:~# netstat -lntup |grep mysql
7、卸载MySQL
root@ubuntu:~# apt -y --purge autoremove mysql-server
2、安装MySQL(二进制)
1)安装依赖
root@ubuntu:~# apt -y update
root@ubuntu:~# apt -y install wget libncurses5 libnuma-dev
2)下载二进制软件包
root@ubuntu:~# wget https://mirrors.huaweicloud.com/mysql/Downloads/MySQL-8.0/mysql-8.0.29-linux-glibc2.12-x86_64.tar.xz
3)解压
root@ubuntu:~# tar xf mysql-8.0.29-linux-glibc2.12-x86_64.tar.xz
4)重命名
root@ubuntu:~# mv mysql-8.0.29-linux-glibc2.12-x86_64 /usr/local/mysql
5)创建用户和数据库日志目录
root@ubuntu:~# useradd -s /sbin/nologin mysql
root@ubuntu:~# mkdir -p /var/log/mysql
root@ubuntu:~# chown -R mysql:mysql /var/log/mysql
6)配置my.cnf
root@ubuntu:~# vim /etc/my.cnf
# 服务器端配置
[mysqld]
# 数据存储目录
datadir = /data/mysql
# socket通信文件
socket = /tmp/mysql.sock
# 使用Mysql用户启动
user = mysql
# Mysql服务运行的端口号
port = 3306
# 定义error错误文件
log-error = /var/log/mysql/mysql.log
# 开启bin-log日志
log-bin = mysql-bin
# Mysql服务ID号
server-id = 1
# 开启慢查询日志
slow_query_log = 1
# 慢查询日志记录时间为1秒
slow_launch_time = 1
# 定义慢查询日志文件
slow_query_log_file = /var/log/mysql/slow.log
# binlog日志过期清理时间
expire_logs_days = 5
# 定义binlog的模式为Mixed Level模式,默认为Statement Level
binlog_format = MIXED
# 设置binlog日志文件最大大小,达到512M,自动生成新的Binlog文件
max_binlog_size = 512M
# binlog缓存大小
binlog_cache_size = 256m
# 最大binlog缓存大小
max_binlog_cache_size = 512m
# 非事务语句缓存大小
binlog_stmt_cache_size = 256m
# PID文件路径
pid-file = mysqld.pid
# 最大连接数
max_connections = 5000
# 开启记录所有SQL语句记录
general_log = 1
# 记录所有SQL语句文件
general_log_file = /var/log/mysql/general.log
# 开启从库同步数据写入log-bin日志
log_slave_updates = 1
sql_mode=NO_ENGINE_SUBSTITUTION,STRICT_TRANS_TABLES
# 设置字符集为utf8
character-set-server = utf8
# 缓存区大小
innodb_buffer_pool_size = 1G
# 缓冲区实例个数
innodb_buffer_pool_instances = 2
sync_binlog = 0
[client]
default-character-set = utf8
port = 3306
socket = /tmp/mysql.sock
[mysql]
default-character-set = utf8
7)初始化数据库
root@ubuntu:~# mkdir -p /data/mysql
root@ubuntu:~# chown -R mysql:mysql /data/mysql
root@ubuntu:~# /usr/local/mysql/bin/mysqld --initialize-insecure --user=mysql --basedir=/usr/local/mysql --datadir=/data/mysql
root@ubuntu:~# ll /data/mysql/
8)创建软链接
root@ubuntu:~# ln -sf /usr/local/mysql/bin/mysql* /usr/bin
9)配置开机启动及启动MySQL
root@ubuntu:~# cp /usr/local/mysql/support-files/mysql.server /etc/init.d/mysql
root@ubuntu:~# systemctl daemon-reload
root@ubuntu:~# systemctl start mysql
root@ubuntu:~# systemctl status mysql
10)设置root密码
root@ubuntu:~# mysql -u root 2>/dev/null -e "ALTER USER 'root'@'localhost' IDENTIFIED WITH mysql_native_password BY 'G7#Wv8eDQbwdEBCL';"
11)登录MySQL
root@ubuntu:~# mysql -uroot -pG7#Wv8eDQbwdEBCL
mysql: [Warning] Using a password on the command line interface can be insecure.
Welcome to the MySQL monitor. Commands end with ; or \g.
Your MySQL connection id is 11
Server version: 8.0.29 MySQL Community Server - GPL
Copyright (c) 2000, 2022, Oracle and/or its affiliates.
Oracle is a registered trademark of Oracle Corporation and/or its
affiliates. Other names may be trademarks of their respective
owners.
Type 'help;' or '\h' for help. Type '\c' to clear the current input statement.
mysql> select version();
+-----------+
| version() |
+-----------+
| 8.0.29 |
+-----------+
1 row in set (0.00 sec)
继续阅读
历史上的今天
11 月
21
 51工具盒子


