一、Prometheus告警简介
告警能力在Prometheus的架构中被划分成两个独立的部分。如下所示,通过在Prometheus中定义AlertRule(告警规则),Prometheus会周期性的对告警规则进行计算,如果满足告警触发条件就会向Alertmanager发送告警信息。
 文章源自小柒网-https://www.yangxingzhen.cn/9070.html
在Prometheus中一条告警规则主要由以下几部分组成:
文章源自小柒网-https://www.yangxingzhen.cn/9070.html
告警名称:用户需要为告警规则命名,当然对于命名而言,需要能够直接表达出该告警的主要内容
文章源自小柒网-https://www.yangxingzhen.cn/9070.html
告警规则:告警规则实际上主要由PromQL进行定义,其实际意义是当表达式(PromQL)查询结果持续多长时间(During)后出发告警
文章源自小柒网-https://www.yangxingzhen.cn/9070.html
在Prometheus中,还可以通过Group(告警组)对一组相关的告警进行统一定义。当然这些定义都是通过YAML文件来统一管理的。
文章源自小柒网-https://www.yangxingzhen.cn/9070.html
Alertmanager作为一个独立的组件,负责接收并处理来自Prometheus Server(也可以是其它的客户端程序)的告警信息。Alertmanager可以对这些告警信息进行进一步的处理,比如当接收到大量重复告警时能够消除重复的告警信息,同时对告警信息进行分组并且路由到正确的通知方,Prometheus内置了对邮件,Slack等多种通知方式的支持,同时还支持与Webhook的集成,以支持更多定制化的场景。
文章源自小柒网-https://www.yangxingzhen.cn/9070.html
例如,目前Alertmanager还不支持钉钉,那用户完全可以通过Webhook与钉钉机器人进行集成,从而通过钉钉接收告警信息。同时AlertManager还提供了静默和告警抑制机制来对告警通知行为进行优化。
文章源自小柒网-https://www.yangxingzhen.cn/9070.html
二、Alertmanager特性
告警能力在Prometheus的架构中被划分成两个独立的部分。如下所示,通过在Prometheus中定义AlertRule(告警规则),Prometheus会周期性的对告警规则进行计算,如果满足告警触发条件就会向Alertmanager发送告警信息。
文章源自小柒网-https://www.yangxingzhen.cn/9070.html
 文章源自小柒网-https://www.yangxingzhen.cn/9070.html
1、分组
分组机制可以将详细的告警信息合并成一个通知。在某些情况下,比如由于系统宕机导致大量的告警被同时触发,在这种情况下分组机制可以将这些被触发的告警合并为一个告警通知,避免一次性接受大量的告警通知,而无法对问题进行快速定位。
文章源自小柒网-https://www.yangxingzhen.cn/9070.html
例如,当集群中有数百个正在运行的服务实例,并且为每一个实例设置了告警规则。假如此时发生了网络故障,可能导致大量的服务实例无法连接到数据库,结果就会有数百个告警被发送到Alertmanager。
而作为用户,可能只希望能够在一个通知中中就能查看哪些服务实例收到影响。这时可以按照服务所在集群或者告警名称对告警进行分组,而将这些告警内聚在一起成为一个通知。
告警分组,告警时间,以及告警的接受方式可以通过Alertmanager的配置文件进行配置。
2、抑制
抑制是指当某一告警发出后,可以停止重复发送由此告警引发的其它告警的机制。
例如,当集群不可访问时触发了一次告警,通过配置Alertmanager可以忽略与该集群有关的其它所有告警。这样可以避免接收到大量与实际问题无关的告警通知。
抑制机制同样通过Alertmanager的配置文件进行设置。
3、静默
静默提供了一个简单的机制可以快速根据标签对告警进行静默处理。如果接收到的告警符合静默的配置,Alertmanager则不会发送告警通知。
静默设置需要在Alertmanager的Werb页面上进行设置。
Prometheus本身不支持告警功能,主要通过插件alertmanage来实现告警。AlertManager用于接收Prometheus发送的告警并对于告警进行一系列的处理后发送给指定的用户。
Prometheus触发一条告警的过程:
prometheus--->触发阈值--->超出持续时间--->alertmanager--->分组|抑制|静默--->媒体类型--->邮件|钉钉|微信等。
三、实现钉钉告警
1)登录钉钉
2)创建机器人
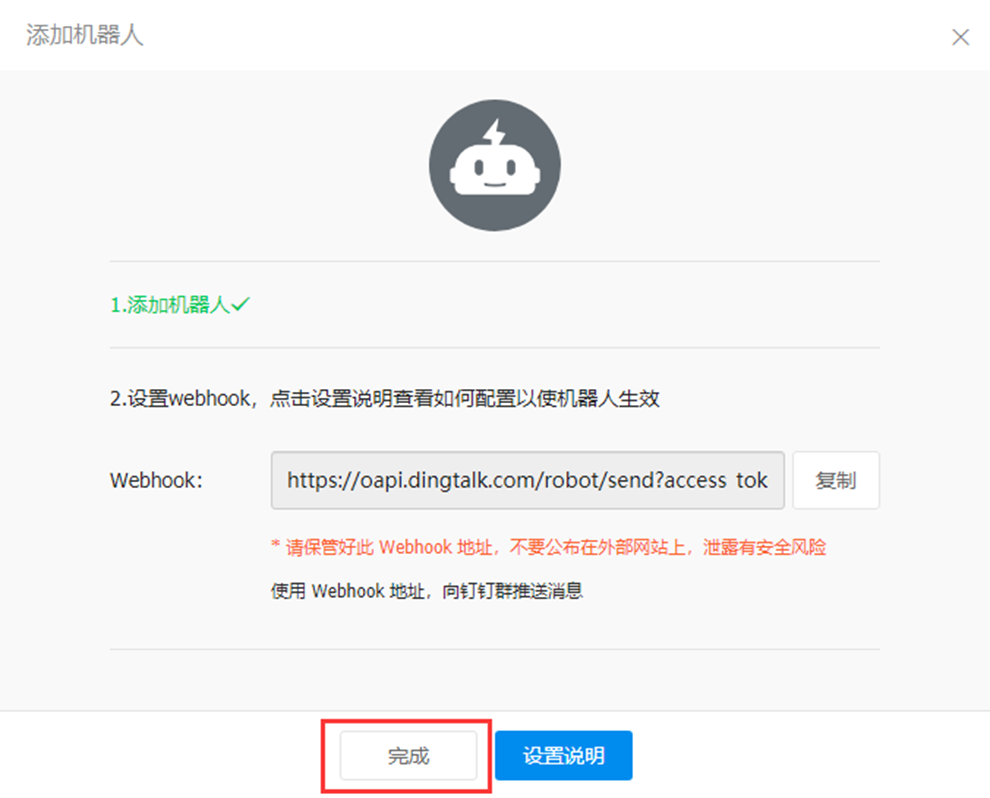
3)获取钉钉token
4)配置钉钉webhook
5)dingtalk插件下载
1、dingtalk插件下载
1)下载插件
[root@localhost ~]# wget https://github.com/timonwong/prometheus-webhook-dingtalk/releases/download/v2.1.0/prometheus-webhook-dingtalk-2.1.0.linux-amd64.tar.gz
2)解压
[root@localhost ~]# tar xf prometheus-webhook-dingtalk-2.1.0.linux-amd64.tar.gz
3)重命名
[root@localhost ~]# mv prometheus-webhook-dingtalk-2.1.0.linux-amd64 /usr/local/dingtalk
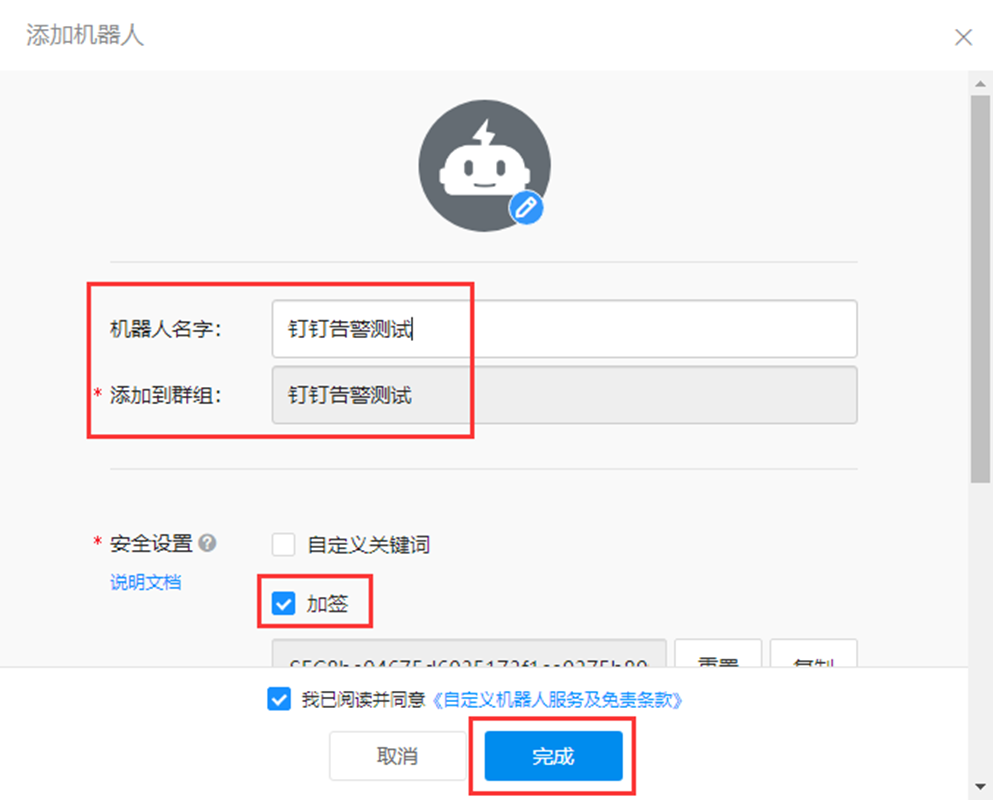
4)获取钉钉机器人
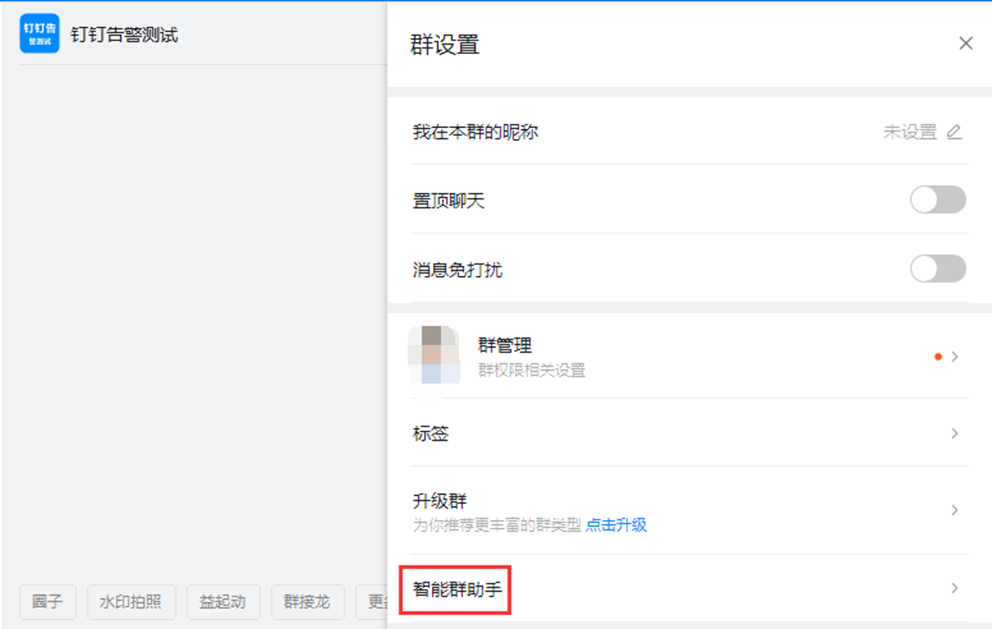
1、钉钉选择群组 ---> 群设置 ---> 智能群助手
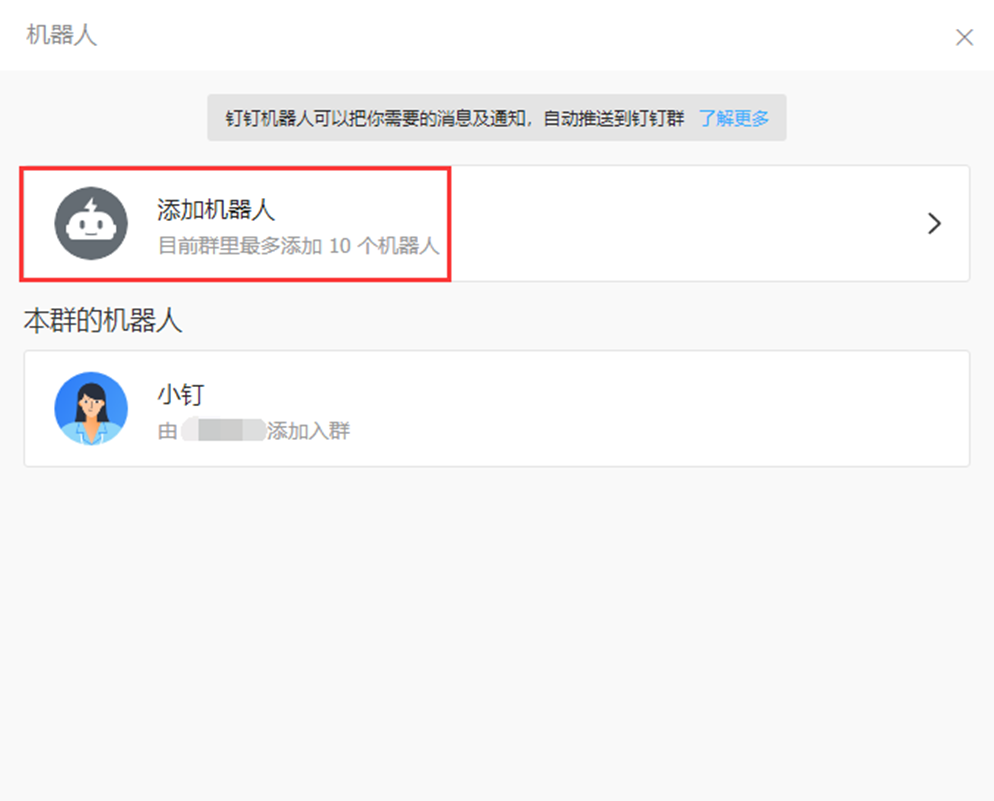
2、添加机器人
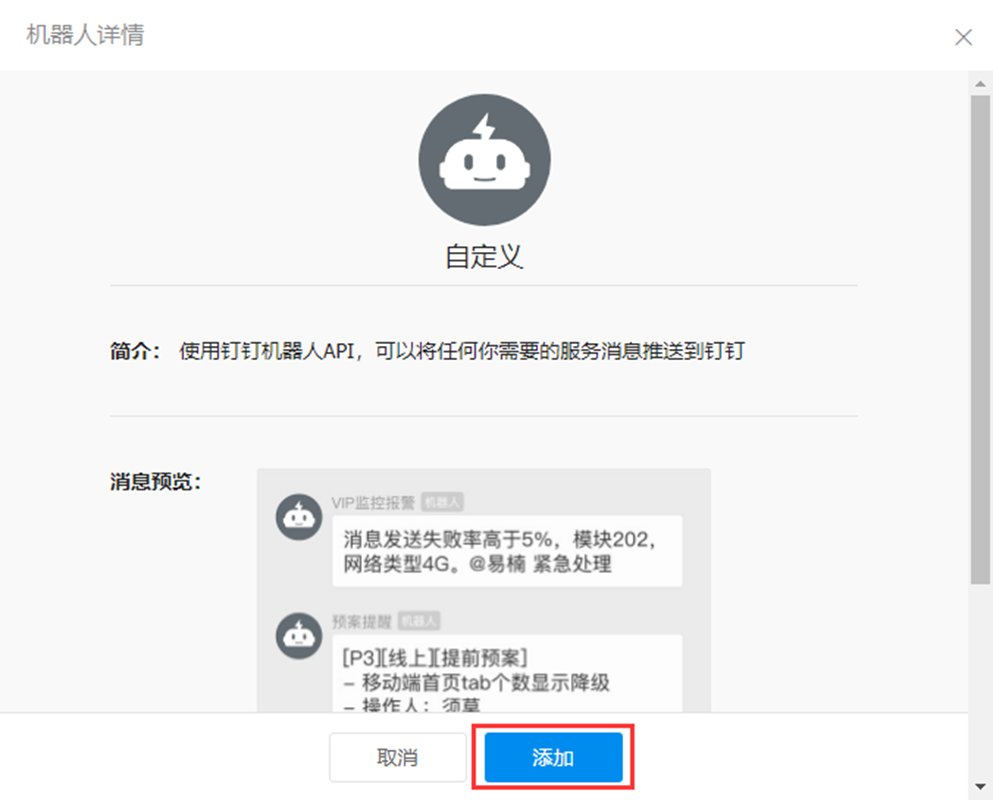
3、选择自定义
4、输入机器人名字、群组、安全设置
5)配置config.yml
[root@localhost ~]# cd /usr/local/dingtalk
[root@localhost dingtalk]# cp config.example.yml config.yml
[root@localhost dingtalk]# vim config.yml
## Request timeout
# timeout: 5s

Uncomment following line in order to write template from scratch (be careful!)
------------------------------------------------------------------------------


#no_builtin_template: true


Customizable templates path
---------------------------


templates:


* '/usr/local/dingtalk/template/dingtalk.tmpl'


You can also override default template using `default_message`
--------------------------------------------------------------


The following example to use the 'legacy' template from v0.3.0
--------------------------------------------------------------


#default_message:


title: '{{ template "legacy.title" . }}'
========================================


text: '{{ template "legacy.content" . }}'
=========================================


Targets, previously was known as "profiles"
-------------------------------------------


targets:
webhook:
url: https://oapi.dingtalk.com/robot/send?access_token=输入自己的Token
# secret for signature
secret: 加签内容
6)配置告警模版
[root@localhost dingtalk]# mkdir /usr/local/dingtalk/template
[root@localhost dingtalk]# vim /usr/local/dingtalk/template/dingtalk.tmpl
{{ define "__subject" }}
[{{ .Status | toUpper }}{{ if eq .Status "firing" }}:{{ .Alerts.Firing | len }}{{ end }}]
{{ end }}

{{ define "__alert_list" }}{{ range . }}
----------------------------------------


{{ if .Labels.owner }}@{{ .Labels.owner }}{{ end }}


告警状态:{{ .Status }}


告警级别:{{ .Labels.severity }}


告警类型:{{ .Labels.alertname }}


告警主机:{{ .Labels.instance }}


告警详情:{{ .Annotations.description }}


告警时间:{{ (.StartsAt.Add 28800e9).Format "2006-01-02 15:04:05" }}
{{ end }}{{ end }}


{{ define "__resolved_list" }}{{ range . }}
-------------------------------------------


{{ if .Labels.owner }}@{{ .Labels.owner }}{{ end }}
告警状态:{{ .Status }}


告警级别:{{ .Labels.severity }}


告警类型:{{ .Labels.alertname }}


告警主机:{{ .Labels.instance }}


告警详情:{{ .Annotations.description }}


告警时间:{{ (.StartsAt.Add 28800e9).Format "2006-01-02 15:04:05" }}


恢复时间:{{ (.EndsAt.Add 28800e9).Format "2006-01-02 15:04:05" }}
{{ end }}{{ end }}


{{ define "default.title" }}
{{ template "__subject" . }}
{{ end }}


{{ define "default.content" }}
{{ if gt (len .Alerts.Firing) 0 }}
**Prometheus故障告警**
{{ template "__alert_list" .Alerts.Firing }}
---------------------------------------------------------------------------------------------------------------------------------


{{ end }}


{{ if gt (len .Alerts.Resolved) 0 }}
Prometheus故障恢复
{{ template "__resolved_list" .Alerts.Resolved }}
{{ end }}
{{ end }}


{{ define "ding.link.title" }}{{ template "default.title" . }}{{ end }}
{{ define "ding.link.content" }}{{ template "default.content" . }}{{ end }}
{{ template "default.title" . }}
{{ template "default.content" . }}
7)配置系统服务
[root@localhost dingtalk]# vim /usr/lib/systemd/system/prometheus-webhook-dingtalk.service
[Unit]
Description=prometheus-webhook-dingtalk
After=network-online.target

\[Service\]
Type=simple
ExecStart=/usr/local/dingtalk/prometheus-webhook-dingtalk --config.file=/usr/local/dingtalk/config.yml
Restart=on-failure


\[Install\]
WantedBy=multi-user.target
8)启动dingtalk
[root@localhost dingtalk]# systemctl daemon-reload
[root@localhost dingtalk]# systemctl start prometheus-webhook-dingtalk
[root@localhost dingtalk]# systemctl enable prometheus-webhook-dingtalk
2、安装Node_Exporter
1)下载安装包
[root@localhost dingtalk]# cd ~ && wget https://github.com/prometheus/node_exporter/releases/download/v1.5.0/node_exporter-1.5.0.linux-amd64.tar.gz
2)解压
[root@localhost ~]# tar xf node_exporter-1.5.0.linux-amd64.tar.gz
3)重命名
[root@localhost ~]# mv node_exporter-1.5.0.linux-amd64 /usr/local/node_exporter
4)配置系统服务
[root@localhost ~]# vim /usr/lib/systemd/system/node_exporter.service
[Unit]
Description=node_exporter
Documentation=https://prometheus.io/
After=network.target

\[Service\]
Type=simple
User=root
ExecStart=/usr/local/node_exporter/node_exporter
Restart=on-failure


\[Install\]
WantedBy=multi-user.target
5)启动Node_Exporter
[root@localhost ~]# systemctl daemon-reload
[root@localhost ~]# systemctl enable node_exporter
[root@localhost ~]# systemctl start node_exporter
3、安装Prometheus
1)下载软件包
[root@localhost ~]# wget https://github.com/prometheus/prometheus/releases/download/v2.37.6/prometheus-2.37.6.linux-amd64.tar.gz
2)解压
[root@localhost ~]# tar xf prometheus-2.37.6.linux-amd64.tar.gz
3)重命名
[root@localhost ~]# mv prometheus-2.37.6.linux-amd64 /usr/local/prometheus
4)配置Prometheus
[root@localhost ~]# vim /usr/local/prometheus/prometheus.yml
global:
alerting:
  alertmanagers:
    - static_configs:
        - targets:
           - '192.168.11.199:9093'
rule_files:
  - 'rules/node.yml'
scrape_configs:
  - job_name: "node-exporter"
    static_configs:
      - targets:
        - "192.168.11.199:9100"
5)配置告警规则
[root@localhost ~]# mkdir /usr/local/prometheus/rules
[root@localhost ~]# vim /usr/local/prometheus/rules/node.yml
groups:
- name: Node Resource Monitoring
  rules:
  - alert: Node实例已宕机
    expr: up{instance =~ ".*:9100"} == 0
    for: 15s
    labels:
      user: root
      severity: Emergency
    annotations:
      summary: "{{ $labels.instance }} 客户端已停止运行,请尽快处理!"
      description: "Node_exporter客户端已停止运行超过15s,当前状态:{{ $value }} "
6)创建启动文件
[root@localhost ~]# vim /usr/lib/systemd/system/prometheus.service
[Unit]
Description=prometheus
Documentation=https://prometheus.io/docs/introduction/overview
Wants=network-online.target
After=network.target

\[Service\]
Type=simple
User=root
ExecStart=/usr/local/prometheus/prometheus --config.file=/usr/local/prometheus/prometheus.yml --web.enable-lifecycle
ExecReload=/bin/kill -HUP $MAINPID
ExecStop=/bin/kill -s SIGTERM $MAINPID
Restart=on-failure


\[Install\]
WantedBy=multi-user.target
7)启动Prometheus
[root@localhost ~]# systemctl daemon-reload
[root@localhost ~]# systemctl start prometheus
[root@localhost ~]# systemctl enable prometheus.service
4、安装Alertmanager
1)下载Alertmanager
[root@localhost ~]# wget https://github.com/prometheus/alertmanager/releases/download/v0.25.0/alertmanager-0.25.0.linux-amd64.tar.gz
2)解压
[root@localhost ~]# tar xf alertmanager-0.25.0.linux-amd64.tar.gz
3)重命名
[root@localhost ~]# mv alertmanager-0.25.0.linux-amd64 /usr/local/alertmanager
4)创建启动文件
[root@localhost ~]# vim /usr/lib/systemd/system/alertmanager.service
[Unit]
Description=alertmanager
Documentation=https://github.com/prometheus/alertmanager
After=network.target

\[Service\]
Type=simple
User=root
ExecStart=/usr/local/alertmanager/alertmanager --config.file=/usr/local/alertmanager/alertmanager.yml
Restart=on-failure


\[Install\]
WantedBy=multi-user.target
5)配置alertmanager.yml文件
Alertmanager安装目录下默认有alertmanager.yml配置文件,可以创建新的配置文件,在启动时指定即可。
[root@localhost ~]# vim /usr/local/alertmanager/alertmanager.yml
global:
  # 每2分钟检查一次是否恢复
  resolve_timeout: 2m
# route用来设置报警的分发策略
route:
  # 采用哪个标签来作为分组依据
  group_by: ['alertname']
  # 组告警等待时间。也就是告警产生后等待10s,如果有同组告警一起发出
  group_wait: 10s
  # 两组告警的间隔时间
  group_interval: 10s
  # 重复告警的间隔时间,减少相同微信告警的发送频率
  repeat_interval: 1h
  # 设置默认接收人
  receiver: 'webhook'
receivers:
- name: 'webhook'
  webhook_configs:
  - url: 'http://localhost:8060/dingtalk/webhook/send'
    send_resolved: true
6)启动Alertmanager
[root@localhost ~]# systemctl daemon-reload
[root@localhost ~]# systemctl start alertmanager
[root@localhost ~]# systemctl enable alertmanager
5、验证钉钉告警
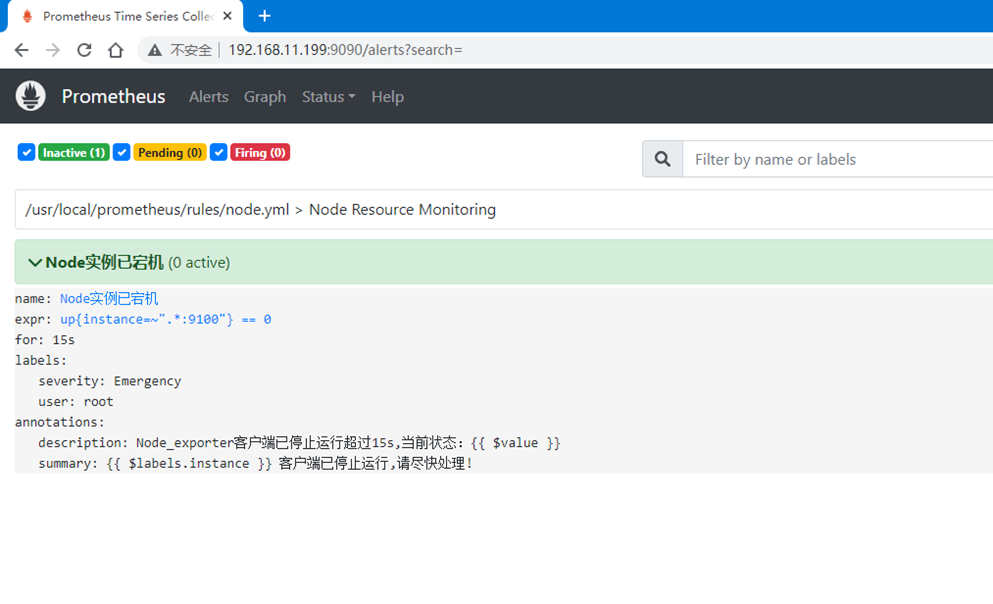
浏览器访问Prometheus管理界面可以看到如下信息:
1)模拟停止node_exporter服务,触发钉钉告警
[root@localhost ~]# systemctl stop node_exporter
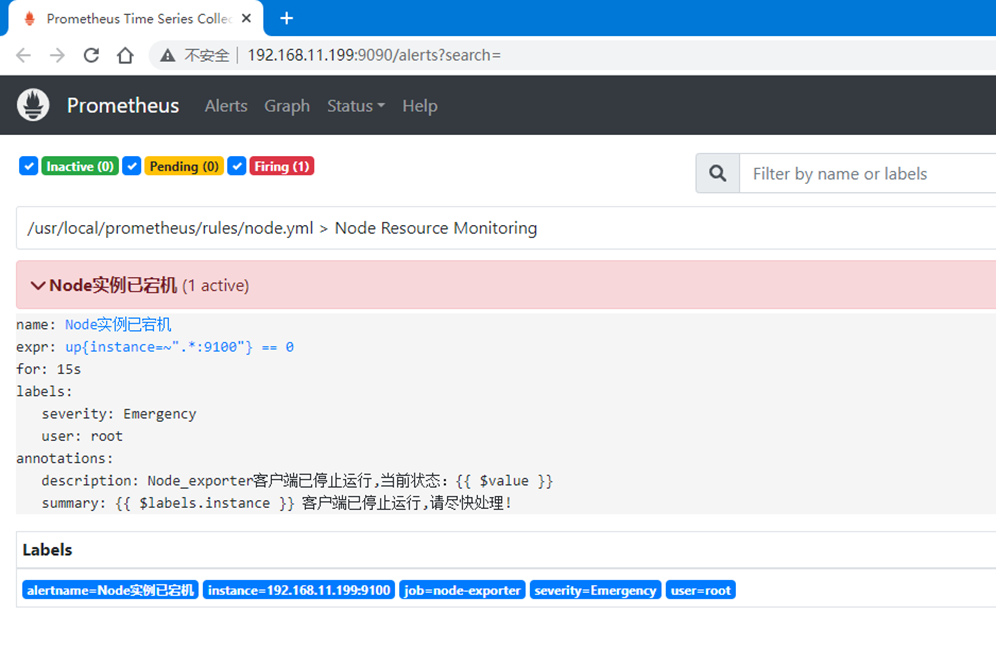
2)再次查看Prometheus界面的Alerts可以看到告警状态。
绿色表示正常。
黄色状态为PENDING表示Alerts还没有发送至Alertmanager,因为rules里面配置了for: 15s。
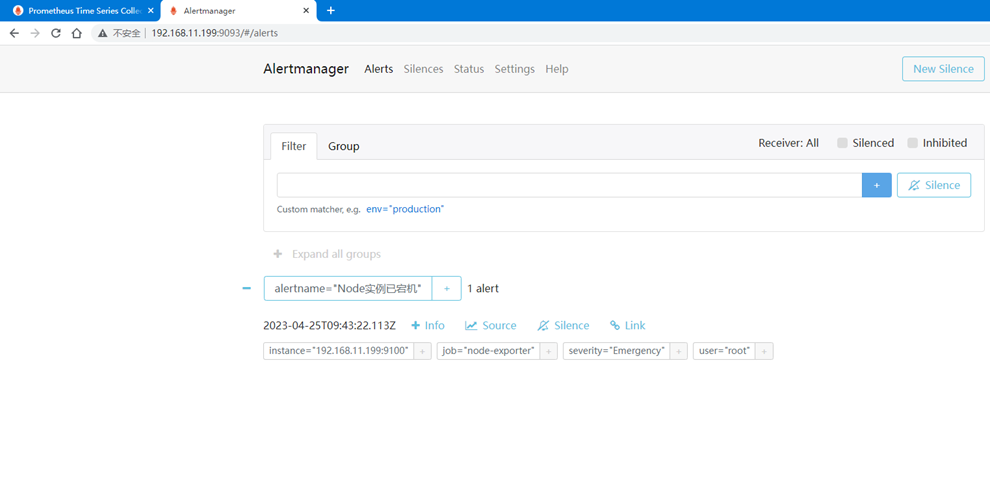
15秒后状态由PENDING变为FIRING,此时Prometheus才将告警发给alertmanager,在Alertmanager中可以看到有一个alert。
3)查看Alertmanager
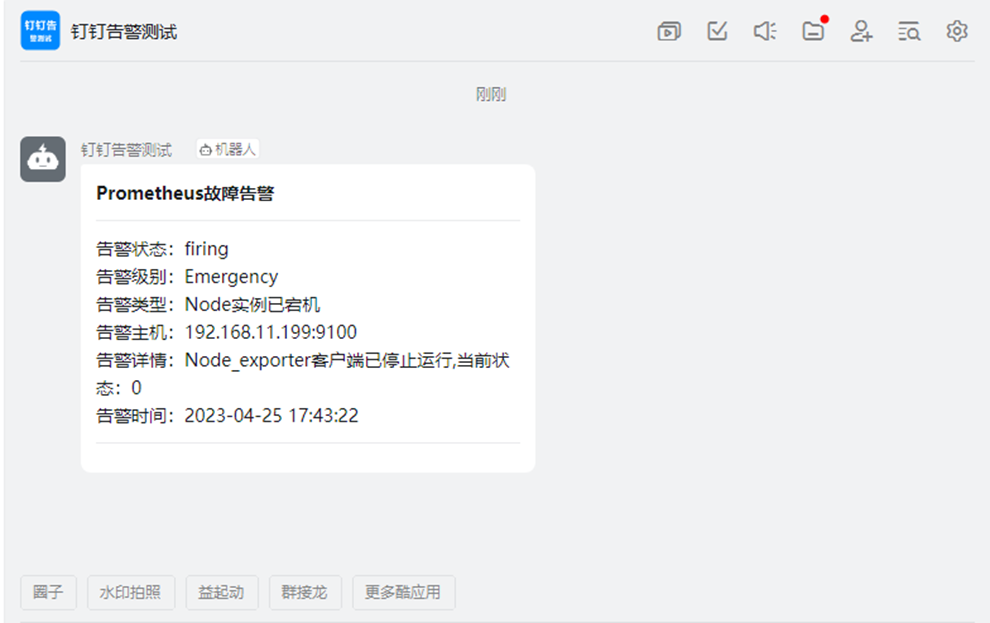
4)查看钉钉告警信息
5)再次启动node_exporter
[root@localhost ~]# systemctl start node_exporter
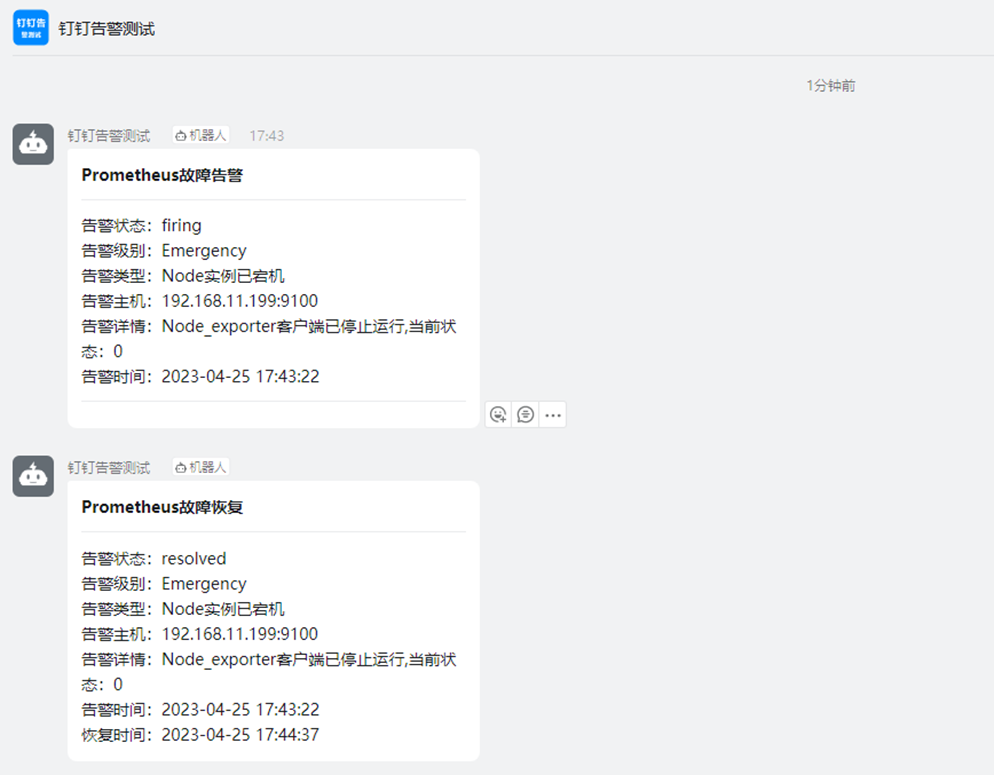
6)再次查看钉钉会收到恢复信息
附:
CPU使用率告警规则:
groups:
- name: CPU
  rules:
  - alert: CPU使用率过高
    expr: (100 - (avg by (instance) (irate(node_cpu{mode="idle"}[5m])) * 100)) > 80
    for: 1m
    labels:
    severity: Warning
      annotations:
    summary: "{{ $labels.instance }} CPU使用率过高"
      description: "{{ $labels.instance }}: CPU使用率超过80%,当前使用率({{ $value }})."
内存使用率告警规则:
groups:
- name: Memory
  rules:
  - alert: 内存使用率过高
    expr: (node_memory_MemTotal - (node_memory_MemFree+node_memory_Buffers+node_memory_Cached )) / node_memory_MemTotal * 100 > 80
    for: 1m  # 告警持续时间,超过这个时间才会发送给alertmanager
    labels:
      severity: Warning
    annotations:
      summary: "{{ $labels.instance }} 内存使用率过高"
      description: "{{ $labels.instance }}:内存使用率超过80%,当前使用率({{ $value }})."
继续阅读 Prometheus最后更新:2023-4-27
 51工具盒子




![[JavaScript学习]JavaScript文档对象模型-DOM2级样式](http://static.51tbox.com/static/2024-11-23/col/77e29788959fd092c523a3ce7afd1d52/57acf7c1e2484e0680744299a8930873.png.jpg)

