一、Consul简介
Consul是由HashiCorp基于Go语言开发的支持多数据中心的分布式高可用服务发布和注册软件, 采用Raft算法保持服务的一致性, 且支持健康检查,Consul和Eureka的侵入式服务中心不同的是, Consul是以独立的软件形式运行, 对项目侵入性小, 更方便部署。
Consul是微服务架构中,解决服务发现、配置中心的分布式中间件。
文章源自小柒网-https://www.yangxingzhen.cn/8975.html
二、Consul特性
- 服务发现:解决在分布式环境中,如何找到可用的服务地址的问题,支持通过DNS和HTTP查询服务地址。
- 健康检查:定时监控服务是否正常,对于异常的服务会主动下线。
- 键值存储:配置中心解决方案,是一种key/value存储结构,区别就是key是以目录树结构形式组织的,可以用来存储系统配置信息。
- 多数据中心:支持多数据中心部署。
三、Consul架构
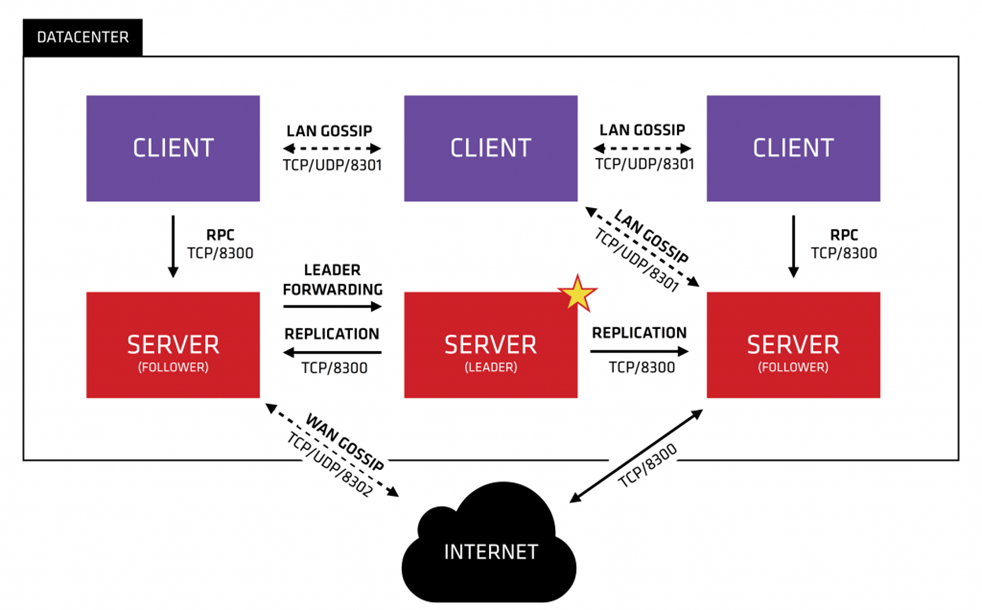
consul是分布式、高可用的系统,下图是单数据中心的部署架构。
文章源自小柒网-https://www.yangxingzhen.cn/8975.html
 文章源自小柒网-https://www.yangxingzhen.cn/8975.html
说明:
文章源自小柒网-https://www.yangxingzhen.cn/8975.html
consul主要有server和client两种组件组成。
文章源自小柒网-https://www.yangxingzhen.cn/8975.html
server负责核心数据的存储和处理请求,server可以部署多个实例(通常推荐3-5个),server只有一个实例是leader实例,就是主节点,主节点是自动选举产生的,主节点负责处理数据的写入处理,同时将数据同步至其他server节点。
文章源自小柒网-https://www.yangxingzhen.cn/8975.html
client负责跟server通信,处理转发服务注册、服务发现请求到server节点,client还负责服务的健康检查,client节点也可以部署多个实例,甚至每个微服务节点都部署一个client实例。
文章源自小柒网-https://www.yangxingzhen.cn/8975.html
四、Consul单机部署
1、安装Consul
文章源自小柒网-https://www.yangxingzhen.cn/8975.html
[root@localhost ~]# yum install -y yum-utils
文章源自小柒网-https://www.yangxingzhen.cn/8975.html
[root@localhost ~]# yum-config-manager --add-repo https://rpm.releases.hashicorp.com/RHEL/hashicorp.repo
文章源自小柒网-https://www.yangxingzhen.cn/8975.html
[root@localhost ~]# yum -y install consul
2、查看Consul是否安装成功
[root@localhost ~]# consul version
Consul v1.15.2
Revision 5e08e229
Build Date 2023-03-30T17:51:19Z
Protocol 2 spoken by default, understands 2 to 3 (agent will automatically use protocol >2 when speaking to compatible agents)
3、配置Consul
[root@localhost ~]# vim /etc/consul.d/consul.hcl
# 数据中心名称
datacenter = "consul-cluster"
# 数据目录
data_dir = "/opt/consul"
# 指定客户端访问的IP,0.0.0.0不限制客户端IP
client_addr = "0.0.0.0"
# 开启UI
ui_config{
  enabled = true
}
# Agent以服务端模式启动(注册中心)
server = true
# 监听所有地址
bind_addr = "0.0.0.0"
# 部署1个server节点
bootstrap_expect=1
4、启动Consul
[root@localhost ~]# systemctl start consul
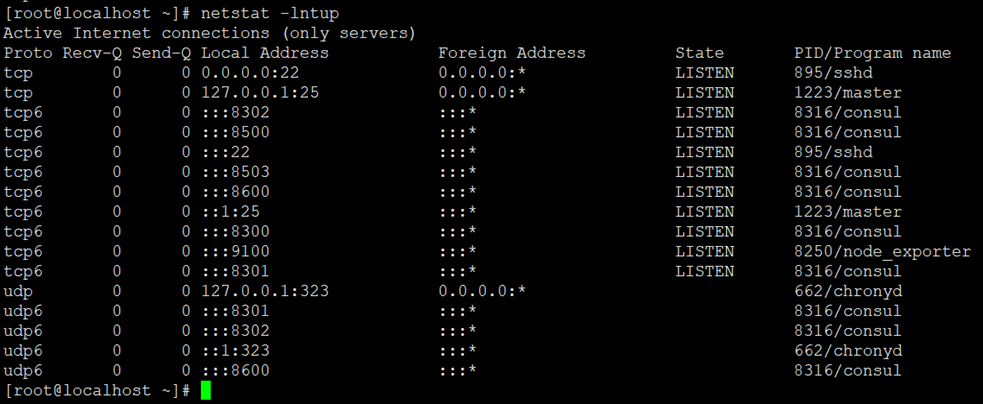
[root@localhost ~]# netstat -lntup
5、访问Consul
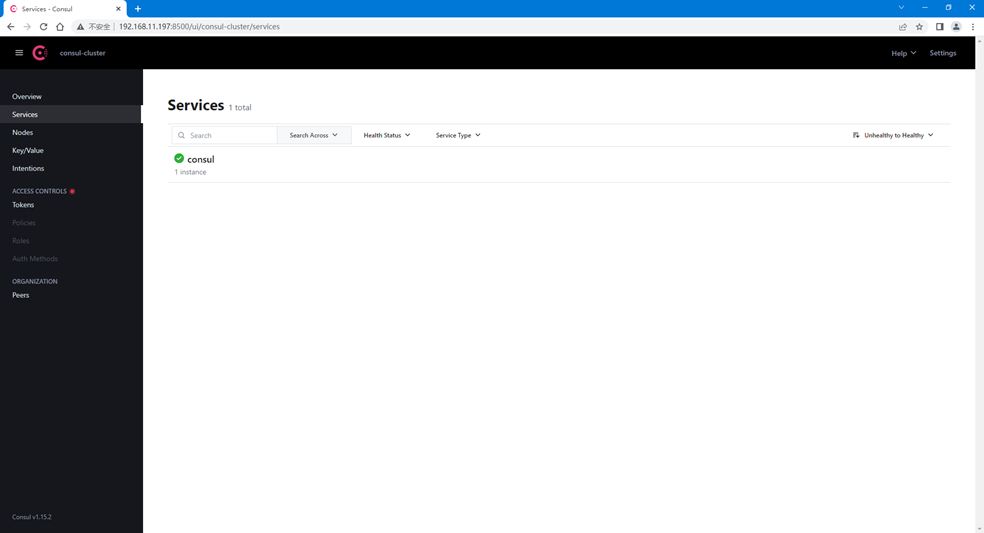
浏览器访问http://192.168.11.197:8500/,如下图所示
6、基本命令
1)查询集群节点
[root@localhost ~]# consul members
Node Address Status Type Build Protocol DC Partition Segment
localhost.localdomain 192.168.11.197:8301 alive server 1.15.2 2 consul-cluster default <all>
2)重新加载配置文件
[root@localhost ~]# consul reload
3)优雅关闭节点
[root@localhost ~]# consul leave
注意:优雅的关闭当前机器上的节点,如果你有多个节点,需要每个节点都要执行关闭命令,否则只是关闭机器中的一个节点。
4)查询所有注册的服务
[root@localhost ~]# consul catalog services
5)加入集群
[root@localhost ~]# consul join 192.168.11.197
五、Consul集群部署
1、集群部署环境准备
|----|----------------|-----------------|-------| | 序号 | IP地址 | 操作系统 | 主机名 | | 1 | 192.168.11.197 | CentOS 7.9.2009 | node1 | | 2 | 192.168.11.198 | CentOS 7.9.2009 | node2 | | 3 | 192.168.11.199 | CentOS 7.9.2009 | node3 |
2、主机名配置(所有节点执行)
[root@localhost ~]# hostnamectl set-hostname node1
[root@localhost ~]# hostnamectl set-hostname node2
[root@localhost ~]# hostnamectl set-hostname node3
3、安装Consul(所有节点执行)
[root@node1 ~]# yum install -y yum-utils
[root@node2 ~]# yum-config-manager --add-repo https://rpm.releases.hashicorp.com/RHEL/hashicorp.repo
[root@node3 ~]# yum -y install consul
4、查看Consul是否安装成功(所有节点执行)
[root@node1 ~]# consul version
Consul v1.15.2
Revision 5e08e229
Build Date 2023-03-30T17:51:19Z
Protocol 2 spoken by default, understands 2 to 3 (agent will automatically use protocol >2 when speaking to compatible agents)
5、配置Consul(所有server节点执行)
[root@node1 ~]# vim /etc/consul.d/consul.hcl
# 数据中心名称
datacenter = "consul-cluster"
# 数据目录
data_dir = "/opt/consul"
# 指定客户端访问的IP,0.0.0.0不限制客户端IP
client_addr = "0.0.0.0"
# 开启UI
ui_config{
  enabled = true
}
# Agent以服务端模式启动(注册中心)
server = true
# 监听所有地址
bind_addr = "0.0.0.0"
# 部署3个server节点
bootstrap_expect=3
6、启动Consul(所有节点执行)
[root@node1 ~]# systemctl start consul
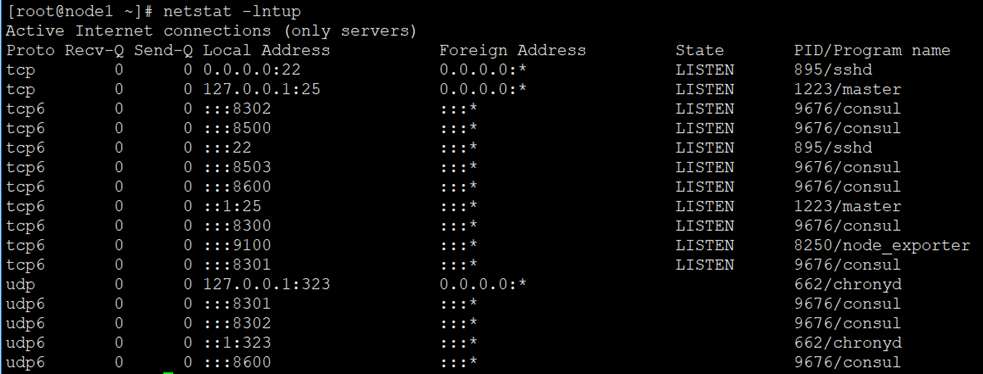
[root@node1 ~]# netstat -lntup
7、指定主节点(所有server节点执行)
[root@node1 ~]# consul join 192.168.11.197
8、查看集群状态
[root@node1 ~]# consul members
9、访问Consul(任意server节点)
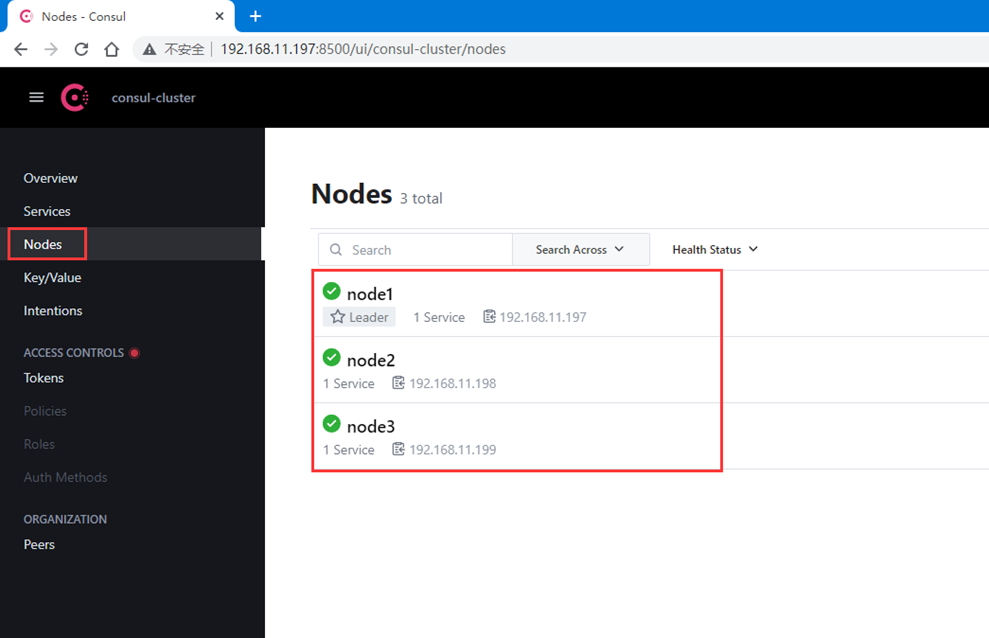
浏览器访问http://192.168.11.197:8500/,如下图所示
10、模拟主节点故障自动切换
第一种方式:
1、停止consul
[root@node1 ~]# systemctl stop consul
2、查询集群状态
[root@node2 ~]# consul members
从集群状态可以看出,node1主节点的状态变成left。
3、访问Consul
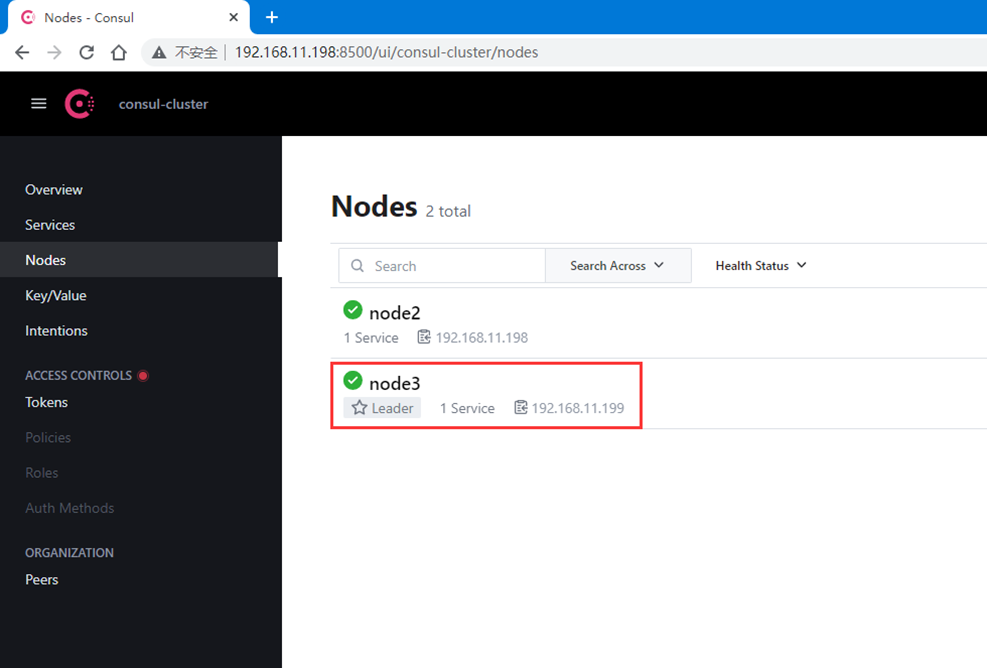
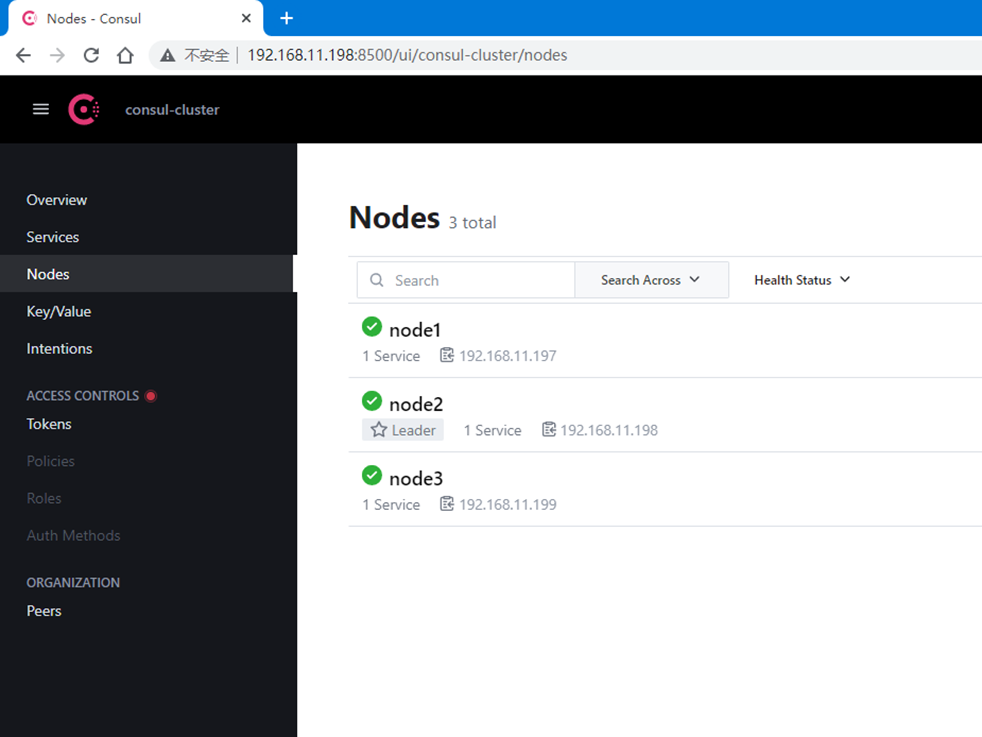
浏览器访问http://192.168.11.198:8500/,如下图所示
从上图看出,目前leader已经自动切换成node3。
4、重新启动consul自动加入集群
[root@node1 ~]# systemctl start consul
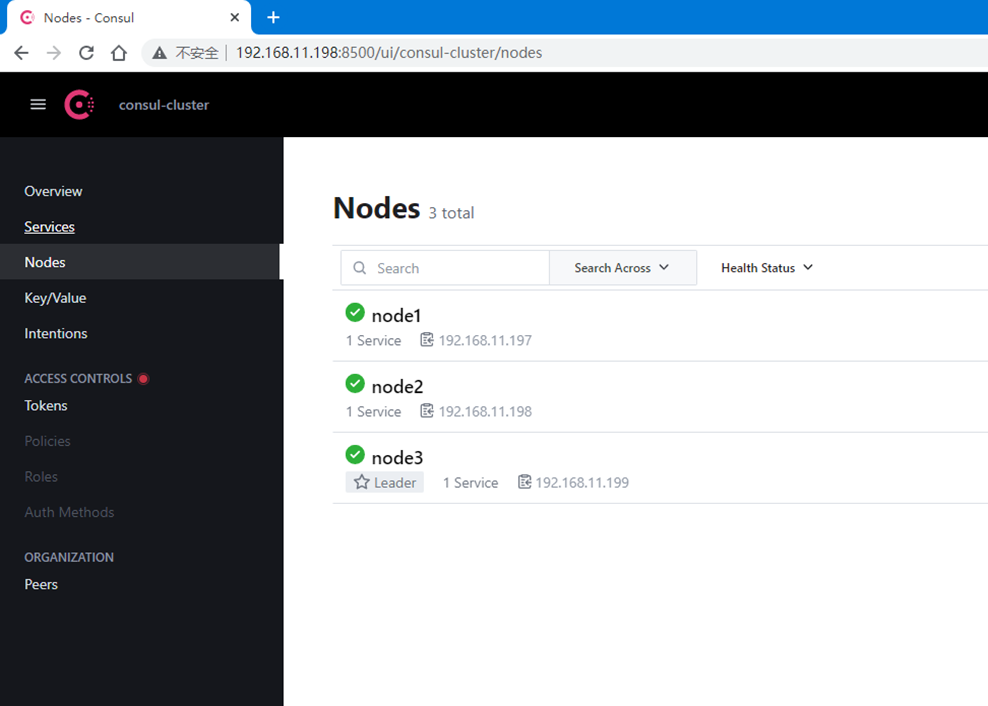
5、再次访问Consul
浏览器访问http://192.168.11.198:8500/,如下图所示
第二种方式:
1、优雅停止consul
[root@node3 ~]# consul leave
Graceful leave complete
2、查询集群状态
[root@node2 ~]# consul members
从集群状态可以看出,node3主节点的状态变成left。
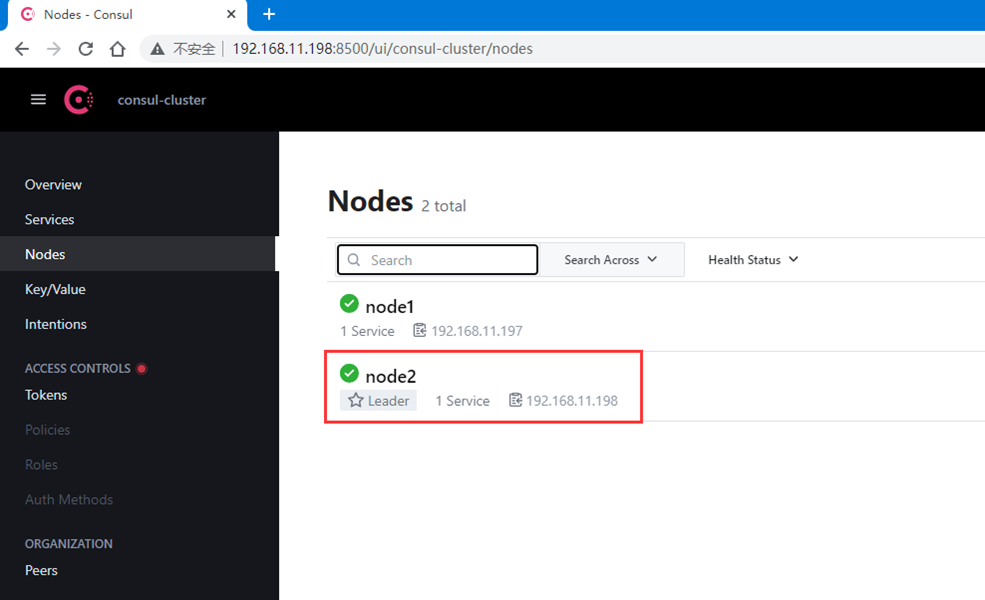
3、访问Consul
浏览器访问http://192.168.11.198:8500/,如下图所示
从上图看出,目前leader已经自动切换成node2。
4、重新启动consul
[root@node3 ~]# systemctl start consul
5、再次访问Consul
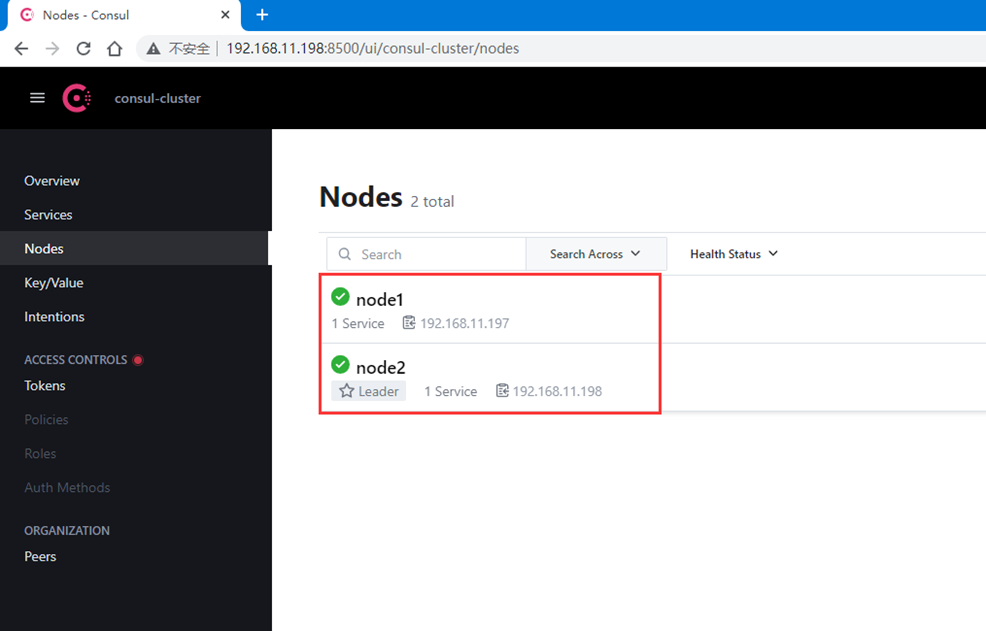
浏览器访问http://192.168.11.198:8500/,如下图所示
从上图可以看出,重新启动consul后并不会自动加入集群。
6、手动加入集群
[root@node3 ~]# consul join 192.168.11.198
Successfully joined cluster by contacting 1 nodes.
7、查看集群状态
[root@node2 ~]# consul members
8、再次访问Consul
浏览器访问http://192.168.11.198:8500/,如下图所示
总结:综上所述,经过对比这两种关闭方式,优雅停止会自动移出集群(重新启动需要手动加入集群(持续观察5分钟也没有加入,日志也一直提示'No cluster leader')),直接stop停止,重新启动后会自动加入原有集群。
11、基本命令
1)查询集群状态
[root@localhost ~]# consul members
2)重新加载配置文件
[root@localhost ~]# consul reload
3)优雅关闭节点
[root@localhost ~]# consul leave
注意:优雅的关闭当前机器上的节点,如果你有多个节点,需要每个节点都要执行关闭命令,否则只是关闭机器中的一个节点。
4)查询所有注册的服务
[root@localhost ~]# consul catalog services
5)加入集群
[root@localhost ~]# consul join 192.168.11.197
继续阅读
Consul
 51工具盒子