一、lnmp简介
LNMP代表的就是:Linux系统下Nginx+MySQL+PHP这种网站服务器架构。
Linux是一类Unix计算机操作系统的统称,是目前最流行的免费操作系统。代表版本有:debian、centos、ubuntu、fedora、gentoo等。
文章源自小柒网-https://www.yangxingzhen.cn/8818.html
Nginx是一个高性能的HTTP和反向代理服务器,也是一个IMAP/POP3/SMTP代理服务器。
文章源自小柒网-https://www.yangxingzhen.cn/8818.html
Mysql是一个小型关系型数据库管理系统。
文章源自小柒网-https://www.yangxingzhen.cn/8818.html
PHP是一种在服务器端执行的嵌入HTML文档的脚本语言。
文章源自小柒网-https://www.yangxingzhen.cn/8818.html
这四种软件均为免费开源软件,组合到一起,成为一个免费、高效、扩展性强的网站服务系统。
文章源自小柒网-https://www.yangxingzhen.cn/8818.html
二、Zabbix简介
zabbix([`zæbiks])是一个基于WEB界面的提供分布式系统监视以及网络监视功能的企业级的开源解决方案。
文章源自小柒网-https://www.yangxingzhen.cn/8818.html
zabbix能监视各种网络参数,保证服务器系统的安全运营;并提供灵活的通知机制以让系统管理员快速定位/解决存在的各种问题。
文章源自小柒网-https://www.yangxingzhen.cn/8818.html
zabbix由2部分构成,zabbix server与可选组件zabbix agent。
文章源自小柒网-https://www.yangxingzhen.cn/8818.html
zabbix server可以通过SNMP、zabbix agent、ping端口监视等方法提供对远程服务器/网络状态的监视,数据收集等功能,它可以运行在Linux,Solaris,HP-UX,AIX,Free BSD,Open BSD,OS X等平台上。
文章源自小柒网-https://www.yangxingzhen.cn/8818.html
三、Centos 7安装lnmp、zabbix
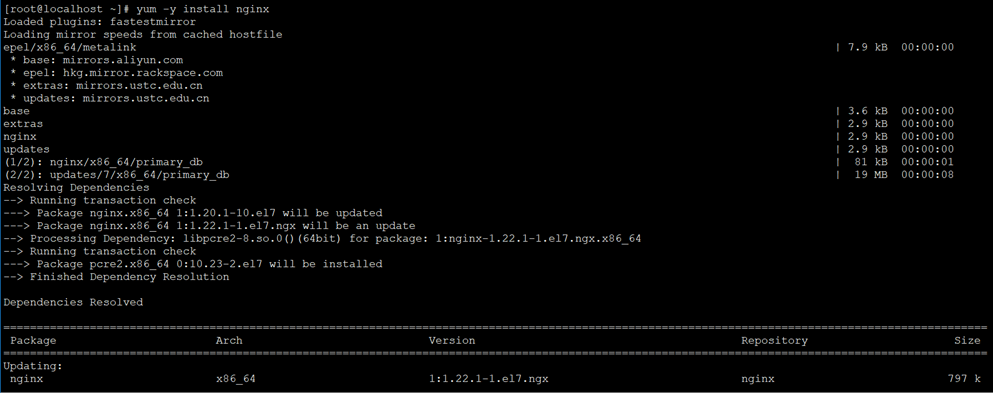
1、Yum安装Nginx
1)配置Centos 7 Nginx Yum源仓库
文章源自小柒网-https://www.yangxingzhen.cn/8818.html
[root@localhost ~]# rpm -Uvh http://nginx.org/packages/centos/7/noarch/RPMS/nginx-release-centos-7-0.el7.ngx.noarch.rpm
Retrieving http://nginx.org/packages/centos/7/noarch/RPMS/nginx-release-centos-7-0.el7.ngx.noarch.rpm
warning: /var/tmp/rpm-tmp.PiXlZn: Header V4 RSA/SHA1 Signature, key ID 7bd9bf62: NOKEY
Preparing... ################################# [100%]
Updating / installing...
1:nginx-release-centos-7-0.el7.ngx ################################# [100%]
2)安装Nginx
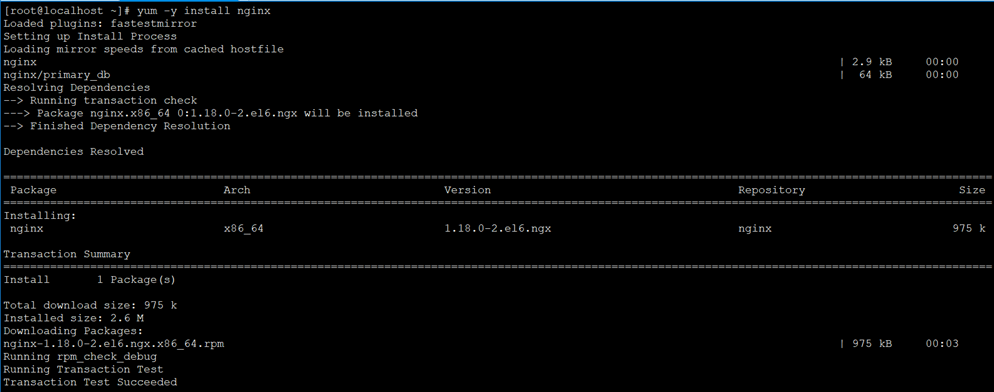
[root@localhost ~]# yum -y install nginx
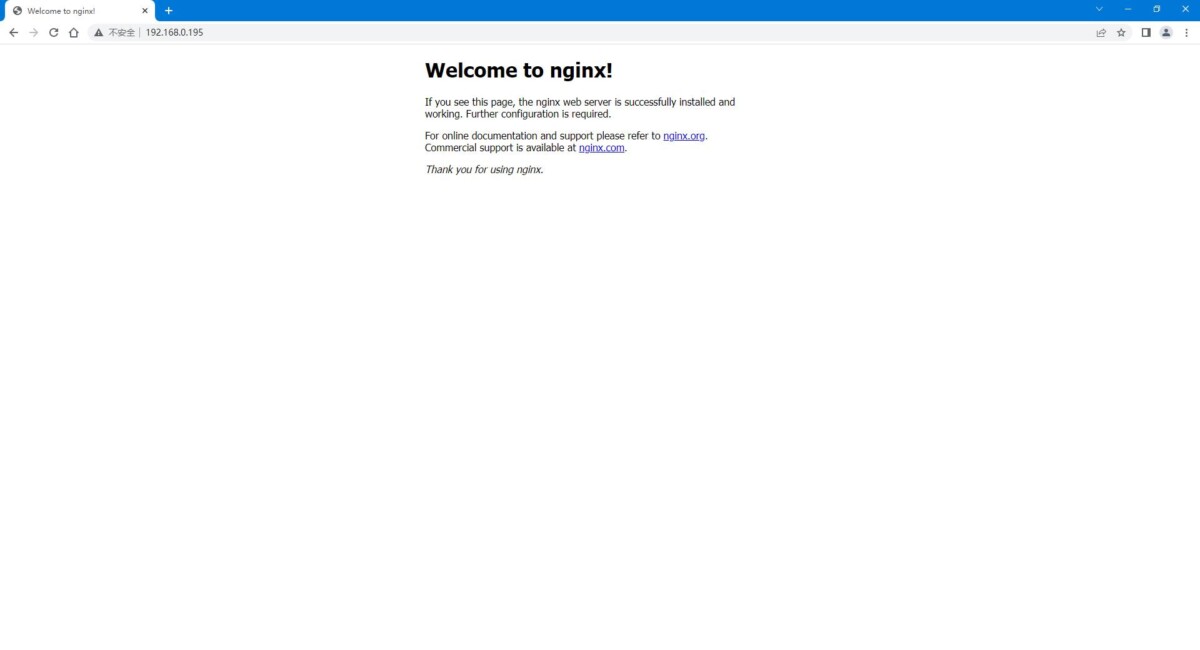
3)启动Nginx
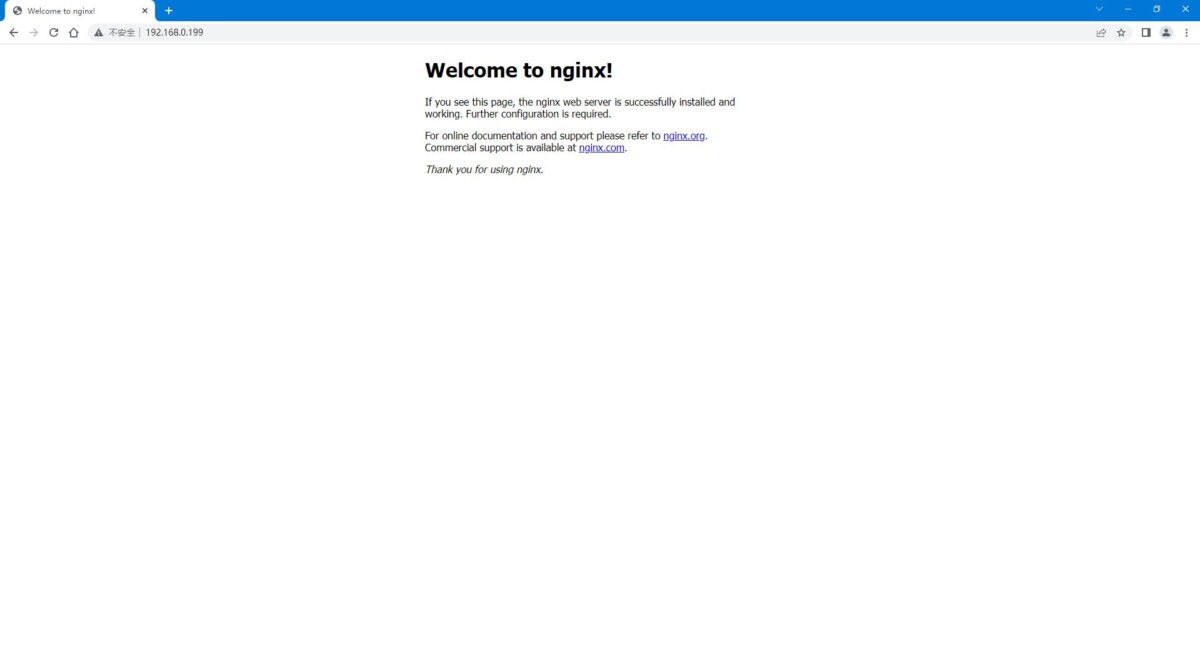
[root@localhost ~]# systemctl start nginx
5)Nginx默认地址和配置
/etc/nginx/nginx.conf # Yum安装Nginx默认主配置文件
/usr/share/nginx/html # Nginx默认存放目录
/usr/share/nginx/html/index.html # Nginx默认主页路径
6)常用基本操作
1、启动Nginx
[root@localhost ~]# systemctl start nginx
2、停止Nginx
[root@localhost ~]# systemctl stop nginx
3、重载Nginx
[root@localhost ~]# systemctl reload nginx
4、重启Nginx
[root@localhost ~]# systemctl restart nginx
5、查询Nginx运行状态
[root@localhost ~]# systemctl status nginx
6、查询Nginx进程
[root@localhost ~]# ps -ef |grep nginx
7、查询Nginx监听端口
[root@localhost ~]# netstat -lntup |grep nginx
8、卸载Nginx
[root@localhost ~]# yum -y remove nginx
9、RPM方式安装升级指定版本Nginx
[root@localhost ~]# rpm -Uvh http://nginx.org/packages/centos/7/x86_64/RPMS/nginx-1.22.0-1.el7.ngx.x86_64.rpm
2、Yum安装MySQL
1)配置清华大学Yum源
[root@localhost ~]# vim /etc/yum.repos.d/mysql-community.repo
[mysql-connectors-community]
name=MySQL Connectors Community
baseurl=https://mirrors.tuna.tsinghua.edu.cn/mysql/yum/mysql-connectors-community-el7-$basearch/
enabled=1
gpgcheck=1
gpgkey=https://repo.mysql.com/RPM-GPG-KEY-mysql

\[mysql-tools-community\]
name=MySQL Tools Community
baseurl=https://mirrors.tuna.tsinghua.edu.cn/mysql/yum/mysql-tools-community-el7-$basearch/
enabled=1
gpgcheck=1
gpgkey=https://repo.mysql.com/RPM-GPG-KEY-mysql


\[mysql-5.7-community\]
name=MySQL 5.7 Community Server
baseurl=https://mirrors.tuna.tsinghua.edu.cn/mysql/yum/mysql-5.7-community-el7-$basearch/
enabled=1
gpgcheck=0
gpgkey=https://repo.mysql.com/RPM-GPG-KEY-mysql
2)安装MySQL-5.7
[root@localhost ~]# yum -y install mysql-community-server
3)启动MySQL
[root@localhost ~]# systemctl start mysqld
4)登录MySQL
1、查看初始化后生成的密码
[root@localhost ~]# grep 'password' /var/log/mysqld.log
2023-03-25T12:54:39.593636Z 1 [Note] A temporary password is generated for root@localhost: hiPZY4U6yZ_6
2、登录MySQL
[root@localhost ~]# mysql -uroot -p'hiPZY4U6yZ_6'
mysql: [Warning] Using a password on the command line interface can be insecure.
Welcome to the MySQL monitor. Commands end with ; or \g.
Your MySQL connection id is 2
Server version: 5.7.41
Copyright (c) 2000, 2023, Oracle and/or its affiliates.
Oracle is a registered trademark of Oracle Corporation and/or its
affiliates. Other names may be trademarks of their respective
owners.
Type 'help;' or '\h' for help. Type '\c' to clear the current input statement.
初始化后需重置密码才能执行sql
mysql> set password=password('Aa123456@!');
Query OK, 0 rows affected, 1 warning (0.00 sec)
mysql> flush privileges;
Query OK, 0 rows affected (0.00 sec)
mysql> select version();
+-------------+
| version() |
+-------------+
| 5.7.41 |
+-------------+
1 row in set (0.00 sec)
3、Yum安装PHP
1)安装remi扩展源
remi源是Remi repository是包含最新版本PHP和MySQL包的Linux源,由Remi 提供维护。有这个源之后,使用YUM安装或更新PHP、MySQL、phpMyAdmin等服务器相关程序的时候就非常方便了。
[root@localhost ~]# yum -y install epel-release
[root@localhost ~]# yum -y install http://rpms.remirepo.net/enterprise/remi-release-7.rpm
2)安装YUM管理工具
[root@localhost ~]# yum -y install yum-utils
3)安装PHP
[root@localhost ~]# yum -y install php74-php-cli php74-php-common php74-php-devel php74-php-embedded php74-php-fpm php74-php-gd php74-php-mbstring php74-php-mysqlnd php74-php-pdo php74-php-opcache php74-php-xml php74-php-soap php74-php-bcmath
4)查看是否安装成功及php配置文件以及对应目录
[root@localhost ~]# rpm -qa |grep php74
[root@localhost ~]# rpm -ql php74-php-fpm
5)建立软连接
[root@localhost ~]# ln -sf /opt/remi/php74/root/usr/bin/php* /usr/local/bin
6)查看PHP版本
[root@localhost ~]# php -v
PHP 7.4.33 (cli) (built: Feb 14 2023 08:49:52) ( NTS )
Copyright (c) The PHP Group
Zend Engine v3.4.0, Copyright (c) Zend Technologies
with Zend OPcache v7.4.33, Copyright (c), by Zend Technologies
7)启动PHP-FPM
[root@localhost ~]# systemctl start php74-php-fpm
8)设置开机自启动
[root@localhost ~]# systemctl enable php74-php-fpm
9)常用基本操作
1、启动PHP
[root@localhost ~]# systemctl start php74-php-fpm
2、停止PHP
[root@localhost ~]# systemctl stop php74-php-fpm
3、重载PHP
[root@localhost ~]# systemctl reload php74-php-fpm
4、重启PHP
[root@localhost ~]# systemctl restart php74-php-fpm
5、查询PHP运行状态
[root@localhost ~]# systemctl status php74-php-fpm
6、查询PHP进程
[root@localhost ~]# ps -ef |grep php-fpm
7、查询PHP监听端口
[root@localhost ~]# netstat -lntup |grep php-fpm
8、卸载PHP
[root@localhost ~]# yum -y remove php74*
4、源码安装Zabbix 5.0 LTS
1)安装依赖包
[root@localhost ~]# yum -y install wget net-snmp net-snmp-devel perl-DBI curl curl-devel libevent libevent-devel gcc gcc-c++ mysql-devel pcre pcre-devel OpenIPMI-devel
2)下载Zabbix软件包
[root@localhost ~]# wget https://cdn.zabbix.com/zabbix/sources/stable/5.0/zabbix-5.0.32.tar.gz
3)解压
[root@localhost ~]# tar xf zabbix-5.0.32.tar.gz
4)预编译
[root@localhost ~]# cd zabbix-5.0.32
[root@localhost zabbix-5.0.32]# ./configure --prefix=/usr/local/zabbix --enable-server --enable-agent --with-mysql --enable-ipv6 --with-net-snmp --with-libcurl --with-libxml2 --with-openipmi
5)安装Zabbix
[root@localhost zabbix-5.0.32]# make && make install
6)配置Zabbix
1、备份配置文件
[root@localhost zabbix-5.0.32]# cp /usr/local/zabbix/etc/zabbix_server.conf{,_bak}
[root@localhost zabbix-5.0.32]# cp /usr/local/zabbix/etc/zabbix_agentd.conf{,_bak}
2、创建软链接
[root@localhost zabbix-5.0.32]# ln -sf /usr/local/zabbix/sbin/zabbix_* /usr/local/sbin
3、拷贝Web到Nginx发布目录
[root@localhost zabbix-5.0.32]# cp -a ui /usr/share/nginx/html/zabbix
4、授权
[root@localhost zabbix-5.0.32]# chown -R nginx.nginx /usr/share/nginx/html/zabbix
5、配置Zabbix Server
[root@localhost zabbix-5.0.32]# vim /usr/local/zabbix/etc/zabbix_server.conf
LogFile=/tmp/zabbix_server.log
PidFile=/tmp/zabbix_server.pid
DBHost=localhost
DBName=zabbix
DBUser=zabbix
DBPassword=Aa123456@
Timeout=30
LogSlowQueries=3000
6、配置Zabbix Agentd
[root@localhost zabbix-5.0.32]# vim /usr/local/zabbix/etc/zabbix_agentd.conf
LogFile=/tmp/zabbix_agentd.log
Server=localhost
ServerActive=localhost
Hostname=192.168.0.199
AllowKey=system.run[*]
UnsafeUserParameters=1
LogFileSize=10
Timeout=30
7、配置系统服务
[root@localhost zabbix-5.0.32]# cp misc/init.d/tru64/zabbix_* /etc/init.d
[root@localhost zabbix-5.0.32]# chmod +x /etc/init.d/zabbix_*
8、创建Zabbix用户
[root@localhost zabbix-5.0.32]# useradd -s /sbin/nologin zabbix
9、创建Zabbix数据库
[root@localhost zabbix-5.0.32]# mysql -hlocalhost -uroot -p'Aa123456@!' 2>/dev/null -e "create database zabbix character set utf8 collate utf8_bin;"
[root@localhost zabbix-5.0.32]# mysql -hlocalhost -uroot -p'Aa123456@!' 2>/dev/null -e "grant all on zabbix.* to zabbix@'localhost' identified by 'Aa123456@';"
[root@localhost zabbix-5.0.32]# mysql -hlocalhost -uroot -p'Aa123456@!' 2>/dev/null -e "flush privileges;"
10、导入Zabbix数据和创建表
[root@localhost zabbix-5.0.32]# mysql -hlocalhost -uzabbix -pAa123456@ 2>/dev/null zabbix < database/mysql/schema.sql
[root@localhost zabbix-5.0.32]# mysql -hlocalhost -uzabbix -pAa123456@ 2>/dev/null zabbix < database/mysql/images.sql
[root@localhost zabbix-5.0.32]# mysql -hlocalhost -uzabbix -pAa123456@ 2>/dev/null zabbix < database/mysql/data.sql
11、启动Zabbix Server和Zabbix Agentd
[root@localhost zabbix-5.0.32]# /etc/init.d/zabbix_server start
Zabbix server started.
[root@localhost zabbix-5.0.32]# /etc/init.d/zabbix_agentd start
Zabbix agent started.
12、查看Zabbix Server和Zabbix Agentd监听端口
[root@localhost zabbix-5.0.32]# netstat -lntup |egrep "10050|10051"
13、配置开机自启动
[root@localhost zabbix-5.0.32]# sed -i '/#!\/bin\/sh/a#chkconfig: - 30 90' /etc/init.d/zabbix_server
[root@localhost zabbix-5.0.32]# sed -i '/#!\/bin\/sh/a#description: Zabbix Server' /etc/init.d/zabbix_server
[root@localhost zabbix-5.0.32]# chkconfig --add zabbix_server
[root@localhost zabbix-5.0.32]# chkconfig zabbix_server on
[root@localhost zabbix-5.0.32]# sed -i '/#!\/bin\/sh/a#chkconfig: - 40 95' /etc/init.d/zabbix_agentd
[root@localhost zabbix-5.0.32]# sed -i '/#!\/bin\/sh/a#description: Zabbix Agentd' /etc/init.d/zabbix_agentd
[root@localhost zabbix-5.0.32]# chkconfig --add zabbix_agentd
[root@localhost zabbix-5.0.32]# chkconfig zabbix_agentd on
7)配置nginx.conf
[root@localhost ~]# vim /etc/nginx/nginx.conf
    user nginx nginx;
    worker_processes auto;
    pid /var/run/nginx.pid;
events {
    use epoll;
    worker_connections 10240;
    multi_accept on;
    }
http {
    include       mime.types;
    default_type  application/octet-stream;
    log_format  main  '$remote_addr - $remote_user [$time_local] "$request" '
                  '$status $body_bytes_sent "$http_referer" '
                  '"$http_user_agent" "$http_x_forwarded_for"';
    access_log /var/log/nginx/access.log main;
    error_log /var/log/nginx/error.log warn;
    sendfile        on;
    tcp_nopush          on;
    keepalive_timeout  120;
    tcp_nodelay         on;
    server_tokens off;
    gzip    on;
    gzip_min_length 1k;
    gzip_buffers    4 64k;
    gzip_http_version 1.1;
    gzip_comp_level 4;
    gzip_types      text/plain application/x-javascript text/css application/xml;
    gzip_vary       on;
    client_max_body_size 10m;
    client_body_buffer_size 128k;
    proxy_connect_timeout 90;
    proxy_send_timeout 90;
    proxy_buffer_size 4k;
    proxy_buffers 4 32k;
    proxy_busy_buffers_size 64k;
    large_client_header_buffers 4 4k;
    client_header_buffer_size 4k;
    open_file_cache_valid 30s;
    open_file_cache_min_uses 1;
server {
    listen	80;
    server_name	localhost;
    location / {
    root	/usr/share/nginx/html/zabbix;
    index index.php index.html index.htm;
    }
    location ~* \.php$ {
    root    /usr/share/nginx/html/zabbix;
    fastcgi_connect_timeout 300s;
    fastcgi_send_timeout 300s;
    fastcgi_read_timeout 300s;
    fastcgi_buffer_size 64k;
    fastcgi_buffers 4 64k;
    fastcgi_busy_buffers_size 128k;
    fastcgi_temp_file_write_size 256k;
    fastcgi_pass    127.0.0.1:9000;
    fastcgi_index   index.php;
    fastcgi_param SCRIPT_FILENAME $document_root$fastcgi_script_name;
    include fastcgi_params;
    }
  }
}
8)重载Nginx
[root@localhost zabbix-5.0.32]# systemctl reload nginx
9)配置php.ini
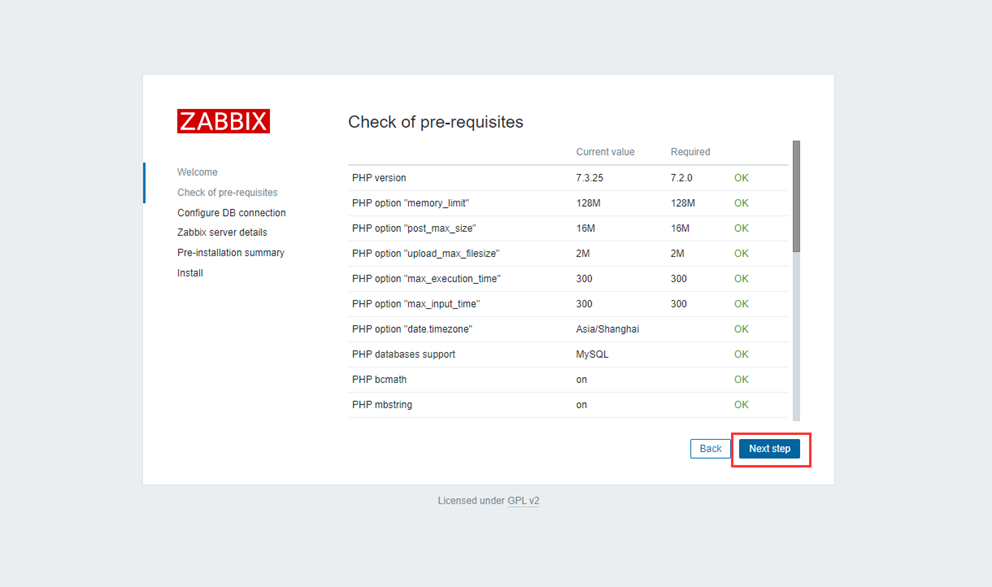
[root@localhost zabbix-5.0.32]# sed -i 's/post_max_size = 8M/post_max_size = 16M/' /etc/opt/remi/php74/php.ini
[root@localhost zabbix-5.0.32]# sed -i 's/max_execution_time = 30/max_execution_time = 300/' /etc/opt/remi/php74/php.ini
[root@localhost zabbix-5.0.32]# sed -i 's/max_input_time = 60/max_input_time = 300/' /etc/opt/remi/php74/php.ini
[root@localhost zabbix-5.0.32]# sed -i 's#;date.timezone =#date.timezone = Asia/Shanghai#' /etc/opt/remi/php74/php.ini
[root@localhost zabbix-5.0.32]# sed -i 's/apache/nginx/g' /etc/opt/remi/php74/php-fpm.d/www.conf
10)重载php-fpm
[root@localhost zabbix-5.0.32]# systemctl reload php74-php-fpm
[root@localhost zabbix-5.0.32]# chown -R nginx.nginx /var/opt/remi/php74/lib/php/session
11)Zabbix安装配置
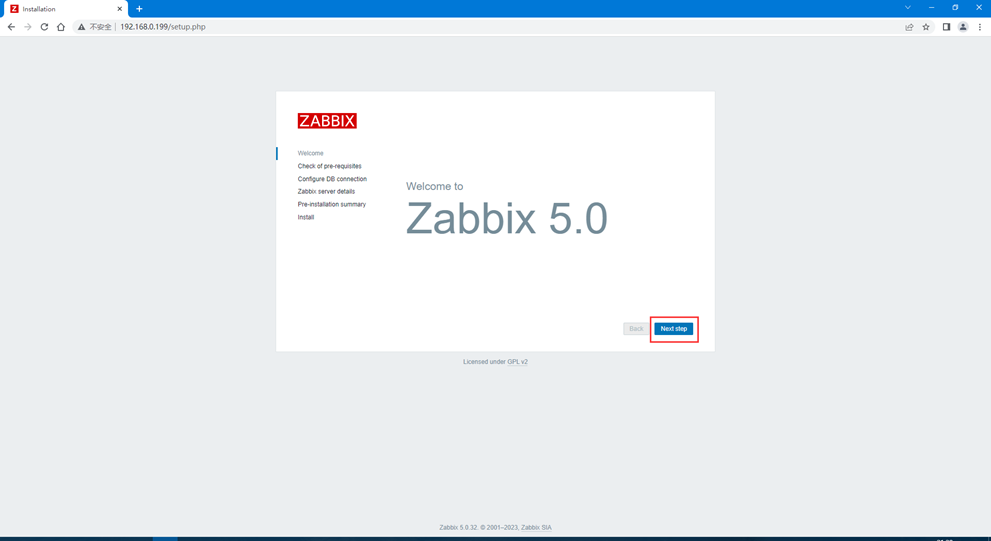
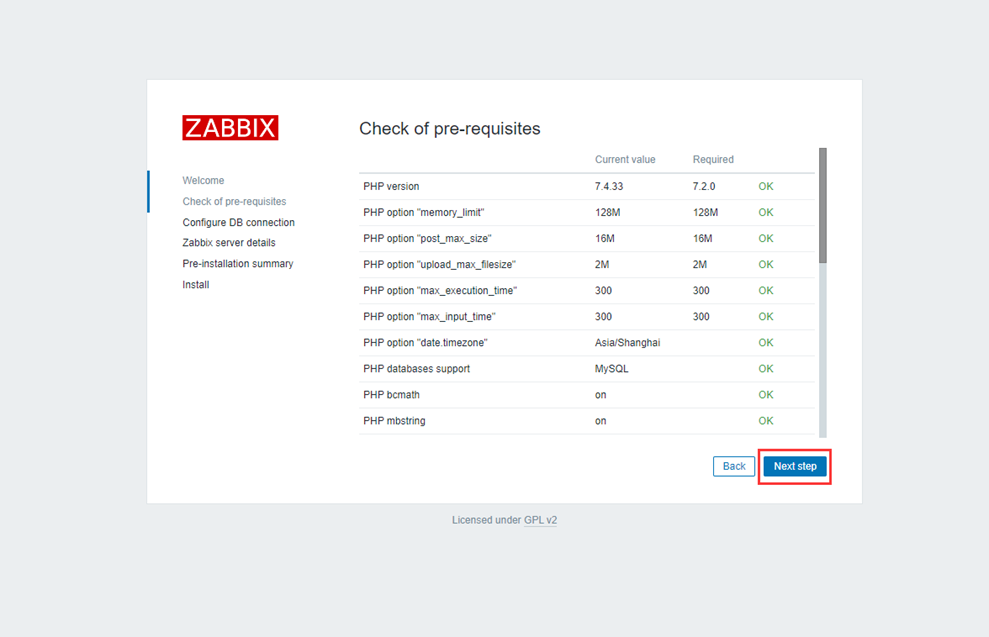
1、浏览器访问:http://192.168.0.199/,如下图所示
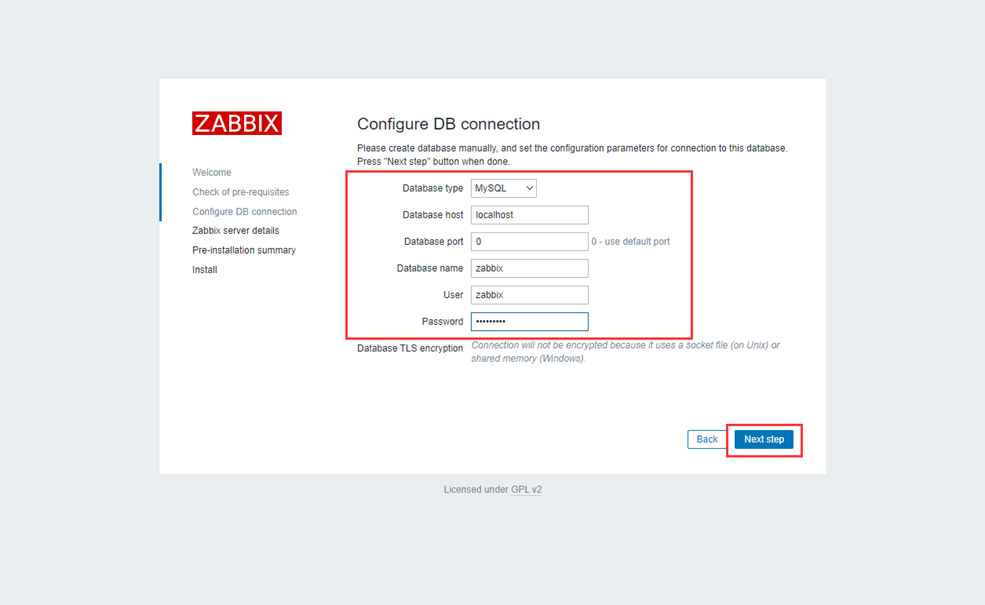
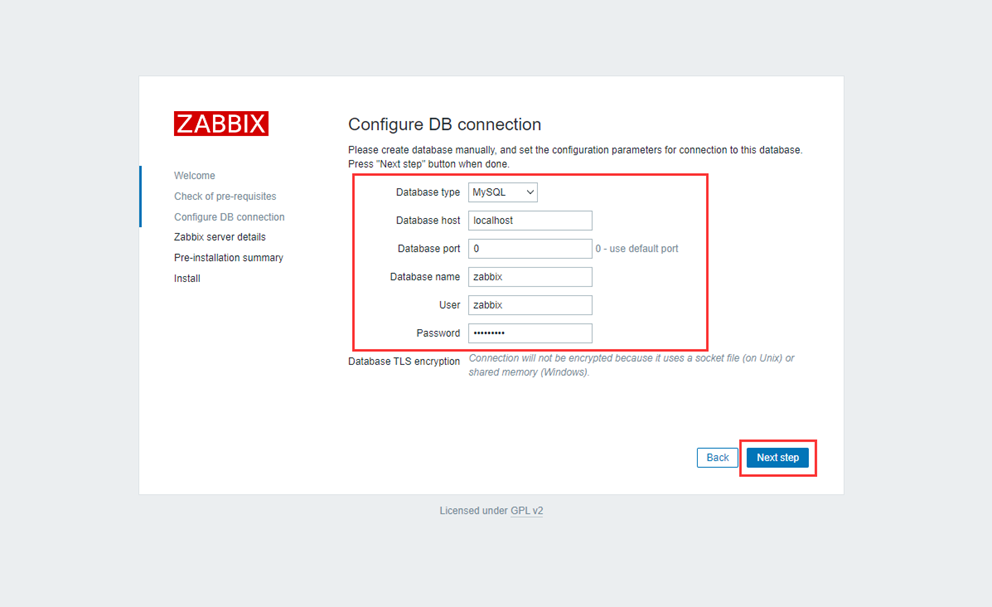
2、填写数据库主机、数据库端口、数据库名、用户名、密码
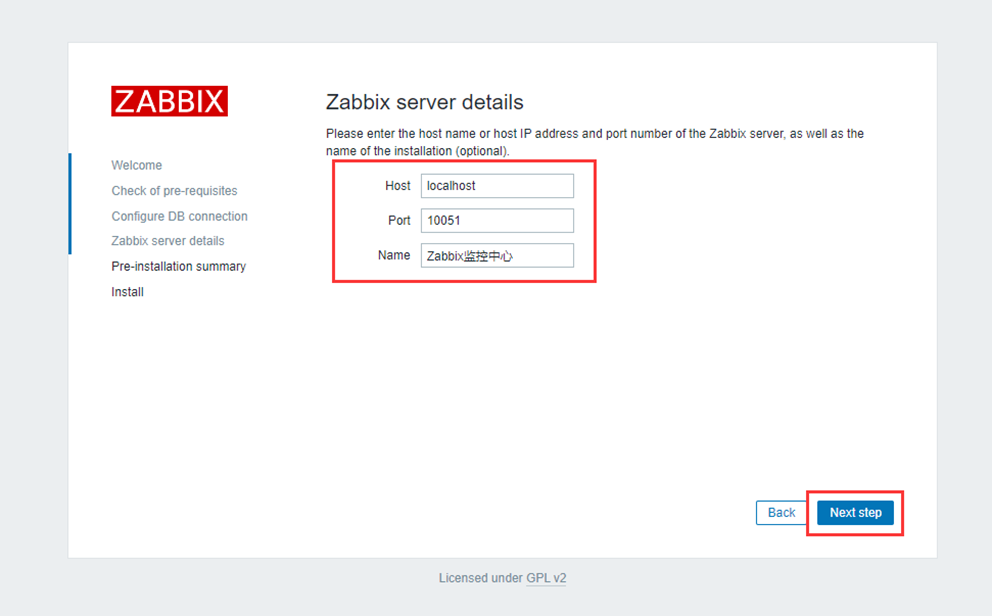
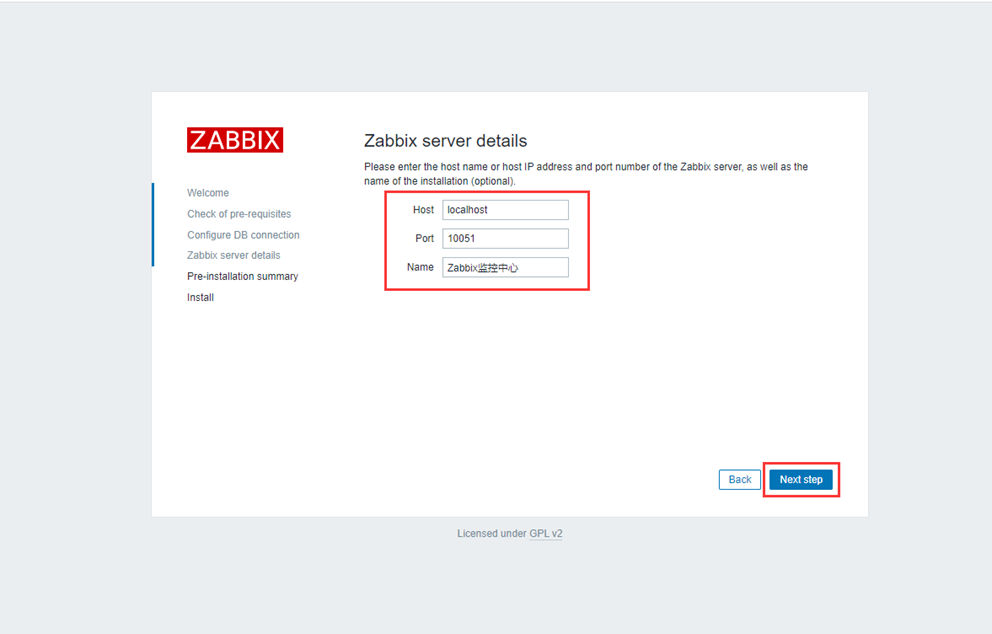
3、填写Host、Port、Name
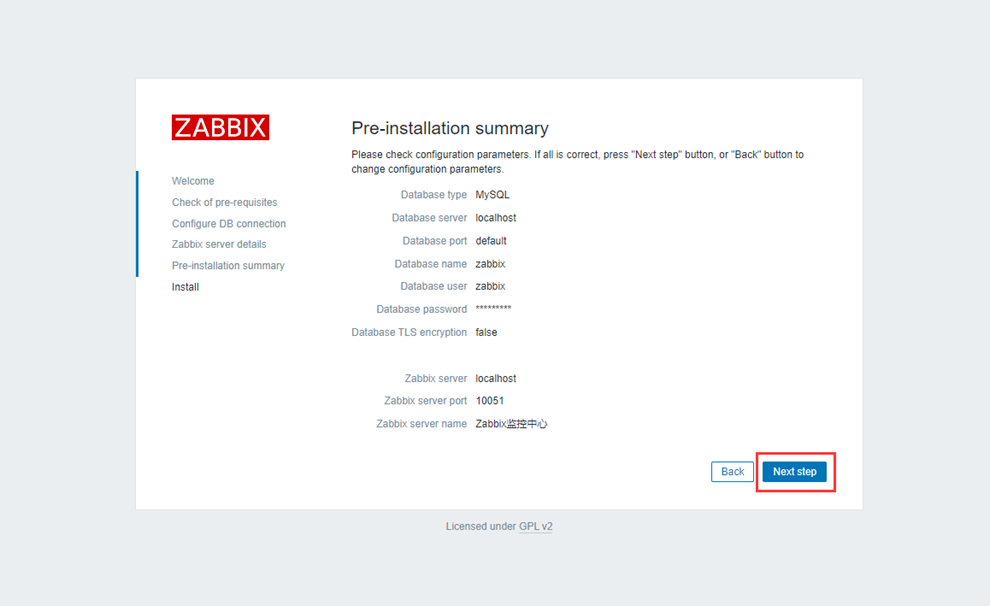
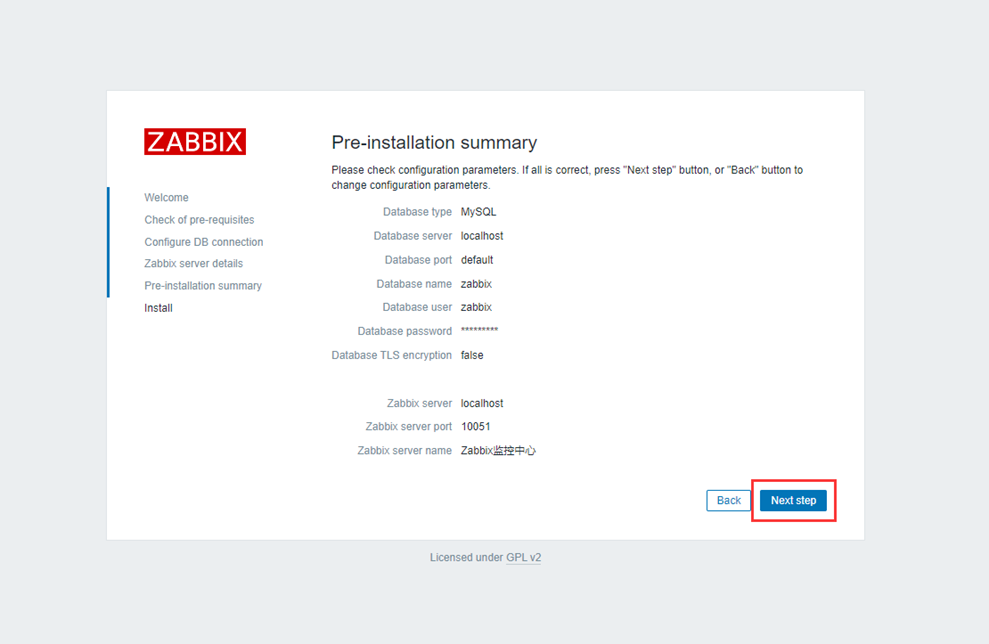
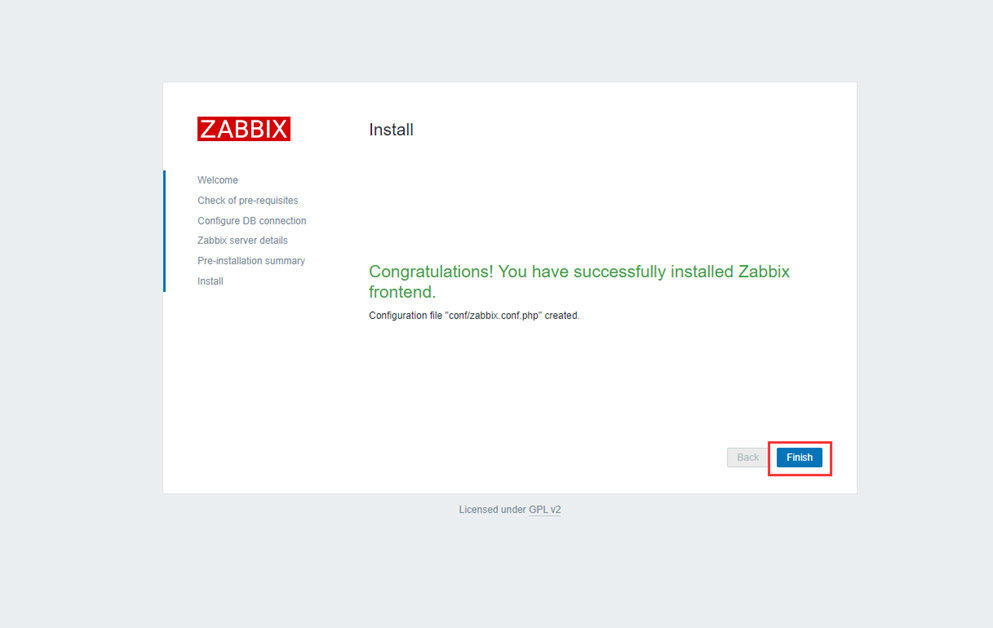
4、安装完成
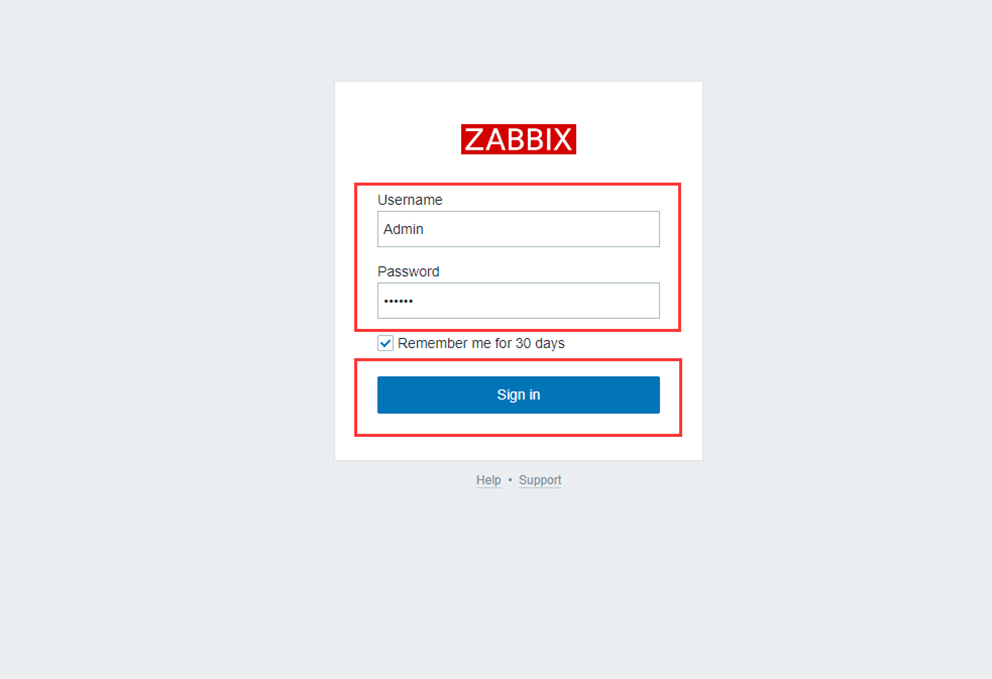
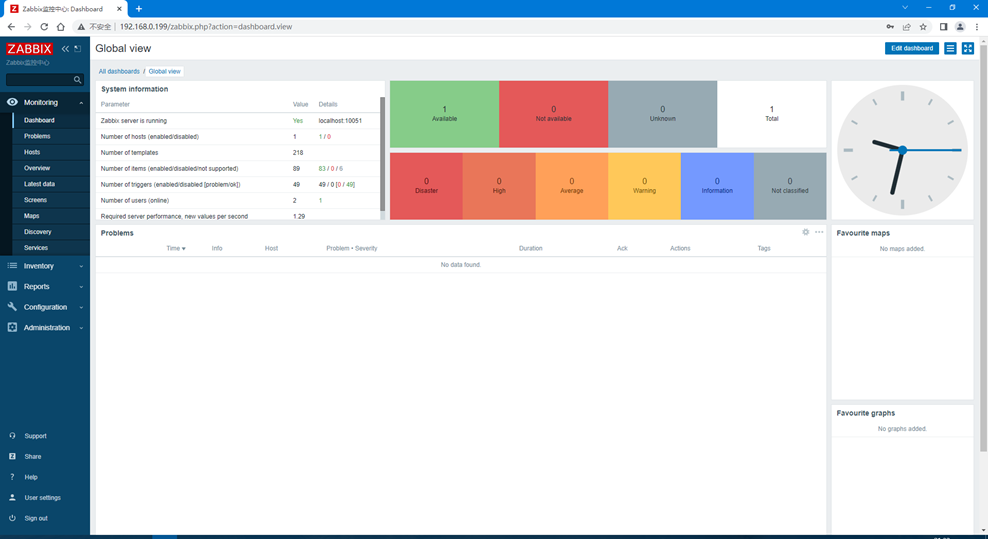
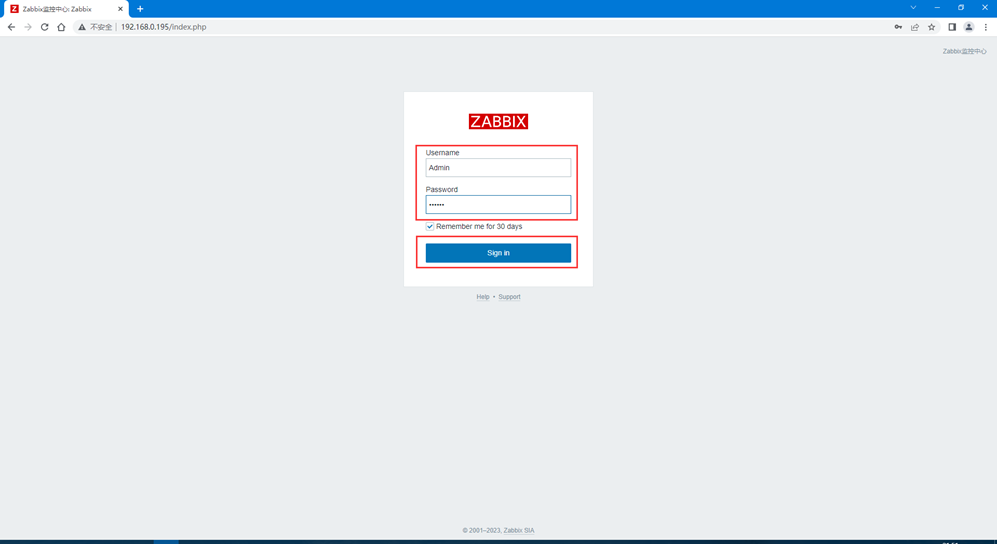
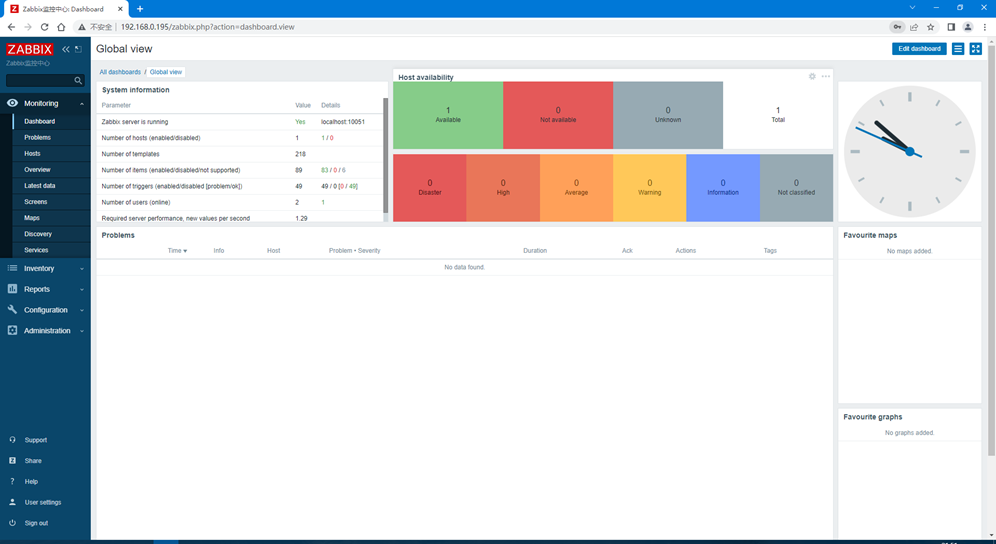
5、登录Zabbix
默认用户名:Admin、密码:zabbix,如下图所示
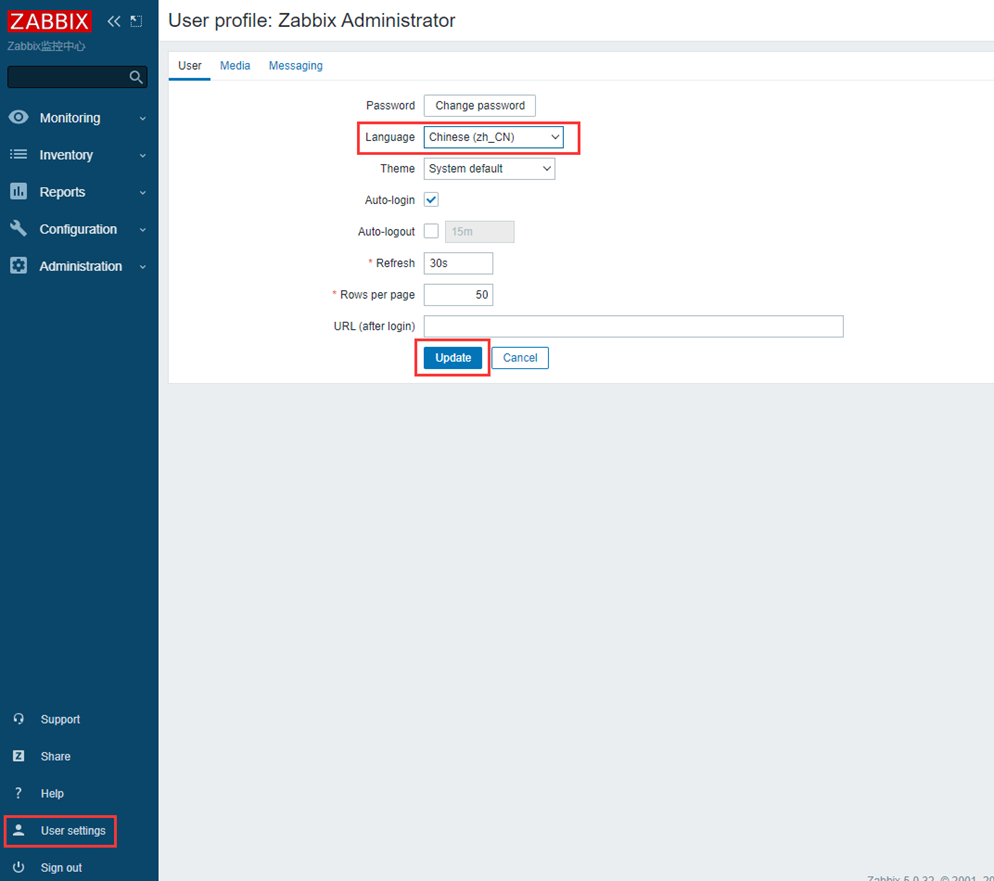
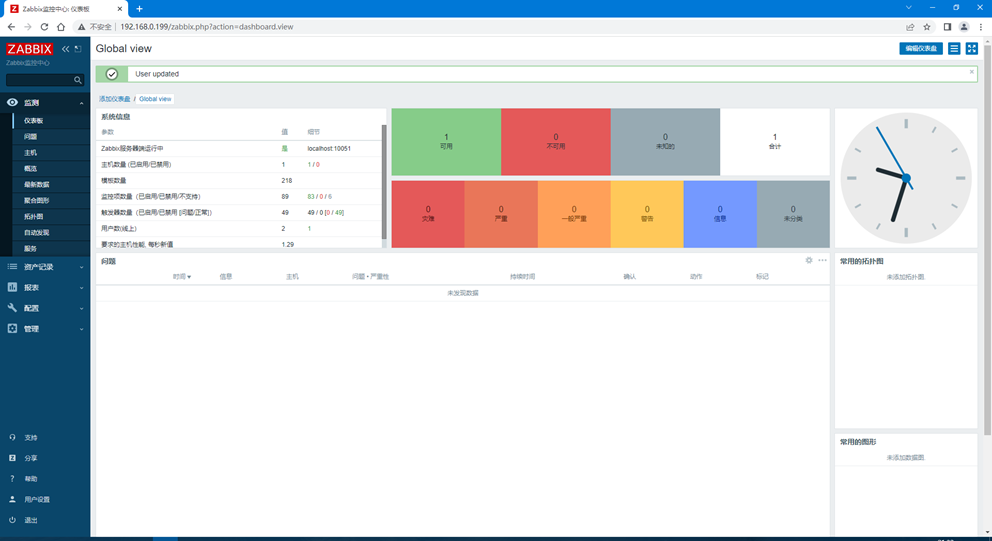
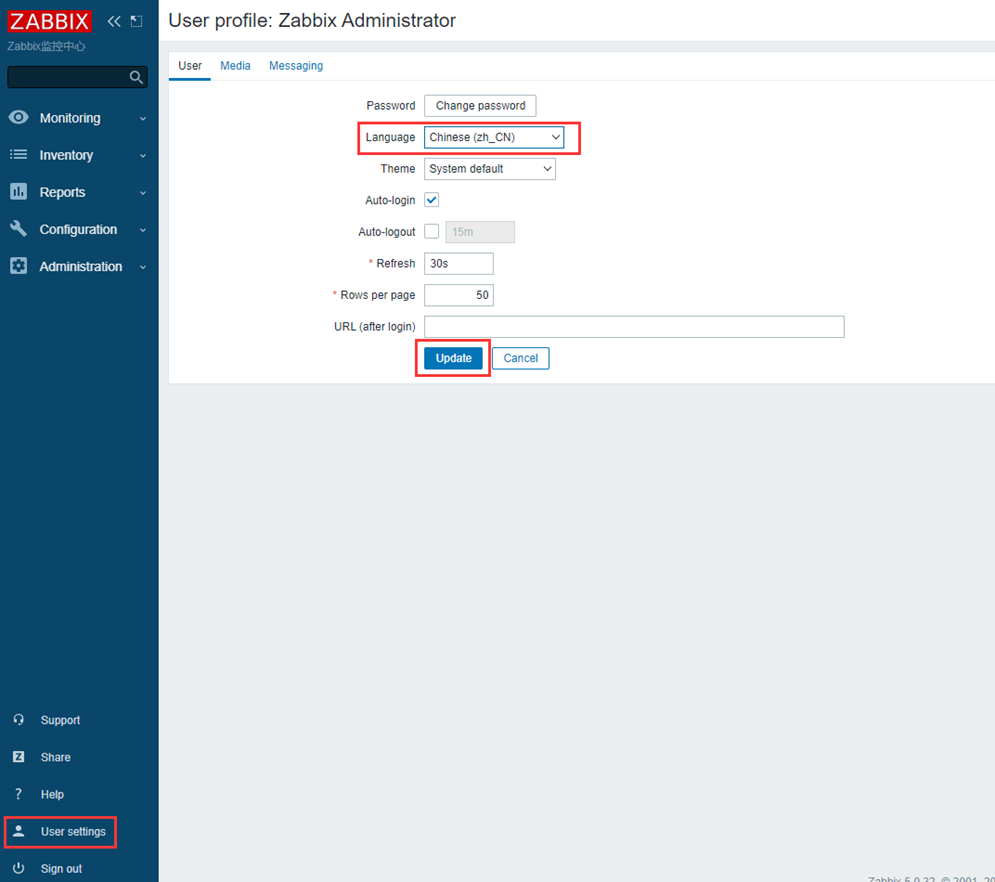
6、修改界面语言为中文
四、Centos 6安装lnmp、zabbix
1、Yum安装Nginx
1)配置Centos 6 Nginx Yum源仓库
[root@localhost ~]# rpm -Uvh http://nginx.org/packages/centos/6/noarch/RPMS/nginx-release-centos-6-0.el6.ngx.noarch.rpm
Retrieving http://nginx.org/packages/centos/6/noarch/RPMS/nginx-release-centos-6-0.el6.ngx.noarch.rpm
warning: /var/tmp/rpm-tmp.xRiIYI: Header V4 RSA/SHA1 Signature, key ID 7bd9bf62: NOKEY
Preparing... ########################################### [100%]
1:nginx-release-centos ########################################### [100%]
2)安装Nginx
[root@localhost ~]# yum -y install nginx
3)启动Nginx
[root@localhost ~]# /etc/init.d/nginx start
5)Nginx默认地址和配置
/etc/nginx/nginx.conf # Yum安装Nginx默认主配置文件
/usr/share/nginx/html # Nginx默认存放目录
/usr/share/nginx/html/index.html # Nginx默认主页路径
6)常用基本操作
1、启动Nginx
[root@localhost ~]# /etc/init.d/nginx start
2、停止Nginx
[root@localhost ~]# /etc/init.d/nginx stop
3、重载Nginx
[root@localhost ~]# /etc/init.d/nginx reload
4、重启Nginx
[root@localhost ~]# /etc/init.d/nginx restart
5、查询Nginx运行状态
[root@localhost ~]# /etc/init.d/nginx status
6、查询Nginx进程
[root@localhost ~]# ps -ef |grep nginx
7、查询Nginx监听端口
[root@localhost ~]# netstat -lntup |grep nginx
8)卸载Nginx
[root@localhost ~]# yum -y remove nginx
9)RPM方式安装升级指定版本Nginx
[root@localhost ~]# rpm -Uvh http://nginx.org/packages/centos/6/x86_64/RPMS/nginx-1.18.0-1.el6.ngx.x86_64.rpm
2、Yum安装MySQL
1)配置清华大学Yum源
[root@localhost ~]# vim /etc/yum.repos.d/mysql-community.repo
[mysql-connectors-community]
name=MySQL Connectors Community
baseurl=http://repo.mysql.com/yum/mysql-connectors-community/el/6/$basearch
enabled=1
gpgcheck=1
gpgkey=file:///etc/pki/rpm-gpg/RPM-GPG-KEY-mysql

\[mysql-tools-community\]
name=MySQL Tools Community
baseurl=http://repo.mysql.com/yum/mysql-tools-community/el/6/$basearch
enabled=1
gpgcheck=1
gpgkey=file:///etc/pki/rpm-gpg/RPM-GPG-KEY-mysql


\[mysql57-community\]
name=MySQL 5.7 Community Server
baseurl=http://repo.mysql.com/yum/mysql-5.7-community/el/6/$basearch
enabled=1
gpgcheck=0
gpgkey=file:///etc/pki/rpm-gpg/RPM-GPG-KEY-mysql
2)安装MySQL-5.7
[root@localhost ~]# yum -y install mysql-community-server
3)启动MySQL
[root@localhost ~]# service mysqld start
4)登录MySQL
1、查看初始化后生成的密码
[root@localhost ~]# grep 'password' /var/log/mysqld.log
2023-03-25T12:55:13.893771Z 1 [Note] A temporary password is generated for root@localhost: GTP9ME3Pfb=y
2、登录MySQL
[root@localhost ~]# mysql -uroot -p'GTP9ME3Pfb=y'
mysql: [Warning] Using a password on the command line interface can be insecure.
Welcome to the MySQL monitor. Commands end with ; or \g.
Your MySQL connection id is 4
Server version: 5.7.41
Copyright (c) 2000, 2023, Oracle and/or its affiliates.
Oracle is a registered trademark of Oracle Corporation and/or its
affiliates. Other names may be trademarks of their respective
owners.
Type 'help;' or '\h' for help. Type '\c' to clear the current input statement.
初始化后需重置密码才能执行sql
mysql> set password=password('Aa123456@!');
Query OK, 0 rows affected, 1 warning (0.00 sec)
mysql> flush privileges;
Query OK, 0 rows affected (0.00 sec)
mysql> select version();
+------------+
| version()|
+------------+
| 5.7.41 |
+------------+
1 row in set (0.00 sec)
3、Yum安装PHP
1)安装remi扩展源
remi源是Remi repository是包含最新版本PHP和MySQL包的Linux源,由Remi 提供维护。有这个源之后,使用YUM安装或更新PHP、MySQL、phpMyAdmin等服务器相关程序的时候就非常方便了。
[root@localhost ~]# yum -y install epel-release
[root@localhost ~]# yum -y install http://rpms.remirepo.net/enterprise/remi-release-6.rpm
2)安装YUM管理工具
[root@localhost ~]# yum -y install yum-utils
3)安装PHP
[root@localhost ~]# yum -y install php73-php-cli php73-php-common php73-php-devel php73-php-embedded php73-php-fpm php73-php-gd php73-php-mbstring php73-php-mysqlnd php73-php-pdo php73-php-opcache php73-php-xml php73-php-soap php73-php-bcmath
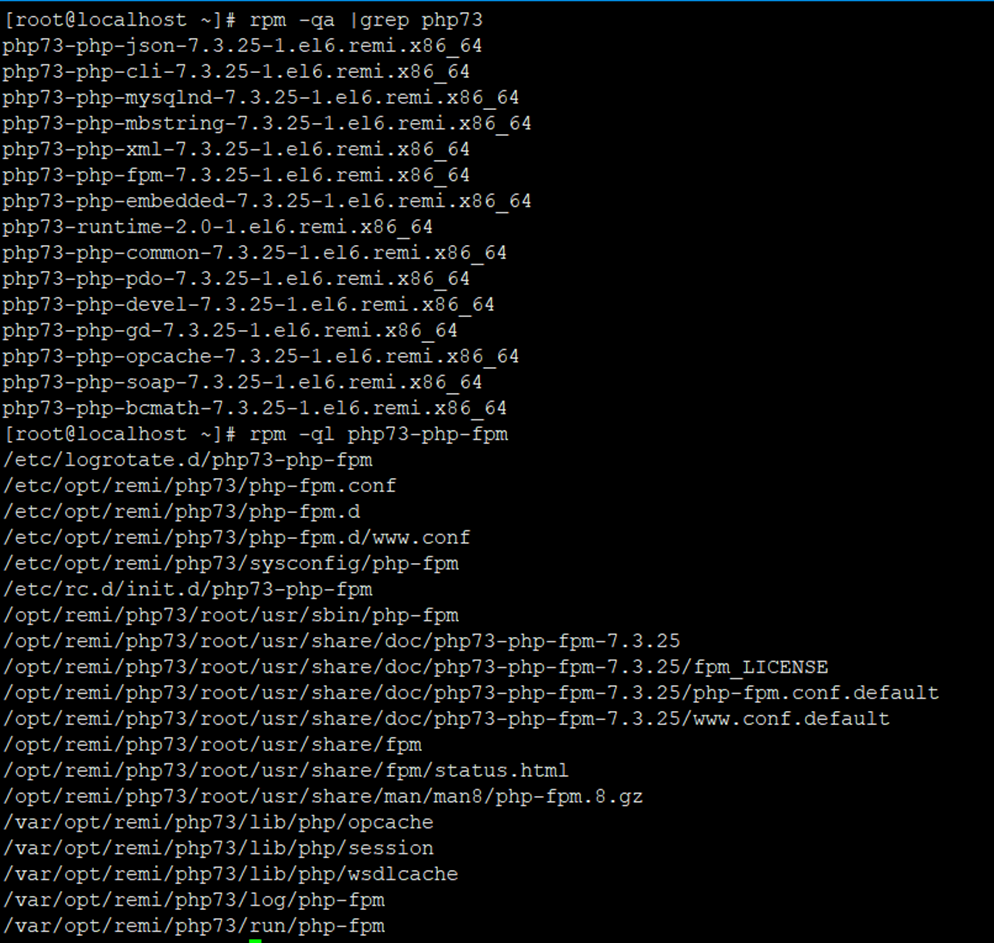
4)查看是否安装成功及php配置文件以及对应目录
[root@localhost ~]# rpm -qa |grep php73
[root@localhost ~]# rpm -ql php73-php-fpm
5)建立软连接
[root@localhost ~]# ln -sf /opt/remi/php73/root/usr/bin/php* /usr/local/bin
6)查看PHP版本
[root@localhost ~]# php -v
PHP 7.3.25 (cli) (built: Nov 24 2020 14:22:04) ( NTS )
Copyright (c) 1997-2018 The PHP Group
Zend Engine v3.3.25, Copyright (c) 1998-2018 Zend Technologies
with Zend OPcache v7.3.25, Copyright (c) 1999-2018, by Zend Technologies
7)启动PHP-FPM
[root@localhost ~]# service php73-php-fpm start
8)设置开机自启动
[root@localhost ~]# chkconfig php73-php-fpm on
9)常用基本操作
1、启动PHP
[root@localhost ~]# service php73-php-fpm start
2、停止PHP
[root@localhost ~]# service php73-php-fpm stop
3、重载PHP
[root@localhost ~]# service php73-php-fpm reload
4、重启PHP
[root@localhost ~]# service php73-php-fpm restart
5、查询PHP运行状态
[root@localhost ~]# service php73-php-fpm status
6、查询PHP进程
[root@localhost ~]# ps -ef |grep php-fpm
7、查询PHP监听端口
[root@localhost ~]# netstat -lntup |grep php-fpm
8、卸载PHP
[root@localhost ~]# yum -y remove php73*
4、源码安装Zabbix 5.0 LTS
1)安装依赖包
[root@localhost ~]# yum -y install wget net-snmp net-snmp-devel perl-DBI curl curl-devel libevent libevent-devel gcc gcc-c++ mysql-devel pcre pcre-devel OpenIPMI-devel
2)下载Zabbix软件包
[root@localhost ~]# wget https://cdn.zabbix.com/zabbix/sources/stable/5.0/zabbix-5.0.32.tar.gz
3)解压
[root@localhost ~]# tar xf zabbix-5.0.32.tar.gz
4)预编译
[root@localhost ~]# cd zabbix-5.0.32
[root@localhost zabbix-5.0.32]# ./configure --prefix=/usr/local/zabbix --enable-server --enable-agent --with-mysql --enable-ipv6 --with-net-snmp --with-libcurl --with-libxml2 --with-openipmi
5)安装Zabbix
[root@localhost zabbix-5.0.32]# make && make install
6)配置Zabbix
1、备份配置文件
[root@localhost zabbix-5.0.32]# cp /usr/local/zabbix/etc/zabbix_server.conf{,_bak}
[root@localhost zabbix-5.0.32]# cp /usr/local/zabbix/etc/zabbix_agentd.conf{,_bak}
2、创建软链接
[root@localhost zabbix-5.0.32]# ln -sf /usr/local/zabbix/sbin/zabbix_* /usr/local/sbin
3、拷贝Web到Nginx发布目录
[root@localhost zabbix-5.0.32]# cp -a ui /usr/share/nginx/html/zabbix
4、授权
[root@localhost zabbix-5.0.32]# chown -R nginx.nginx /usr/share/nginx/html/zabbix
5、配置Zabbix Server
[root@localhost zabbix-5.0.32]# vim /usr/local/zabbix/etc/zabbix_server.conf
LogFile=/tmp/zabbix_server.log
PidFile=/tmp/zabbix_server.pid
DBHost=localhost
DBName=zabbix
DBUser=zabbix
DBPassword=Aa123456@
Timeout=30
LogSlowQueries=3000
6、配置Zabbix Agentd
[root@localhost zabbix-5.0.32]# vim /usr/local/zabbix/etc/zabbix_agentd.conf
LogFile=/tmp/zabbix_agentd.log
Server=localhost
ServerActive=localhost
Hostname=192.168.0.195
AllowKey=system.run[*]
UnsafeUserParameters=1
LogFileSize=10
Timeout=30
7、配置系统服务
[root@localhost zabbix-5.0.32]# cp misc/init.d/tru64/zabbix_* /etc/init.d
[root@localhost zabbix-5.0.32]# chmod +x /etc/init.d/zabbix_*
8、创建Zabbix用户
[root@localhost zabbix-5.0.32]# useradd -s /sbin/nologin zabbix
9、创建Zabbix数据库
[root@localhost zabbix-5.0.32]# mysql -hlocalhost -uroot -p'Aa123456@!' 2>/dev/null -e "create database zabbix character set utf8 collate utf8_bin;"
[root@localhost zabbix-5.0.32]# mysql -hlocalhost -uroot -p'Aa123456@!' 2>/dev/null -e "grant all on zabbix.* to zabbix@'localhost' identified by 'Aa123456@';"
[root@localhost zabbix-5.0.32]# mysql -hlocalhost -uroot -p'Aa123456@!' 2>/dev/null -e "flush privileges;"
10、导入Zabbix数据和创建表
[root@localhost zabbix-5.0.32]# mysql -hlocalhost -uzabbix -pAa123456@ 2>/dev/null zabbix < database/mysql/schema.sql
[root@localhost zabbix-5.0.32]# mysql -hlocalhost -uzabbix -pAa123456@ 2>/dev/null zabbix < database/mysql/images.sql
[root@localhost zabbix-5.0.32]# mysql -hlocalhost -uzabbix -pAa123456@ 2>/dev/null zabbix < database/mysql/data.sql
11、启动Zabbix Server和Zabbix Agentd
[root@localhost zabbix-5.0.32]# /etc/init.d/zabbix_server start
Zabbix server started.
[root@localhost zabbix-5.0.32]# /etc/init.d/zabbix_agentd start
Zabbix agent started.
12、查看Zabbix Server和Zabbix Agentd监听端口
[root@localhost zabbix-5.0.32]# netstat -lntup |egrep "10050|10051"
13、配置开机自启动
[root@localhost zabbix-5.0.32]# sed -i '/#!\/bin\/sh/a#chkconfig: - 30 90' /etc/init.d/zabbix_server
[root@localhost zabbix-5.0.32]# sed -i '/#!\/bin\/sh/a#description: Zabbix Server' /etc/init.d/zabbix_server
[root@localhost zabbix-5.0.32]# chkconfig --add zabbix_server
[root@localhost zabbix-5.0.32]# chkconfig zabbix_server on
[root@localhost zabbix-5.0.32]# sed -i '/#!\/bin\/sh/a#chkconfig: - 40 95' /etc/init.d/zabbix_agentd
[root@localhost zabbix-5.0.32]# sed -i '/#!\/bin\/sh/a#description: Zabbix Agentd' /etc/init.d/zabbix_agentd
[root@localhost zabbix-5.0.32]# chkconfig --add zabbix_agentd
[root@localhost zabbix-5.0.32]# chkconfig zabbix_agentd on
7)配置nginx.conf
[root@localhost zabbix-5.0.32]# vim /etc/nginx/nginx.conf
    user nginx nginx;
    worker_processes auto;
    pid /var/run/nginx.pid;
events {
    use epoll;
    worker_connections 10240;
    multi_accept on;
    }
http {
    include       mime.types;
    default_type  application/octet-stream;
    log_format  main  '$remote_addr - $remote_user [$time_local] "$request" '
                  '$status $body_bytes_sent "$http_referer" '
                  '"$http_user_agent" "$http_x_forwarded_for"';
    access_log /var/log/nginx/access.log main;
    error_log /var/log/nginx/error.log warn;
    sendfile        on;
    tcp_nopush          on;
    keepalive_timeout  120;
    tcp_nodelay         on;
    server_tokens off;
    gzip    on;
    gzip_min_length 1k;
    gzip_buffers    4 64k;
    gzip_http_version 1.1;
    gzip_comp_level 4;
    gzip_types      text/plain application/x-javascript text/css application/xml;
    gzip_vary       on;
    client_max_body_size 10m;
    client_body_buffer_size 128k;
    proxy_connect_timeout 90;
    proxy_send_timeout 90;
    proxy_buffer_size 4k;
    proxy_buffers 4 32k;
    proxy_busy_buffers_size 64k;
    large_client_header_buffers 4 4k;
    client_header_buffer_size 4k;
    open_file_cache_valid 30s;
    open_file_cache_min_uses 1;
server {
    listen	80;
    server_name	localhost;
    location / {
    root	/usr/share/nginx/html/zabbix;
    index index.php index.html index.htm;
    }
    location ~* \.php$ {
    root    /usr/share/nginx/html/zabbix;
    fastcgi_connect_timeout 300s;
    fastcgi_send_timeout 300s;
    fastcgi_read_timeout 300s;
    fastcgi_buffer_size 64k;
    fastcgi_buffers 4 64k;
    fastcgi_busy_buffers_size 128k;
    fastcgi_temp_file_write_size 256k;
    fastcgi_pass    127.0.0.1:9000;
    fastcgi_index   index.php;
    fastcgi_param SCRIPT_FILENAME $document_root$fastcgi_script_name;
    include fastcgi_params;
    }
  }
}
8)重载Nginx
[root@localhost zabbix-5.0.32]# service nginx reload
9)配置php.ini
[root@localhost zabbix-5.0.32]# sed -i 's/post_max_size = 8M/post_max_size = 16M/' /etc/opt/remi/php73/php.ini
[root@localhost zabbix-5.0.32]# sed -i 's/max_execution_time = 30/max_execution_time = 300/' /etc/opt/remi/php73/php.ini
[root@localhost zabbix-5.0.32]# sed -i 's/max_input_time = 60/max_input_time = 300/' /etc/opt/remi/php73/php.ini
[root@localhost zabbix-5.0.32]# sed -i 's#;date.timezone =#date.timezone = Asia/Shanghai#' /etc/opt/remi/php73/php.ini
[root@localhost zabbix-5.0.32]# sed -i 's/apache/nginx/g' /etc/opt/remi/php73/php-fpm.d/www.conf
10)重载php-fpm
[root@localhost zabbix-5.0.32]# service php73-php-fpm reload
[root@localhost zabbix-5.0.32]# chown -R nginx.nginx /var/opt/remi/php73/lib/php/session
11)Zabbix安装配置
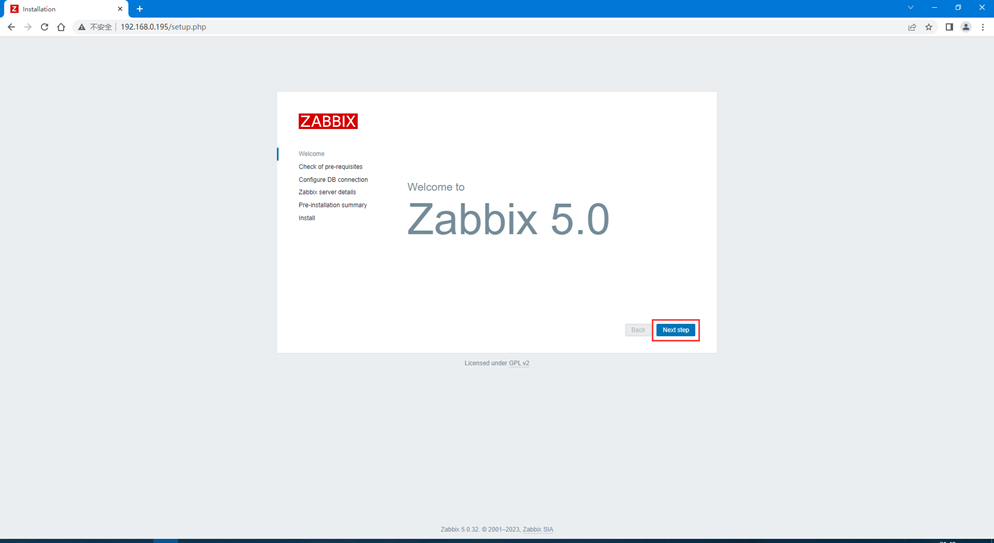
1、浏览器访问:http://192.168.0.195/,如下图所示
2、填写数据库主机、数据库端口、数据库名、用户名、密码
3、填写Host、Port、Name
4、安装完成
5、登录Zabbix
默认用户名:Admin、密码:zabbix,如下图所示
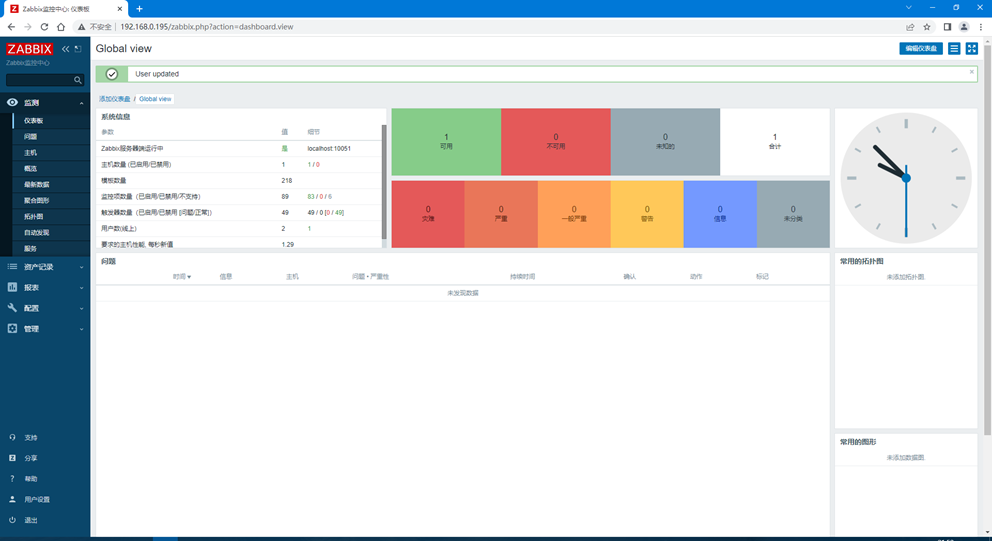
6、修改界面语言为中文
继续阅读
Zabbix最后更新:2023-3-26
 51工具盒子