MongoDB简介
MongoDB 是一个基于分布式文件存储的数据库。由 C++ 语言编写,旨在为 WEB 应用提供可扩展的高性能数据存储解决方案。
MongoDB 是一个介于关系数据库和非关系数据库之间的产品,是非关系数据库当中功能最丰富,最像关系数据库的。
在搭建集群之前,需要首先了解几个概念:路由,分片、副本集、配置服务器等。
文章源自小柒网-https://www.yangxingzhen.cn/5172.html
相关概念
文章源自小柒网-https://www.yangxingzhen.cn/5172.html
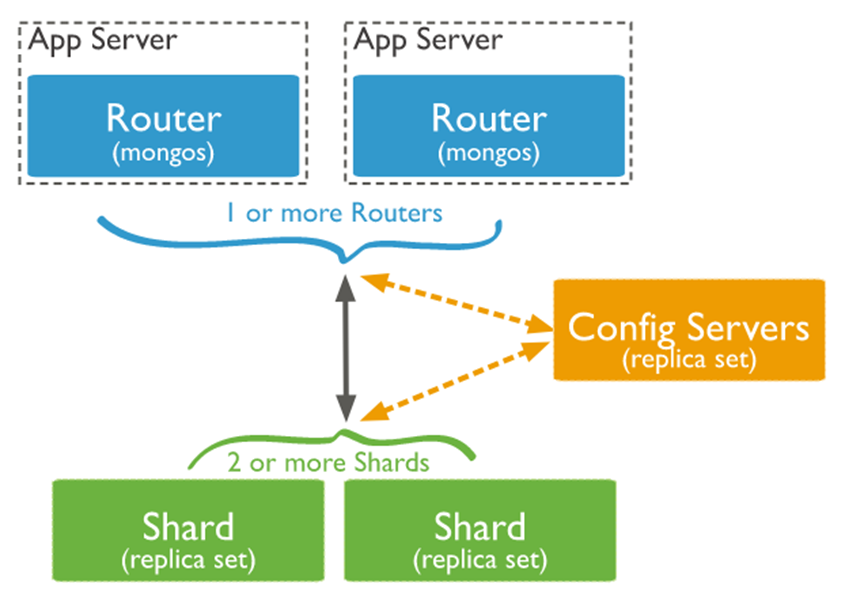
先来看一张图:
文章源自小柒网-https://www.yangxingzhen.cn/5172.html
 文章源自小柒网-https://www.yangxingzhen.cn/5172.html
从图中可以看到有四个组件:mongos、config server、shard、replica set。
文章源自小柒网-https://www.yangxingzhen.cn/5172.html
mongos,数据库集群请求的入口,所有的请求都通过mongos进行协调,不需要在应用程序添加一个路由选择器,mongos自己就是一个请求分发中心,它负责把对应的数据请求请求转发到对应的shard服务器上。在生产环境通常有多mongos作为请求的入口,防止其中一个挂掉所有的mongodb请求都没有办法操作。
文章源自小柒网-https://www.yangxingzhen.cn/5172.html
config server,顾名思义为配置服务器,存储所有数据库元信息(路由、分片)的配置。mongos本身没有物理存储分片服务器和数据路由信息,只是缓存在内存里,配置服务器则实际存储这些数据。mongos第一次启动或者关掉重启就会从 config server 加载配置信息,以后如果配置服务器信息变化会通知到所有的 mongos 更新自己的状态,这样 mongos 就能继续准确路由。在生产环境通常有多个 config server 配置服务器,因为它存储了分片路由的元数据,防止数据丢失!
文章源自小柒网-https://www.yangxingzhen.cn/5172.html
shard,分片(sharding)是指将数据库拆分,将其分散在不同的机器上的过程。将数据分散到不同的机器上,不需要功能强大的服务器就可以存储更多的数据和处理更大的负载。基本思想就是将集合切成小块,这些块分散到若干片里,每个片只负责总数据的一部分,最后通过一个均衡器来对各个分片进行均衡(数据迁移)。
文章源自小柒网-https://www.yangxingzhen.cn/5172.html
replica set,中文翻译副本集,其实就是shard的备份,防止shard挂掉之后数据丢失。复制提供了数据的冗余备份,并在多个服务器上存储数据副本,提高了数据的可用性, 并可以保证数据的安全性。
文章源自小柒网-https://www.yangxingzhen.cn/5172.html
仲裁者(Arbiter),是复制集中的一个MongoDB实例,它并不保存数据。仲裁节点使用最小的资源并且不要求硬件设备,不能将Arbiter部署在同一个数据集节点中,可以部署在其他应用服务器或者监视服务器中,也可部署在单独的虚拟机中。为了确保复制集中有奇数的投票成员(包括primary),需要添加仲裁节点做为投票,否则primary不能运行时不会自动切换primary。
文章源自小柒网-https://www.yangxingzhen.cn/5172.html
简单了解之后,我们可以这样总结一下,应用请求mongos来操作mongodb的增删改查,配置服务器存储数据库元信息,并且和mongos做同步,数据最终存入在shard(分片)上,为了防止数据丢失同步在副本集中存储了一份,仲裁在数据存储到分片的时候决定存储到哪个节点。
mongodb的集群搭建方式主要有三种,主从模式,Replica set模式,sharding模式, 三种模式各有优劣,适用于不同的场合,属Replica set应用最为广泛,主从模式现在用的较少,sharding模式最为完备,但配置维护较为复杂。本文我们来看下Replica Set模式的搭建方法。
Mongodb的Replica Set即副本集方式主要有两个目的,一个是数据冗余做故障恢复使用,当发生硬件故障或者其它原因造成的宕机时,可以使用副本进行恢复。另一个是做读写分离,读的请求分流到副本上,减轻主(Primary)的读压力。
Replica Set是mongod的实例集合,它们有着同样的数据内容。包含三类角色:
1)主节点(Primary)
接收所有的写请求,然后把修改同步到所有Secondary。一个Replica Set只能有一个Primary节点,当Primary挂掉后,其他Secondary或者Arbiter节点会重新选举出来一个主节点。默认读请求也是发到Primary节点处理的,需要转发到Secondary需要客户端修改一下连接配置。
2)副本节点(Secondary)
与主节点保持同样的数据集。当主节点挂掉的时候,参与选主。
3)仲裁者(Arbiter)
不保有数据,不参与选主,只进行选主投票。使用Arbiter可以减轻数据存储的硬件需求,Arbiter跑起来几乎没什么大的硬件资源需求,但重要的一点是,在生产环境下它和其他数据节点不要部署在同一台机器上。
注意,一个自动failover的Replica Set节点数必须为奇数,目的是选主投票的时候要有一个大多数才能进行选主决策。
4)选主过程
其中Secondary宕机,不受影响,若Primary宕机,会进行重新选主:
#使用Arbiter搭建Replica Set
偶数个数据节点,加一个Arbiter构成的Replica Set方式:
MongoDB分片集群搭建
系统环境:CentOS 7.4
1、服务器规划
|--------------------|--------------------|--------------------| | 服务器:172.18.137.156 | 服务器:172.18.137.157 | 服务器:172.18.137.151 | | mongos | mongos | mongos | | config server | config server | config server | | shard server1 主节点 | shard server1 副节点 | shard server1 仲裁 | | shard server2 仲裁 | shard server2 主节点 | shard server2 副节点 | | shard server3 副节点 | shard server3 仲裁 | shard server3 主节 |
2、端口分配
mongos:20000
config: 21000
shard1: 27001
shard2: 27002
shard3: 27003
3、安装包准备
版本:3.4.16
下载地址:https://mirrors.yangxingzhen.com/mongodb/mongodb-linux-x86_64-rhel70-3.4.16.tgz
4、安装步骤
1)下载安装包
[root@localhost ~]# wget -c https://mirrors.yangxingzhen.com/mongodb/mongodb-linux-x86_64-rhel70-3.4.16.tgz
2)解压并更改名称
#解压
[root@localhost ~]# tar zxf mongodb-linux-x86_64-rhel70-3.4.16.tgz
#重命名
[root@localhost ~]# mv mongodb-linux-x86_64-rhel70-3.4.16 /usr/local/mongodb
3)分别在每台机器建立conf、mongos、config、shard1、shard2、shard3六个目录,因为mongos不存储数据,只需要建立日志文件目录即可
[root@localhost ~]# mkdir -p /usr/local/mongodb/conf
[root@localhost ~]# mkdir -p /usr/local/mongodb/mongos/log
[root@localhost ~]# mkdir -p /usr/local/mongodb/config/{data,log}
[root@localhost ~]# mkdir -p /usr/local/mongodb/shard1/{data,log}
[root@localhost ~]# mkdir -p /usr/local/mongodb/shard2/{data,log}
[root@localhost ~]# mkdir -p /usr/local/mongodb/shard3/{data,log}
4)配置环境变量
[root@localhost ~]# vim /etc/profile
#配置内容如下
export PATH=/usr/local/mongodb/bin:$PATH
#执行source /etc/profile使其生效
[root@localhost ~]# source /etc/profile
5、config server配置服务器(3台机器需配置)
[root@localhost ~]# vim /usr/local/mongodb/conf/config.conf
#配置文件内容
pidfilepath = /usr/local/mongodb/config/log/config.pid
dbpath = /usr/local/mongodb/config/data
logpath = /usr/local/mongodb/config/log/config.log
logappend = true
bind_ip = 0.0.0.0
port = 21000
fork = true
#declare this is a config db of a cluster;
configsvr = true
#副本集名称
replSet = configs
#设置最大连接数
maxConns = 20000
#启动三台服务器的config server服务
[root@localhost ~]# mongod -f /usr/local/mongodb/conf/config.conf
#登录任意一台配置服务器,初始化配置副本集(IP和端口根据实际情况更改)
#连接Config Server服务
[root@localhost ~]# mongo --port 21000
#config变量
> config = {
... _id : "configs",
... members : [
... {_id : 0, host : "172.18.137.156:21000" },
... {_id : 1, host : "172.18.137.157:21000" },
... {_id : 2, host : "172.18.137.151:21000" }
... ]
... }
#初始化副本集
> rs.initiate(config)
6、配置分片副本集
设置第一个分片副本集(3台机器需配置)
[root@localhost ~]# vim /usr/local/mongodb/conf/shard1.conf
#配置文件内容
pidfilepath = /usr/local/mongodb/shard1/log/shard1.pid
dbpath = /usr/local/mongodb/shard1/data
logpath = /usr/local/mongodb/shard1/log/shard1.log
logappend = true
bind_ip = 0.0.0.0
port = 27001
fork = true
#打开web监控
httpinterface = true
rest=true
#副本集名称
replSet = shard1
#declare this is a shard db of a cluster;
shardsvr = true
#设置最大连接数
maxConns = 20000
#启动三台服务器的shard1 server服务
[root@localhost ~]# mongod -f /usr/local/mongodb/conf/shard1.conf
#登陆任意一台服务器,初始化副本集
[root@localhost ~]# mongo --port 27001
#使用admin数据库
> use admin
#定义副本集配置,第三个节点的 "arbiterOnly":true 代表其为仲裁节点。(需在非仲裁节点机器执行)
> config = {
... _id : "shard1",
... members : [
... {_id : 0, host : "172.18.137.156:27001" },
... {_id : 1, host : "172.18.137.157:27001" },
... {_id : 2, host : "172.18.137.151:27001" , arbiterOnly: true }
... ]
... }
#初始化副本集配置
mongos> rs.initiate(config)
1)设置第二个分片副本集(3台机器需配置)
[root@localhost ~]# vim /usr/local/mongodb/conf/shard2.conf
#配置文件内容
pidfilepath = /usr/local/mongodb/shard2/log/shard2.pid
dbpath = /usr/local/mongodb/shard2/data
logpath = /usr/local/mongodb/shard2/log/shard2.log
logappend = true
bind_ip = 0.0.0.0
port = 27002
fork = true
#打开web监控
httpinterface = true
rest = true
#副本集名称
replSet = shard2
#declare this is a shard db of a cluster;
shardsvr = true
#设置最大连接数
maxConns = 20000
#启动三台服务器的shard2 server 服务
[root@localhost ~]# mongod -f /usr/local/mongodb/conf/shard2.conf
#登陆任意一台服务器,初始化副本集
[root@localhost ~]# mongo --port 27002
#使用admin数据库
> use admin
#定义副本集配置,第一个节点的 "arbiterOnly":true 代表其为仲裁节点。(需在非仲裁节点机器执行)
> config = {
... _id : "shard2",
... members : [
... {_id : 0, host : "172.18.137.156:27002" , arbiterOnly: true },
... {_id : 1, host : "172.18.137.157:27002" },
... {_id : 2, host : "172.18.137.151:27002" }
... ]
... }
#初始化副本集配置
> rs.initiate(config)
2)设置第三个分片副本集(3台机器需执行)
[root@localhost ~]# vim /usr/local/mongodb/conf/shard3.conf
#配置文件内容
pidfilepath = /usr/local/mongodb/shard3/log/shard3.pid
dbpath = /usr/local/mongodb/shard3/data
logpath = /usr/local/mongodb/shard3/log/shard3.log
logappend = true
bind_ip = 0.0.0.0
port = 27003
fork = true
#打开web监控
httpinterface = true
rest = true
#副本集名称
replSet = shard3
#declare this is a shard db of a cluster;
shardsvr = true
#设置最大连接数
maxConns = 20000
#启动三台服务器的shard3 server服务
[root@localhost ~]# mongod -f /usr/local/mongodb/conf/shard3.conf
#登陆任意一台服务器,初始化副本集
[root@localhost ~]# mongo --port 27003
#使用admin数据库
> use admin
#定义副本集配置,第二个节点的 "arbiterOnly":true 代表其为仲裁节点。(需在非仲裁节点机器执行)
> config = {
... _id : "shard3",
... members : [
... {_id : 0, host : "172.18.137.156:27003" },
... {_id : 1, host : "172.18.137.157:27003" , arbiterOnly: true},
... {_id : 2, host : "172.18.137.151:27003" }
... ]
... }
#初始化副本集配置
> rs.initiate(config)
7、配置路由服务器 mongos服务(三台机器需配置)
[root@localhost ~]# vim /usr/local/mongodb/conf/mongos.conf
#配置内容如下
pidfilepath = /usr/local/mongodb/mongos/log/mongos.pid
logpath = /usr/local/mongodb/mongos/log/mongos.log
logappend = true
bind_ip = 0.0.0.0
port = 20000
fork = true
#监听的配置服务器,只能有1个或者3个 configs为配置服务器的副本集名字
configdb = configs/172.18.137.156:21000,172.18.137.157:21000,172.18.137.151:21000
#设置最大连接数
maxConns = 20000
#启动三台服务器的mongos server服务
[root@localhost ~]# mongos -f /usr/local/mongodb/conf/mongos.conf
8、启用分片(其中IP根据实际情况更改)
#登陆任意一台mongos
[root@localhost ~]# mongo --port 20000
#使用admin数据库
mongos> use admin
#串联路由服务器与分配副本集
mongos> sh.addShard("shard1/172.18.137.156:27001,172.18.137.157:27001,172.18.137.151:27001")
mongos> sh.addShard("shard2/172.18.137.156:27002,172.18.137.157:27002,172.18.137.151:27002")
mongos> sh.addShard("shard3/172.18.137.156:27003,172.18.137.157:27003,172.18.137.151:27003")
#查看集群状态
mongos> sh.status()
9、配置分片
设置test的 table1 表需要分片,根据 id 自动分片到 shard1 ,shard2,shard3 上面去
#指定test分片生效
[root@localhost ~]# mongo --port 20000
mongos> use admin
mongos> db.runCommand({enablesharding :"test"})
#指定数据库里需要分片的集合和片键(先不开启,后期需要开启)
mongos> db.runCommand({shardcollection : "test.table1",key : {_id: 1}})
mongos> db.runCommand({shardcollection : "test.driverPoint",key : {_id: 1}})
测试分片配置结果
[root@localhost ~]# mongo --port 20000
#使用test
mongos> use test
#插入测试数据
mongos> for (var i = 1; i <= 100; i++) db.table1.save({id:i,"test1":"testval1"})
#查看分片情况如下,部分无关信息省掉了
mongos> db.table1.stats()
{
"sharded" : true,
"ns" : "test.table1",
"count" : 100,
"numExtents" : 13,
"size" : 5600,
"storageSize" : 22372352,
"totalIndexSize" : 6213760,
"indexSizes" : {
"id" : 3335808,
"id_1" : 2877952
},
"avgObjSize" : 56,
"nindexes" : 2,
"nchunks" : 3,
"shards" : {
"shard1" : {
"ns" : "test.table1",
"count" : 45,
"size" :2311,
...
"ok" : 1
},
"shard2" : {
"ns" : "test.table1",
"count" : 27,
"size" : 1180,
...
"ok" : 1
},
"shard3" : {
"ns" : "test.table1",
"count" :28,
"size" : 1219,
...
"ok" : 1
}
},
"ok" : 1
}
可以看到数据分到3个分片,各自分片数量为: shard1 "count" : 45,shard2 "count" : 27,shard3 "count" : 28。已经成功了!
服务器启动顺序:先启动配置服务器和分片服务器,后启动路由实例启动路由实例:(三台机器)
继续阅读
历史上的今天
7 月
6
- 2023Centos 7.9安装RocketMQ-Dashboard并开启登录功能 MongoDB最后更新:2022-12-6
 51工具盒子


