Opentsdb简介
opentsdb是基于Hbase的时序数据库[时间序列数据库]。不具备通用性,主要针对具有时间特性和需求的数据,如监控数据、温度变化数据等。opentsdb说是数据库,但并不能称作为数据库,他是在Hbase(HBase才是具有存储功能的)的基础上,进行数据结构的优化和处理,从而适合存储具有时间特性的数据,同时提供特定的工具进行查询等操作。
基础概念
1)时间戳(时间序列),指明时间点文章源自小柒网-https://www.yangxingzhen.cn/1873.html
2)指标名称 :数据的作用,是这个数据的抽象概括,指明监控内容,如温度,湿气,大小文章源自小柒网-https://www.yangxingzhen.cn/1873.html
3)标签 : 对象,指明监控对象 ,如某个城市,某个CPU,某块区域文章源自小柒网-https://www.yangxingzhen.cn/1873.html
4)值 : 存储值文章源自小柒网-https://www.yangxingzhen.cn/1873.html
总体架构
1)servers : 不知道干嘛的。好像跟http api 没关系文章源自小柒网-https://www.yangxingzhen.cn/1873.html
2)TSD : 还是不知道干嘛的 。应该是处理程序文章源自小柒网-https://www.yangxingzhen.cn/1873.html
3)HBase : 存储数据库文章源自小柒网-https://www.yangxingzhen.cn/1873.html
HBase
Hbase 是Hadoop 的子项目,负责数据存储。是一种基于列的NoSQL数据库,在opentsdb中HBase 为其提供了高效的数据存储。文章源自小柒网-https://www.yangxingzhen.cn/1873.html
tsdb-uid表 : opentsdb 将指标、时间戳、标签名及标签值使用 3个字节的uid 进行存储,而tsdb-uid表就是存储的就是做uid 和 真实值之间的映射关系,使用uid是为了优化HBase 中的Rowkey (行键)文章源自小柒网-https://www.yangxingzhen.cn/1873.html
tsdb 表 : 用来保存数据,这图其实是看不懂的。只是知道 Row Key 是用来时存储指标、时间戳、标签的uid映射的,Column Family 存储了是1个小时内的数据(一小时 = 60秒 * 60分钟 = 3600 秒 )文章源自小柒网-https://www.yangxingzhen.cn/1873.html
搭建环境、版本信息
OS:CentOS 7.4
IP:192.168.31.36
JDK:1.8.0_144
Zookeeper:3.4.10
Hbase:1.2.11
Opentsdb:2.4.0
一、Java环境部署
1、安装包准备
版本:jdk-8u144
下载地址:
https://mirrors.yangxingzhen.com/jdk/jdk-8u144-linux-x64.tar.gz
2、安装步骤
1)下载JDK安装包
[root@localhost ~]# wget -c https://mirrors.yangxingzhen.com/jdk/jdk-8u144-linux-x64.tar.gz
2)解压安装包
[root@localhost ~]# tar zxf jdk-8u144-linux-x64.tar.gz -C /usr/local
3)配置系统环境变量
编辑vim /etc/profile,加入以下内容
export JAVA_HOME=/usr/local/jdk1.8.0_144
export CLASSPATH=$CLASSPATH:$JAVA_HOME/lib:$JAVA_HOME/jre/lib
export PATH=$JAVA_HOME/bin:$JAVA_HOME/jre/bin:$PATH:$HOMR/bin
执行source /etc/profile 使其生效
4)使用java、javac等命令验证是否安装成功。
[root@localhost ~]# java -version
java version "1.8.0_144"
Java(TM) SE Runtime Environment (build 1.8.0_144-b01)
Java HotSpot(TM) 64-Bit Server VM (build 25.144-b01, mixed mode)
二、Zookeeper部署
{#7986-1534039767655}1、安装包准备
版本:3.4.10
下载地址: https://mirrors.yangxingzhen.com/zookeeper/zookeeper-3.4.10.tar.gz
2、安装步骤
[root@localhost ]# wget -c https://mirrors.yangxingzhen.com/zookeeper/zookeeper-3.4.10.tar.gz
3)解压安装配置zookeeper
[root@localhost ]# tar zxf zookeeper-3.4.10.tar.gz
[root@localhost ]# mv zookeeper-3.4.10 /usr/local/zookeeper
[root@localhost ]# cd /usr/local/zookeeper/
4)创建快照日志存放目录:
[root@localhost zookeeper]# mkdir -p data
5)创建事务日志存放目录:
[root@localhost zookeeper]# mkdir -p logs
【注意】:如果不配置dataLogDir,那么事务日志也会写在data目录中。这样会严重影响zookeeper的性能。因为在zookeeper吞吐量很高的时候,产生的事务日志和快照日志太多。
[root@localhost zookeeper]# cd conf/
[root@localhost conf]# cp zoo_sample.cfg zoo.cfg
[root@localhost conf]# vim zoo.cfg
#配置内容
tickTime=2000
initLimit=10
syncLimit=5
clientPort=1888
#存放数据文件
dataDir=/usr/local/zookeeper/data
#存放日志文件
dataLogDir=/usr/local/zookeeper/logs
#zookeeper cluster,2888为选举端口,3888为心跳端口
server.1=127.0.0.1:2888:3888
[root@pre_online conf]# echo "1" > /usr/local/zookeeper/data/myid
6)启动和停止zookeeper
在ZooKeeper集群的每个结点上,执行启动ZooKeeper服务的脚本,如下所示:
[root@localhost local]# cd /usr/local/zookeeper/bin
[root@localhost bin]# ./zkServer.sh start
ZooKeeper JMX enabled by default
Using config: /usr/local/zookeeper/bin/../conf/zoo.cfg
Starting zookeeper ... STARTED
7)日志可查询:/usr/local/zookeepe/bin/zookeeper.out
可以通过命令jps查看Zookeeper进程:
[root@localhost bin]# jps
[root@localhost bin]# ps -ef |grep zookeeper
8)停止zookeeper命令:
[root@localhost bin]# /usr/local/zookeeper/bin/zkServer.sh stop
9)配置系统环境变量
[root@localhost ~]# echo "export PATH=/usr/local/zookeeper/bin:\$PATH" >>/etc/profile
执行 source /etc/profile 使其生效
三、Hbase部署
安装包准备
版本:1.2.11
下载地址: https://mirrors.yangxingzhen.com/hbase/hbase-1.2.11-bin.tar.gz
安装步骤
1)下载JDK安装包;
[root@localhost ~]# wget -c https://mirrors.yangxingzhen.com/hbase/hbase-1.2.11-bin.tar.gz
2)解压;
[root@localhost ~]# tar zxf hbase-1.2.11-bin.tar.gz -C /usr/local
3)修改Hbase配置
[root@nginx soft]# cd /usr/local/hbase-1.2.11/conf/
1、修改hbase-env.sh
[root@nginx conf]# vim hbase-env.sh
添加以下内容
export JAVA_HOME=/usr/local/jdk1.8.0_144/
export HBASE_MANAGES_ZK=false
如果使用内置zookeeper不用修改HBASE_MANAGES_ZK
2、修改hbase-site.xml
[root@nginx conf]# vim hbase-site.xml
|-----------------------------------------------------------------------------------------------------------------------------------------------------------------------------------------------------------------------------------------------------------------------------------------------------------------------------------------------------------------------------------------------------------------------------------------------------------------------------------------------------------------------------------------------------------------------------------------------------------------------------------------------------------------------------------------------------------------------------------------------------------------------------------------------------------------------------------------------------------------------------------------------------------------------------------------------------------------------------------------------------------------------------------------------------------------------------------------------------------------------------------------------------------------------------------------------------------------------------------------------------------------------------------------------------------------------------------------------------------------------------------------------------------------------------------------------------------------------------------------------------------------------------------------------------------------------------------------------------------------------------------------------------------------------------------------------------------------------------------------------------------------------------------------------------------------------------------------------------------------------------------------------------------------------------------------------------------------------------------------------------------------------------------------------------------------------------------------------------------------------------------------------------------------------------| | <?xml version="1.0"?> <?xml-stylesheet type="text/xsl" href="configuration.xsl"?> <!-- /** * * Licensed to the Apache Software Foundation (ASF) under one * or more contributor license agreements. See the NOTICE file * distributed with this work for additional information * regarding copyright ownership. The ASF licenses this file * to you under the Apache License, Version 2.0 (the * "License"); you may not use this file except in compliance * with the License. You may obtain a copy of the License at * * http://www.apache.org/licenses/LICENSE-2.0 * * Unless required by applicable law or agreed to in writing, software * distributed under the License is distributed on an "AS IS" BASIS, * WITHOUT WARRANTIES OR CONDITIONS OF ANY KIND, either express or implied. * See the License for the specific language governing permissions and * limitations under the License. */ --> <configuration> <!-- 本地文件系统tmp目录,一般配置成local模式的设置一下,但是最好还是需要设置一下,因为很多文件都会默认设置成它下面的 --> <property> <name>hbase.tmp.dir</name> <value>/usr/local/hbase-1.2.11/tmp</value> </property> <!-- * HBase集群中所有RegionServer共享目录,用来持久化HBase的数据,一般设置的是hdfs的文件目录,如hdfs://namenode.[example.org:9000/hbase](http://example.org:9000/hbase) --> <property> <name>hbase.rootdir</name> <value>file:/usr/local/hbase-1.2.11/data</value> </property> <!-- ZooKeeper的zoo.conf中的配置。 快照的存储位置 --> <property> <name>hbase.zookeeper.property.dataDir</name> <value>/usr/local/zookeeper/data</value> </property> <!-- ZooKeeper端口 --> <property> <name>hbase.zookeeper.property.clientPort</name> <value>1888</value> </property> <!-- ZooKeeper连接机器名或者ip,多个用','号分隔 --> <property> <name>hbase.zookeeper.quorum</name> <value>localhost</value> </property> <!-- ZooKeeper存储hbase数据的节点名称 --> <property> <name>zookeeper.znode.parent</name> <value>/hbase</value> </property> <!-- 集群的模式,分布式还是单机模式,如果设置成false的话,HBase进程和Zookeeper进程在同一个JVM进程 --> <property> <name>hbase.cluster.distributed</name> <value>true</value> </property> </configuration> |
3、启动Hbase
[root@nginx conf]# cd /usr/local/hbase-1.2.11/bin/
[root@nginx bin]# ./start-hbase.sh
4、进入控制台
[root@nginx bin]# ./hbase shell
四、Opentsdb部署
1、安装包准备
版本:2.4.0
下载地址: https://mirrors.yangxingzhen.com/opentsdb/opentsdb-2.4.0.tar.gz
2、安装步骤
1)下载JDK安装包;
[root@localhost ~]# wget -c https://mirrors.yangxingzhen.com/opentsdb/opentsdb-2.4.0.tar.gz
2)解压编译
[root@localhost ~]# tar zxf opentsdb-2.4.0.tar.gz -C /usr/local
[root@nginx opentsdb-2.4.0]# ./build.sh
[root@nginx opentsdb-2.4.0]# cp -r third_party build
[root@nginx opentsdb-2.4.0]# ./build.sh
3)创建表
[root@nginx opentsdb-2.4.0]# env COMPRESSION=NONE HBASE_HOME=/usr/local/hbase-1.2.11 src/create_table.sh
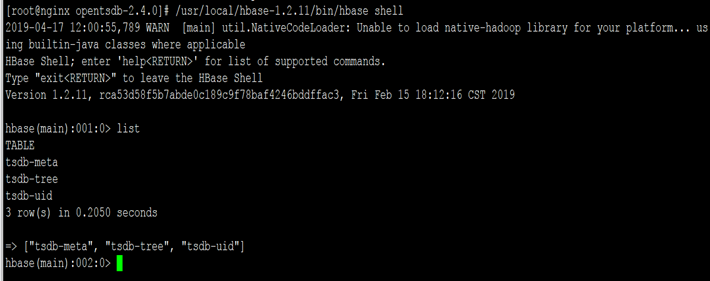
4)进入控制台查看是否创建了表
[root@nginx opentsdb-2.4.0]# /usr/local/hbase-1.2.11/bin/hbase shell
PS:估计有毒,发现少了一张tsdb表,手动创建hbase(main):003:0> create 'tsdb',{NAME => 't', VERSIONS => 1, COMPRESSION => 'NONE', BLOOMFILTER => 'ROW', DATA_BLOCK_ENCODING =>'DIFF'}
5)Opentsdb配置
[root@nginx opentsdb-2.4.0]# cp src/opentsdb.conf build
[root@nginx opentsdb-2.4.0]# vim build/opentsdb.conf
配置内容如下
tsd.network.port = 4242
tsd.network.bind = 0.0.0.0
tsd.network.keep_alive = true
tsd.http.staticroot = ./staticroot
tsd.http.cachedir = /usr/local/hbase-1.2.11/cache
tsd.core.auto_create_metrics = true
tsd.storage.hbase.data_table = tsdb
tsd.storage.hbase.zk_basedir = /hbase
tsd.storage.hbase.zk_quorum = localhost:1888
6)启动Opentsdb
[root@nginx opentsdb-2.4.0]# cd /usr/local/opentsdb-2.4.0/build
[root@nginx build]# nohup ./tsdb tsd &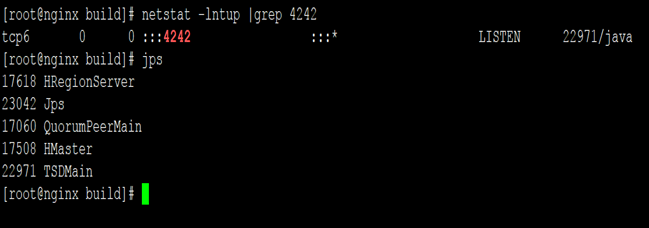
7)访问Opentsdb
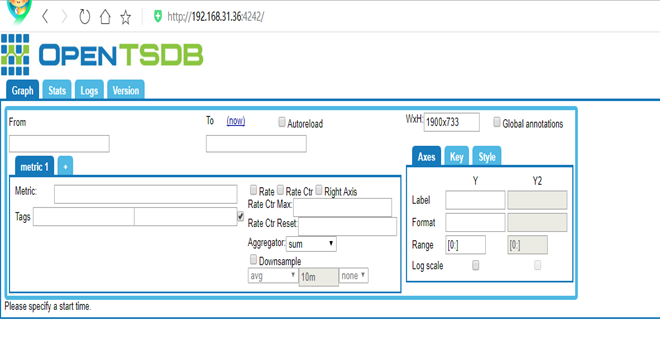
继续阅读
Linux最后更新:2022-12-6
 51工具盒子
