1 方案的主流流程

我们先看下应用简单的架构图,一般请求通过nginx到达我们应用服务,应用服务调用我们的中间件。
1 项目的pv、uv以及运行状态 我们可以通过filebeat 把nginx日志同步到logstash,最终落到es里面,通过grafana做监控实现。
2 项目业务日志查询,我们可以通过logback配置,把日志输入到logstash最终也落到es里面,通过kibana方便问题排查。
3 服务器及中间件的运行状态我们可以通过promethues提供的exporter采集指标数据,通过grafana做监控实现。
4 使用alertmanager 或 第三方告警平台实现各种预警。
2 elk 环境搭建过程
1 elk简介
ELK :是elastic公司提供的一套完整的日志收集、展示解决方案,是三个产品的首字母缩写,分别是ElasticSearch、Logstash 和 Kibana。 ElasticSearch: 简称ES,它是一个实时的分布式搜索和分析引擎,它可以用于全文搜索,结构化搜索以及分析。它是一个建立在全文搜索引擎 Apache Lucene 基础上的搜索引擎,使用 Java 语言编写。 Logstash: 一个具有实时传输能力的数据收集引擎,用来进行数据收集(如:读取文本文件)、解析,并将数据发送给ES。 Kibana: 为 Elasticsearch 提供了分析和可视化的 Web 平台。它可以在 Elasticsearch 的索引中查找,交互数据,并生成各种维度表格、图形。 FileBeat: Elasticsearch , Logstash, Kibana , 它们都是开源软件。新增了一个FileBeat,它是一个轻量级的日志收集处理工具(Agent),Filebeat占用资源少,适合于在各个服务器上搜集日志后传输给Logstash,官方也推荐此工具。
2 软件下载
官方下载中心:https://elasticsearch.cn/download/#seg-3
选择自己需要的版本用wget下载到服务器上,我演示用的版本是:7.16.2
个人习惯下载软件存位置 /usr/local/ 目录下
# 下载elasticsearch
wget https://artifacts.elastic.co/downloads/elasticsearch/elasticsearch-7.16.2-linux-x86_64.tar.gz
下载kibana
wget https://artifacts.elastic.co/downloads/kibana/kibana-7.16.2-linux-x86_64.tar.gz
下载logstash
wget https://artifacts.elastic.co/downloads/logstash/logstash-7.16.2-linux-x86_64.tar.gz
3 部署方案
裸部署非常简单:解压、修改配置文件、启动应用即可
1 说明:由于elasticsearch不允许使用root启动,需要创建用户组及用户
groupadd elsearch
useradd elsearch -g elsearch -p elsearch
2 elk的配置文件目录:
/您的解压目录/elasticsearch-7.16.2/config 设置jvm内存
/您的解压目录/logstash-7.16.2/config 设置jvm内存、收集日志的端口以及es服务地址
/您的解压目录/kibana-7.16.2-linux-x86_64/config 设置es地址
3 配置文件说明
A elasticsearch.yml:配置数据、日志位置服务端口及ip,我修改后的内容如下:
#集群名称(按实际需要配置名称)
cluster.name: elasticsearch
#节点名称
node.name: node-1
#数据路径(按实际需要配置日志地址)
path.data: /usr/local/elasticsearch-7.16.2/data
#日志路径(按实际需要配置日志地址)
path.logs: /usr/local/elasticsearch-7.16.2/logs
#地址(通常使用内网进行配置) 0.0.0.0 all net
network.host: 0.0.0.0
#端口号
http.port: 9200
#节点地址
discovery.seed_hosts: ["127.0.0.1", "[::1]"]
#集群master
cluster.initial_master_nodes: ["node-1"]
#跨域(这两项配置手动添加一下)
http.cors.enabled: true
http.cors.allow-origin: "*"
B elasticsearch-jvm.options :这里设置下jvm的最大内存及最小内存
C kibana.yml : 配置Kibana服务的ip及端口,需要设置下elasticsearch的ip及端口
D logstash.conf : 设置提供日志收集的服务端口,过滤过程的一些字段转换、过滤后日志输入到es,修改后的配置如下: (后面具体使用时候也会再讲)
input {
  # 日志输入-此处配置接收nginx日志(通过filebeat传输过来的)
  beats {
    port => 5044
    #codec => json_lines
    codec => json
    type => "nginx"
  }
  # 日志输入-此处配置接收项目logback日志(通过logback.xml配置传输过来的)
  tcp {
    port => 5088
    type => "logback"
  }
}
filter {
如果是nginx 过来的设置类型转换
if [type] == "nginx"{
mutate {
convert => [ "status","integer" ]
convert => [ "size","integer" ]
convert => [ "upstreatime","float" ]
remove_field => "message"
}
}
如果是logback过来的设置过来条件
if [type] == "logback"{
mutate {
rename => { "host" => "host.name" }
}
json {
source => "message"
remove_field => ["thread","class"]
}
}
geoip {
source => "ip"
}
}
日志输出到es里
output { if [type] == "nginx"{ elasticsearch { hosts => ["http://localhost:9200"] index => "nginx_log" } } if [type] == "logback"{ elasticsearch { hosts => ["http://localhost:9200"] index => "logback" } } }
D logstash-jvm.options : jvm相关配置
4 根据需要修改配置文件后启动命令如下(注意自己的软件路径)
runuser elsearch -s /bin/bash -c '/usr/local/elasticsearch-7.16.2/bin/elasticsearch >/dev/null &'
/usr/local/logstash-7.16.2/bin/logstash -f /usr/local/logstash-7.16.2/config/logstash.conf > /usr/local/logstash-7.16.2/logs/logstash.log &
runuser elsearch -s /bin/bash -c '/usr/local/kibana-7.16.2-linux-x86_64/bin/kibana >/dev/null &'
我们重点介绍下制作镜像容器部署方案,方案中我把elk制作到一个镜像里,部署后的架构图:

A 制作镜像需要的文件目录

B elk 的配置文件统一提出来,配置好后打包到镜像中,容器启动时候也可以加参数再次挂载出来
C mystart.sh为容器运行时的启动服务脚本
#!/bin/sh
runuser elsearch -s /bin/bash -c '/usr/local/elasticsearch-7.16.2/bin/elasticsearch >/dev/null &'
/usr/local/logstash-7.16.2/bin/logstash -f /usr/local/logstash-7.16.2/config/logstash.conf > /usr/local/logstash-7.16.2/logs/logstash.log &
runuser elsearch -s /bin/bash -c '/usr/local/kibana-7.16.2-linux-x86_64/bin/kibana'
tail -200f /usr/local/container/logstash/logs/logstash.log
D build_image.sh 制作docker镜像push到镜像仓库
#!/bin/sh
build镜像 如要推送镜像到私服需要修改自己的镜像仓库地址
docker build -f Dockerfile  -t registry.cn-hangzhou.aliyuncs.com/mrxu-base/elk .
【下面代码是把镜像推送到自己的镜像仓库 可以工别人使用!!!!】
【1 登录腾讯云镜像仓库 (免费)】
【2 push镜像到镜像仓库】
docker login --username=您的账户 -p=您的密码 registry.cn-hangzhou.aliyuncs.com
docker push registry.cn-hangzhou.aliyuncs.com/mrxu-base/elk
E docker-start.sh 拉取镜像并启动镜像
#!/bin/sh
创建elk 文件挂载目录
if [ ! -d "/usr/local/container" ];then
mkdir /usr/local/container
chmod -R 777  /usr/local/container/
else
echo "目录已经存在"
fi
拉取镜像 (如果是自己制作的可以用本地镜像)
docker pull registry.cn-hangzhou.aliyuncs.com/mrxu-base/elk
启动容器
elasticsearch 服务端口:9200 映射宿主机端口:19200
logstash beat 服务端口:5044 映射宿主机端口:15044 自定义接收nginx日志的端口
logstash tcp 服务端口:5088 映射宿主机端口:15088 自定义接收项目logback日志的端口
kibana 服务端口:5601 映射宿主机端口:15601
docker run -it --name elk --privileged=true -p 19200:9200 -p 15044:5044 -p 15088:5088 -p 15601:5601
-v /usr/local/container/elasticsearch/data:/usr/local/elasticsearch-7.16.2/data
-v /usr/local/container/elasticsearch/logs:/usr/local/elasticsearch-7.16.2/logs
-v /usr/local/container/logstash/data:/usr/local/logstash-7.16.2/data
-v /usr/local/container/logstash/logs:/usr/local/logstash-7.16.2/logs
-v /usr/local/container/kibana/data:/usr/local/kibana-7.16.2-linux-x86_64/data
-d registry.cn-hangzhou.aliyuncs.com/mrxu-base/elk
chmod -R 777 /usr/local/container/
F Dockerfile为容器编排文件
FROM openjdk:11
MAINTAINER jsonxu<1012733642@qq.com>
添加elk到容器
ADD elasticsearch-7.16.2-linux-x86_64.tar.gz /usr/local/
ADD logstash-7.16.2-linux-x86_64.tar.gz /usr/local/
ADD kibana-7.16.2-linux-x86_64.tar.gz /usr/local/
添加es配置文件
ADD config/elasticsearch.yml /usr/local/elasticsearch-7.16.2/config/
ADD config/elasticsearch-jvm.options /usr/local/elasticsearch-7.16.2/config/jvm.options
添加logstash配置文件
ADD config/logstash.conf /usr/local/logstash-7.16.2/config/
ADD config/logstash-jvm.options /usr/local/logstash-7.16.2/config/jvm.options
添加kibana配置文件
ADD config/kibana.yml /usr/local/kibana-7.16.2-linux-x86_64/config/
添加elk服务启动脚本
ADD config/mystart.sh /
执行命令 说明:es 必须使用非root用户启动
RUN cp /usr/share/zoneinfo/Asia/Shanghai /etc/localtime
&& echo "Asia/Shanghai" > /etc/timezone
由于elasticsearch不允许使用root启动,创建以下用户及组
&& groupadd elsearch
&& useradd elsearch -g elsearch -p elsearch
&& chown -R elsearch:elsearch /usr/local/elasticsearch-7.16.2/
创建日志目录
&& mkdir /usr/local/logstash-7.16.2/logs/
kibana
&& chown -R elsearch:elsearch /usr/local/kibana-7.16.2-linux-x86_64/
&& chmod +x /mystart.sh
执行启动脚本
CMD ["sh","-c","/mystart.sh"]
G 配置文件我打包好下载即可,软件太大自行下载,文件按我给的目录结构存放
链接:https://caiyun.139.com/m/i?165CkwqnxdGXl
提取码:hruh
H 文件放到服务器后
第一步:到文件目录下 授权脚本
chmod +x build_image.sh docker-start.sh
第二步:执行build_image.s脚本 制作镜像 (如果有镜像仓库可以设置) 第三步:执行docker-start.sh脚本 启动容器
执行后elk就部署完成了,kibana 容器端口是5601 映射到宿主机端口是15601
可以通过: http://宿主机IP:15601 访问kibana地址了。
3 分布式日志收集方案
1 方案的大体流程
请求到达gateway 网关后我们生成日志链路追踪的唯一traceId,在调用微服务前把traceId放入请求的header里,微服务接收到请求,从header获取traceId 放入MDC中,由微服务A到微服务B也是同样的道理通过http请求的header传递traceId信息。最后在各微服务的logback.xml中配置logstash的地址。方案如图:

2 具体实现细节
1 在gateway 网关添加filter生成随机traceid放入ThreadLocal和MDC中
@WebFilter(urlPatterns = {"/*"},filterName = "frontFilter")
public class FrontFilter implements Filter {
@Override
public void doFilter(ServletRequest request,
ServletResponse response, FilterChain chain)
throws IOException, ServletException {
HttpServletRequest httpRequest = (HttpServletRequest)request;
// 自定义的threadlocal对象
RpcRequestInfo rpcRequestInfo = RpcRequestInfo.get();
// 生成随机唯一id
String traceId = traceId = StrFunc.randomNumber(12);
// setTraceId 还会 MDC.put(&quot;traceId&quot;,traceId);
rpcRequestInfo.setTraceId(traceId);
chain.doFilter(request,response);
// 删除threadlocal内容防止内存泄漏
RpcRequestInfo.remove();
}
}
2 调用微服务前定义 RequestInterceptor,从ThreadLocal获取traceId放入请求header
public class FeignRequestInterceptor implements RequestInterceptor {
@Override
public void apply(RequestTemplate requestTemplate) {
    if(StringUtils.isNotBlank(RpcRequestInfo.getTraceId())){
        requestTemplate.header(HeaderConstant.TRACE_ID,RpcRequestInfo.getTraceId());
    }
}

}
**说明:**FeignRequestInterceptor 要交给spring管理
3 微服务接收到请求时 从header中获取traceId放入ThreadLocal和MDC中
public class UserInfoHandler extends HandlerInterceptorAdapter {
@Override
public boolean preHandle(HttpServletRequest request, HttpServletResponse response, Object handler){
    //获取设置头部信息
    if(RpcRequestInfo.getTraceId() != null){
        //已经设置过当前登录信息
        return true;
    }
    RpcRequestInfo requestInfo = RpcRequestInfo.get();
    String traceId = request.getHeader(HeaderConstant.TRACE_ID);
    if (StringUtils.isNotBlank(traceId)) {
        // setTraceId 还会 MDC.put("traceId",traceId);
        requestInfo.setTraceId(traceId);
    }
    return true;
}
@Override
public void afterCompletion(HttpServletRequest request, HttpServletResponse response, Object handler, Exception ex){
//清理当前登录者信息
RpcRequestInfo.remove();
}

}
**说明:**FeignRequestInterceptor 要交给spring管理
4 logback.xml配置
<appender name="logstash" class="net.logstash.logback.appender.LogstashTcpSocketAppender">
    <destination>您的logstashIP:15088</destination>
    <!-- 日志输出编码 -->
    <encoder class="net.logstash.logback.encoder.LoggingEventCompositeJsonEncoder">
        <providers>
            <timestamp>
                <timeZone>GMT+8</timeZone>
            </timestamp>
            <pattern>
                <pattern>
                    {
                    "serviceName": "${contextName}",
                    "time":"%d{yyyy-MM-dd HH:mm:ss.SSS}",
                    "level": "%level",
                    "traceId": "%X{traceId}",<!-- 说明这里可以直接取MDC设置的值 -->
                    "clientIp": "%X{ip}",
                    "thread": "%thread",
                    "class": "%logger",
                    "msg": "%message"
                    }
                </pattern>
            </pattern>
        </providers>
    </encoder>
</appender>
`<!-- 日志输出级别 -->
<root level="info">
<appender-ref ref="logstash"/>
</root>`
5 logstash相关配置
input {
  tcp {
    port => 5088
    type => "logback"
  }
}
filter {
if [type] == "logback"{
mutate {
rename => { "host" => "host.name" }
}
json {
source => "message"
remove_field => ["thread","class"]
}
}
geoip {
source => "ip"
}
}
output { if [type] == "logback"{ elasticsearch { hosts => ["http://localhost:9200"] index => "logback" #user => "elastic" #password => "changeme" } } }
配置好后就可以根据traceId把个微服务的日志串接起来,通过kibana进行过滤了。
4 promethues+grafana搭建过程
1 简介
Prometheus是一个开源的服务监控系统和时间序列数据库。
Grafana是一款用Go语言开发的,源数据可视化工具,可以做数据监控和数据统计,带有告警功能。
2 软件下载
Prometheus官网下载地址:https://prometheus.io/download/
Grafana 官网下载地址:https://grafana.com/get/?plcmt=top-nav&cta=downloads&tab=self-managed
选择自己需要的版本用wget下载到服务器上,我演示用的版本是:Prometheus 2.37.0;Grafana 8.5.3
个人习惯下载软件存位置 /usr/local/ 目录下
3 部署方案
1 配置文件目录:
Grafana : /usr/local/grafana-8.5.3/conf/
Promethues :/usr/local/prometheus-2.37.0.linux-amd64/
2 说明:Grafana 的统计图、地图需要自行安装,可以通过下面指令(注意自己软件位置):
# 安装图表插件
/usr/local/grafana-8.5.3/bin/grafana-cli plugins install grafana-piechart-panel
/usr/local/grafana-8.5.3/bin/grafana-cli plugins install grafana-worldmap-panel
# 安装图表插件后放 指定位置
cp -r /var/lib/grafana/plugins/ /usr/local/grafana-8.5.3/data/
3 启动服务脚本
/usr/local/prometheus-2.37.0.linux-amd64/prometheus --config.file="/usr/local/prometheus-2.37.0.linux-amd64/prometheus.yml" >/dev/null &
/usr/local/grafana-8.5.3/bin/grafana-server --config=/usr/local/grafana-8.5.3/conf/defaults.ini
启动后就可以访问 Promethues Grafana 了
Promethues 地址 : http://IP:9090
Grafana 地址:http://IP:3000
需要容器部署的可以制作docker镜像部署
1 制作镜像需要的文件目录

2 mystart.sh为容器运行时的启动服务脚本
#!/bin/sh
cd /usr/local/grafana-8.5.3/bin/
# 安装图表插件
/usr/local/grafana-8.5.3/bin/grafana-cli plugins install grafana-piechart-panel
/usr/local/grafana-8.5.3/bin/grafana-cli plugins install grafana-worldmap-panel
# 安装图表插件后放 指定位置
cp -r /var/lib/grafana/plugins/ /usr/local/grafana-8.5.3/data/
`/usr/local/prometheus-2.37.0.linux-amd64/prometheus --config.file="/usr/local/prometheus-2.37.0.linux-amd64/prometheus.yml" >/dev/null &
/usr/local/grafana-8.5.3/bin/grafana-server --config=/usr/local/grafana-8.5.3/conf/defaults.ini >/dev/null &`
3 build_image.sh 制作docker镜像push到镜像仓库
#!/bin/sh
build镜像 如要推送镜像到私服需要修改自己的镜像仓库地址
docker build -f Dockerfile  -t registry.cn-hangzhou.aliyuncs.com/mrxu-base/prom .
【下面代码是把镜像推送到自己的镜像仓库 可以工别人使用!!!!】
【1 登录阿里云镜像仓库 (免费)】
【2 push镜像到镜像仓库】
docker login --username=您的账号 -p=您的密码 registry.cn-hangzhou.aliyuncs.com
docker push registry.cn-hangzhou.aliyuncs.com/mrxu-base/prom
4 docker-start.sh 拉取镜像并启动镜像
#!/bin/sh
创建prometheus grafana 文件挂载目录
if [ ! -d "/usr/local/container" ];then
mkdir /usr/local/container
chmod -R 777  /usr/local/container/
else
echo "容器挂载目录已经存在"
fi
创建prometheus 挂载文件
if [ ! -d "/usr/local/container/prometheus" ];then
mkdir /usr/local/container/prometheus
chmod -R 777  /usr/local/container/
else
echo "prometheus 挂载文件目录已经存在"
fi
if [ ! -f "/usr/local/container/prometheus/prometheus.yml" ];then
cp config/prometheus.yml /usr/local/container/prometheus/
else
echo "prometheus 配置文件存在"
fi
拉取镜像 (如果是自己制作的可以用本地镜像)
docker pull registry.cn-hangzhou.aliyuncs.com/mrxu-base/prom
启动容器
prometheus 服务端口:9090 映射宿主机端口:19090
grafana 服务端口:3000 映射宿主机端口:13000
docker run -it --name prom --privileged=true -p 13000:3000 -p 19090:9090
-v /usr/local/container/prometheus/data:/usr/local/prometheus-2.37.0.linux-amd64/data
-v /usr/local/container/grafana/data:/usr/local/grafana-8.5.3/data
-v /usr/local/container/prometheus/prometheus.yml:/usr/local/prometheus-2.37.0.linux-amd64/prometheus.yml
-d registry.cn-hangzhou.aliyuncs.com/mrxu-base/prom
chmod -R 777 /usr/local/container/
5 Dockerfile为容器编排文件
FROM centos:7
MAINTAINER jsonxu<1012733642@qq.com>
添加软件 到容器
ADD prometheus-2.37.0.linux-amd64.tar.gz /usr/local/
ADD grafana-enterprise-8.5.3.linux-amd64.tar.gz /usr/local/
添加服务启动脚本
ADD config/mystart.sh /
RUN cp /usr/share/zoneinfo/Asia/Shanghai /etc/localtime
&& echo "Asia/Shanghai" > /etc/timezone
&& chmod +x /mystart.sh CMD ["sh","-c","/mystart.sh"]
6 配置文件我打包好下载即可,软件太大自行下载,文件按我给的目录结构存放
链接:https://caiyun.139.com/m/i?165Ckcp5WLHVU
提取码:Abbh
7 放到服务器后
第一步:到文件目录下 授权脚本
chmod +x build_image.sh docker-start.sh
第二步:执行build_image.s脚本 制作镜像 (如果有镜像仓库可以设置) 第三步:执行docker-start.sh脚本 启动镜像
执行成功后就部署完成了,Promethues 容器端口是9090映射到宿主机端口是19090,Grafana 容器端口是3000映射到宿主机端口是13000
Promethues 地址 : http://宿主机IP:19090
Grafana 地址:http://宿主机IP:13000
4 应用举例
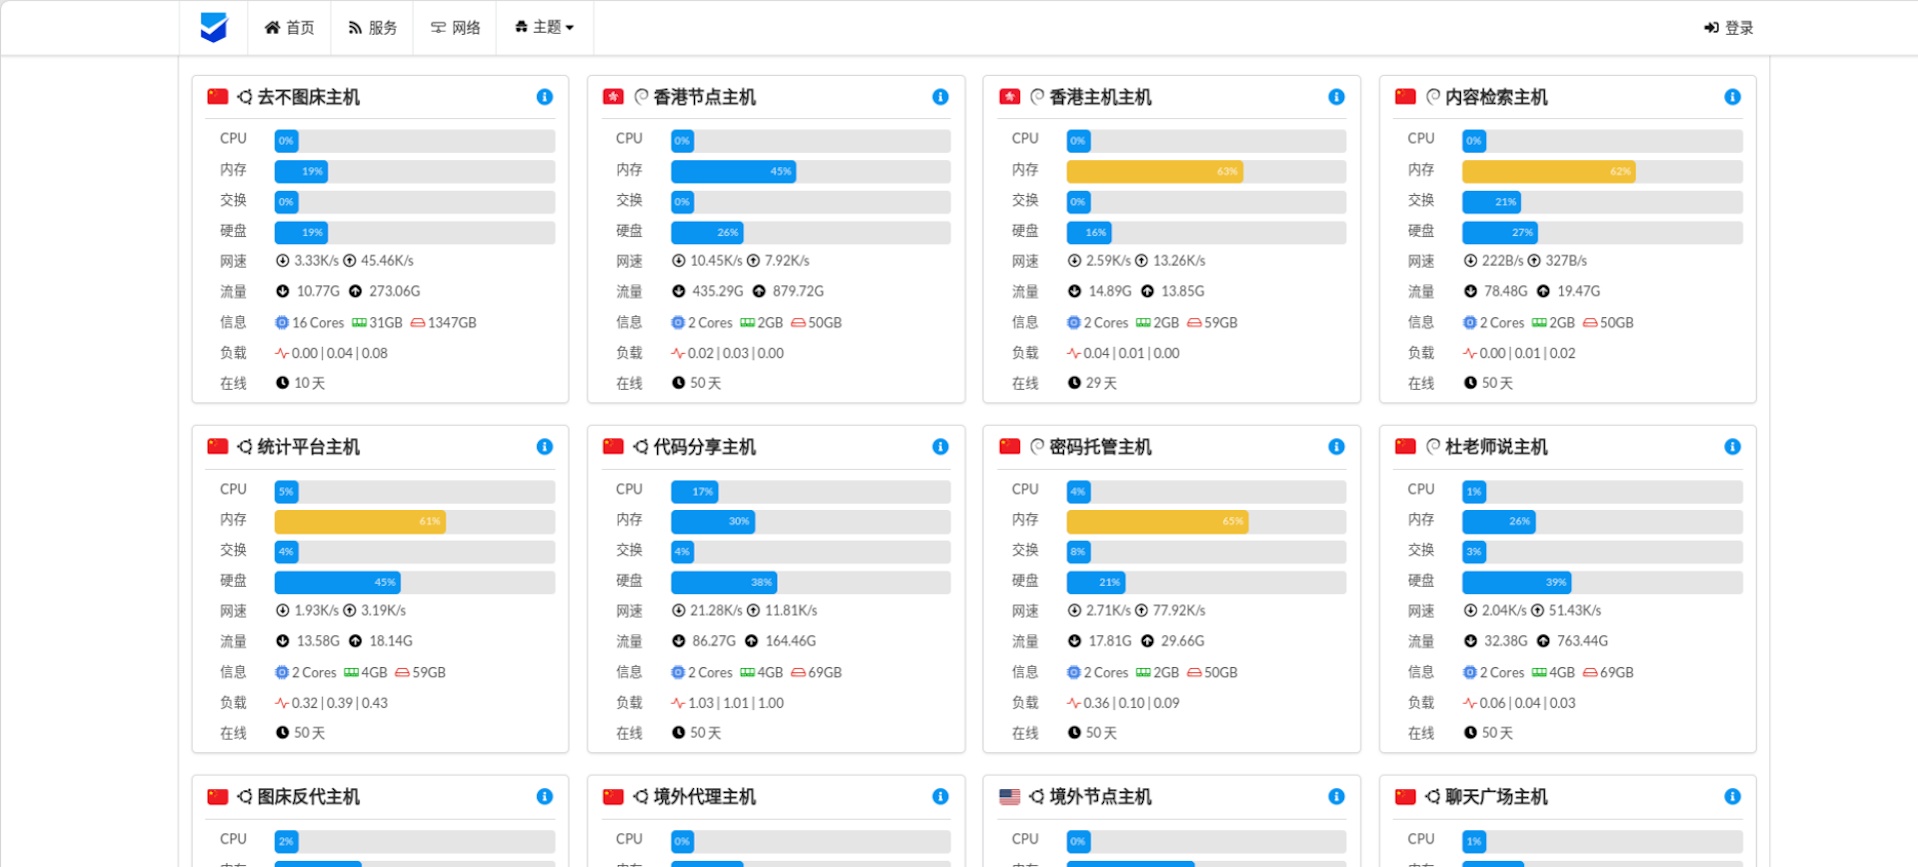
Promethues 、Grafana 安装完成后数据采集,数据展示的已经完成,还缺少一个数据源。promethues官网给我们提供了很多数据采集的exporter,监控服务器(内存、cpu、网络....)的我们可以使用node_exporter,监控mysql的可以使用mysqld_exporter 等等更多exporter可以到官网查询https://prometheus.io/docs/instrumenting/exporters/
实际操作我们选择监控服务器资源举例
1 下载node_exporter 解压、启动 。服务默认端口是:9100
wget https://github.com/prometheus/node_exporter/releases/download/v1.4.0/node_exporter-1.4.0.linux-amd64.tar.gz
tar -zxvf node_exporter-1.1.2.linux-amd64.tar.gz  -C /usr/local/
/usr/local/node_exporter-1.1.2.linux-amd64/node_exporter --web.listen-address=":9100" &
2 在promethues配置文件prometheus.yml配置node_exporter 服务ip及端口
scrape_configs:
  # node exporter
  - job_name: "node-exporter"
    static_configs:
      - targets: ["172.16.0.13:9100"]
配置后重启下promethues 成功后在promethues后台可以看到相关信息了

3 登录grafana(默认账户:admin密码:adim )后端添加promethues数据源

4 添加成功后,就可以做监控界面了,grafana官网给我们提供了很多demo界面:https://grafana.com/grafana/dashboards/ 选择数据源 然后进行搜索,选择一个合适自己的页面,copy页面id


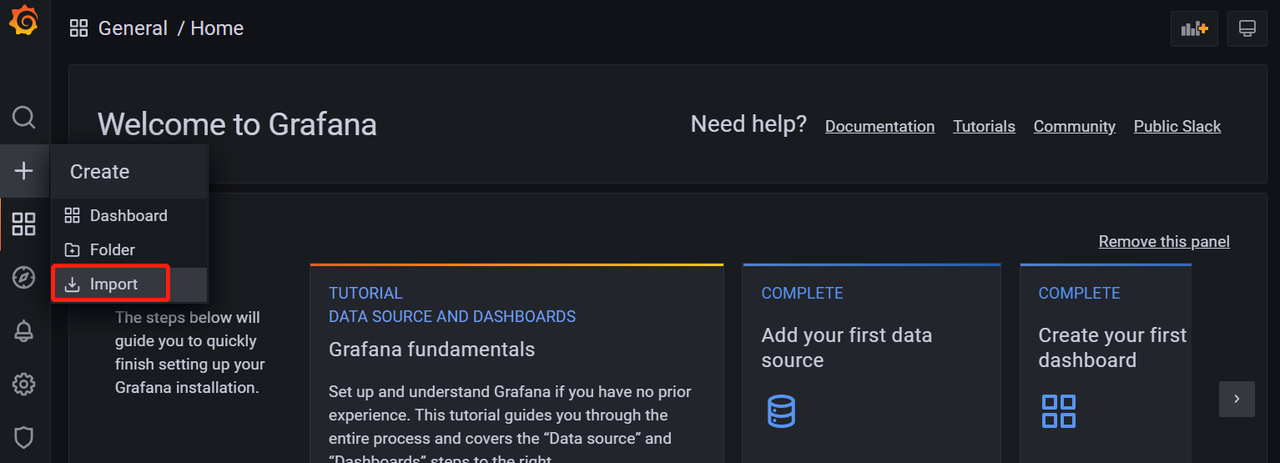
5 在grafana界面直接导入id就可以看到服务器相关信息了


5 项目pv、uv运行状态统计
1 方案的大体流程
filebeat 把nginx日志同步到logstash,最终落到es,然后在grafana中做图表监控。
2 软件安装
elk、grafana安装看上面文档,Filebeat 官网下载地址:https://elasticsearch.cn/download/#seg-3
选择自己需要的版本用wget下载到服务器上,我演示用的版本是:8.5.0
个人习惯下载软件存位置 /usr/local/ 目录下
说明:推荐rpm软件包安装;tar.gz 软件包启动的老是自动关闭服务,需要特殊配置。
下载后使用下面指令安装:
yum install filebeat-7.16.2-x86_64.rpm
1 安装成功后filebeat的配置文件路径 在/etc/filebeat文件夹下,修改/etc/filebeat/filebeat.yml配置文件把ng日志输入到logstash里,内容如下:
filebeat.inputs:
setup.template.settings:
  index.number_of_shards: 3
filebeat.config.modules:
  path: ${path.config}/modules.d/*.yml
  reload.enabled: false
output.logstash:
    hosts: ["您的logstash IP:端口"]
2 在模块配置文件/etc/filebeat/modules.d/nginx.yml中配置ng日志文件的位置
... 其他配置地方省略
`
`
* `module: nginx
  `
Access logs

access: enabled: true var.paths: ["/usr/local/nginx/logs/*access.log"]
3 启动filebeat服务
systemctl start filebeat
4 然后启用filebeat的nginx 模块
filebeat modules enable nginx
5 设置filebeat开机启动
systemctl enable filebeat
3 具体实现细节
1 设置nginx的日志格式为json格式
http {
    ...其他配置省略
    log_format main   '{"@timestamp":"$time_iso8601",'
                        '"@source":"$server_addr",'
                        '"hostname":"$hostname",'
                        '"ip":"$remote_addr",'
                        '"request_method":"$request_method",'
                        '"scheme":"$scheme",'
                        '"domain":"$server_name",'
                        '"referer":"$http_referer",'
                        '"request":"$request_uri",'
                        '"args":"$args",'
                        '"size":$body_bytes_sent,'
                        '"status": $status,'
                        '"responsetime":$request_time,'
                        '"upstreamtime":"$upstream_response_time",'
                        '"upstreamaddr":"$upstream_addr",'
                        '"http_user_agent":"$http_user_agent",'
                        '"https":"$https"'
                        '}';
    access_log  logs/access.log main;
    include vhosts/*.conf;
}
2 reload nginx 配置
nginx -s reload
3 设置logstash的配置文件,接收到filebeat推送的日志信息后输入到es里,设置后记得重启下logstash
input {
  # 日志输入-此处配置接收nginx日志(通过filebeat传输过来的)
  beats {
    port => 5044
    #codec => json_lines
    codec => json
    type => "nginx"
  }
  # 日志输入-此处配置接收项目logback日志(通过logback.xml配置传输过来的)
  tcp {
    port => 5088
    type => "logback"
  }
}
filter {
如果是nginx 过来的设置类型转换
if [type] == "nginx"{
mutate {
convert => [ "status","integer" ]
convert => [ "size","integer" ]
convert => [ "upstreatime","float" ]
remove_field => "message"
}
}
geoip {
source => "ip"
}
}
日志输出到es里
output { if [type] == "nginx"{ elasticsearch { hosts => ["http://localhost:9200"] index => "nginx_log" } } }
4 在grafana界面中添加es数据源,注意这里需要选择下自己es的版本

5 在grafana上做图表进行指标监控了,我已经做好了一个监控页面直接通过json文件内容导入即可
链接:https://caiyun.139.com/m/i?165Cjyq4tg9PM
提取码:squ1
导入成功后就可以看到相关的数据了

6 告警配置
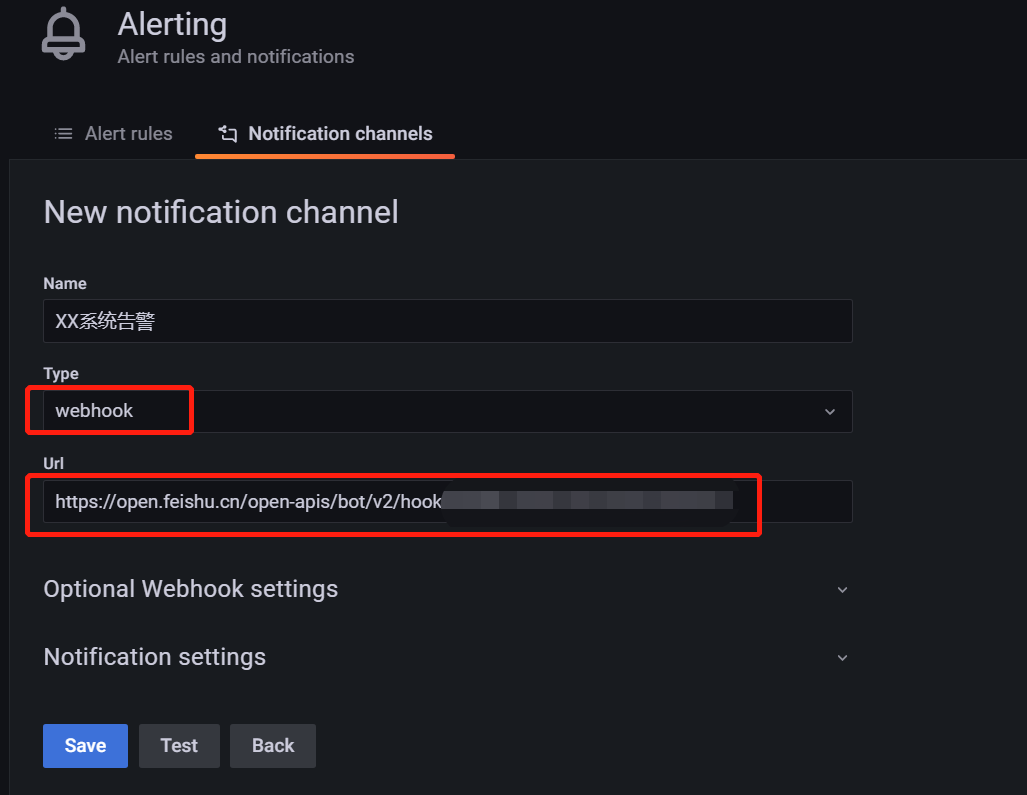
1 在grafana中添加告警渠道,进去可以看到支持很多类型,最常用的是alertmanager和webhook方式使用也很简单。我们简单讲下通过webhook方式,webhook可以把告警通知到企业微信、钉钉、飞书及其他第三方平台。我们具体看下把告警通知到飞书,其他的也类似。

1 在 飞书 群设置中添加机器人,添加成功后会获得webhook地址

2 在grafana中添加告警渠道配置该地址既可以

3 在做图表后就可以写规则触发告警了

 51工具盒子


