在一个全新的Centos7.6系统环境下,全部通过yum方式安装zabbix4.0,默认安装mariadb5.5,php5.4,apache2.4
所有配置几乎都是默认,最终目的是以最快速的方式安装zabbix环境,当然生产环境也可以这么部署(需要自行对相关参数进行优化)
1、安装epel源
yum -y install epel-release
|---|-----------------------------| | 1 | yum -y install epel-release |
2、安装php-fpm和mariadb
yum -y install php-fpm mariadb mariadb-server wget
|---|----------------------------------------------------| | 1 | yum -y install php-fpm mariadb mariadb-server wget |
3、配置zabbix4.0源
我这里使用清华大学的zabbix镜像源:
wget -P /etc/yum.repos.d/ https://down.whsir.com/downloads/zabbix.repo
|---|------------------------------------------------------------------------| | 1 | wget -P /etc/yum.repos.d/ https://down.whsir.com/downloads/zabbix.repo |
或官方的源(备用)
官方镜像:
rpm -ivh https://repo.zabbix.com/zabbix/4.0/rhel/7/x86_64/zabbix-release-4.0-1.el7.noarch.rpm
|---|-----------------------------------------------------------------------------------------------| | 1 | rpm -ivh https://repo.zabbix.com/zabbix/4.0/rhel/7/x86_64/zabbix-release-4.0-1.el7.noarch.rpm |
4、安装zabbix4.0
yum -y install zabbix-server-mysql zabbix-web-mysql zabbix-agent
|---|------------------------------------------------------------------| | 1 | yum -y install zabbix-server-mysql zabbix-web-mysql zabbix-agent |
5、启动mariadb
systemctl enable mariadb systemctl start mariadb
|-----|--------------------------------------------------| | 1 2 | systemctl enable mariadb systemctl start mariadb |
6、配置mariadb
创建zabbix数据库(默认密码空)
mysql -uroot -p
|---|-----------------| | 1 | mysql -uroot -p |
MariaDB [(none)]> create database zabbix character set utf8 collate utf8_bin; MariaDB [(none)]> grant all privileges on zabbix.* to zabbix@localhost identified by 'blog.whsir.com'; MariaDB [(none)]> quit
|-------|-----------------------------------------------------------------------------------------------------------------------------------------------------------------------------------------------------------------------| | 1 2 3 | MariaDB [(none)]> create database zabbix character set utf8 collate utf8_bin; MariaDB [(none)]> grant all privileges on zabbix.* to zabbix@localhost identified by 'blog.whsir.com'; MariaDB [(none)]> quit |
导入zabbix数据
zcat /usr/share/doc/zabbix-server-mysql*/create.sql.gz | mysql -uzabbix -pblog.whsir.com zabbix
|---|---------------------------------------------------------------------------------------------------| | 1 | zcat /usr/share/doc/zabbix-server-mysql*/create.sql.gz | mysql -uzabbix -pblog.whsir.com zabbix |
7、修改zabbix-server配置文件
vi /etc/zabbix/zabbix_server.conf
|---|-----------------------------------| | 1 | vi /etc/zabbix/zabbix_server.conf |
DBHost=localhost DBName=zabbix DBUser=zabbix DBPassword=blog.whsir.com
|---------|------------------------------------------------------------------------| | 1 2 3 4 | DBHost=localhost DBName=zabbix DBUser=zabbix DBPassword=blog.whsir.com |
这里的帐号密码和实际你设置的帐号密码不一致的话,启动zabbix-server时,看不到端口,但是可以看到进程!
8、修改php配置
vi /etc/php.ini
|---|-----------------| | 1 | vi /etc/php.ini |
date.timezone = Asia/Shanghai
|---|-------------------------------| | 1 | date.timezone = Asia/Shanghai |
9、启动相关服务
systemctl enable php-fpm systemctl start php-fpm systemctl enable httpd systemctl start httpd systemctl enable zabbix-server systemctl start zabbix-server systemctl enable zabbix-agent systemctl start zabbix-agent
|-----------------|-----------------------------------------------------------------------------------------------------------------------------------------------------------------------------------------------------------------------| | 1 2 3 4 5 6 7 8 | systemctl enable php-fpm systemctl start php-fpm systemctl enable httpd systemctl start httpd systemctl enable zabbix-server systemctl start zabbix-server systemctl enable zabbix-agent systemctl start zabbix-agent |
10、进入web安装
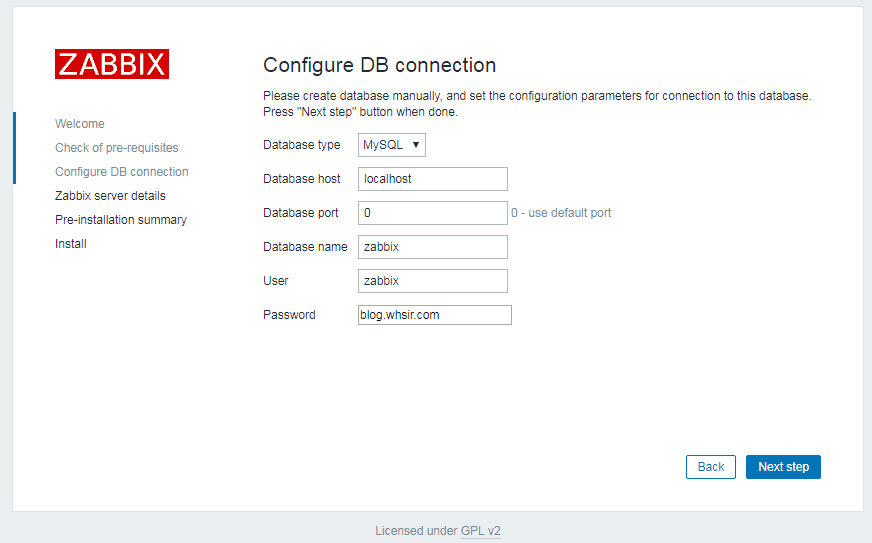
访问http://IP/zabbix
设置下Password后一直下一步就好了,跟正常编译安装的zabbix一样,默认帐号Admin密码zabbix


 51工具盒子


