前言 {#前言}
根据前几次的经验,这一次,运用脚本的形式安装,可以节约大部分的步骤,把一些前置的配置什么的写到shell脚本里面,随着vagrant up启动命令一起安装
集群环境:
| | IP | 内存 | CPU核数 | |:------:|-------------|----|-------| | master | 172.17.8.51 | 4G | 2 | | node | 172.17.8.52 | 4G | 1 | | node | 172.17.8.53 | 4G | 1 |
1、编写Vagrantfile文件 {#1编写vagrantfile文件}
Vagrantfile内容:
# -*- mode: ruby -*-
# vi: set ft=ruby :
# on win10, you need `vagrant plugin install vagrant-vbguest --plugin-version 0.21` and change synced_folder.type="virtualbox"
# reference `https://www.dissmeyer.com/2020/02/11/issue-with-centos-7-vagrant-boxes-on-windows-10/`

Vagrant.configure("2") do \|config\|
config.vm.box_check_update = false
config.vm.provider 'virtualbox' do \|vb\|
vb.customize \[ "guestproperty", "set", :id, "/VirtualBox/GuestAdd/VBoxService/--timesync-set-threshold", 1000 \]
end

$num_instances = 3


curl https://discovery.etcd.io/new?size=3
=========================================


`(1..$num_instances).each do |i|
config.vm.define "node#{i}" do |node|
node.vm.box = "centos/7"
node.vm.hostname = "node#{i}"
ip = "172.17.8.#{i+50}"
node.vm.network "private_network", ip: ip
node.vm.provider "virtualbox" do |vb|
vb.memory = "4096"
if i==1 then
vb.cpus = 2
else
vb.cpus = 1
end
vb.name = "node#{i+50}"
end
end
end
config.vm.provision "shell", privileged: true, path: "./setup.sh"
end
`
2、编写启动后的脚本 {#2编写启动后的脚本}
setup.sh内容:
#/bin/sh

安装docker相关依赖
============


sudo yum install -y yum-utils


添加阿里源
=====


sudo yum-config-manager

--add-repo

http://mirrors.aliyun.com/docker-ce/linux/centos/docker-ce.repo
sudo sed -i 's/gpgcheck=1/gpgcheck=0/g' /etc/yum.repos.d/docker-ce.repo


安装docker
========


yes y\|sudo yum install docker-ce docker-ce-cli containerd.io


启动docker
========


sudo systemctl start docker
y
y


更改cgroup driver以及docker镜像仓库源
============================


sudo bash -c 'cat \> /etc/docker/daemon.json \<\<EOF
{
"exec-opts": \["native.cgroupdriver=systemd"\],
"log-driver": "json-file",
"log-opts": {
"max-size": "100m"
},
"storage-driver": "overlay2",
"storage-opts": \[
"overlay2.override_kernel_check=true"
\],
"registry-mirrors": \[
"https://registry.docker-cn.com",
"http://hub-mirror.c.163.com",
"https://w5a7th34.mirror.aliyuncs.com",
"http://f1361db2.m.daocloud.io",
"https://mirror.ccs.tencentyun.com"
\]
}
EOF'


添加docker组
=========


if \[ ! $(getent group docker) \];
then
sudo groupadd docker;
else
echo "docker user group already exists"
fi


sudo gpasswd -a $USER docker


加载、重启docker
===========


sudo systemctl  daemon-reload
sudo systemctl restart docker


sudo sed -i 's/PasswordAuthentication no/PasswordAuthentication yes/g' /etc/ssh/sshd_config
sudo systemctl restart sshd


sudo bash -c 'cat \<\<EOF \> /etc/yum.repos.d/kubernetes.repo
\[kubernetes\]
name=Kubernetes
baseurl=https://mirrors.aliyun.com/kubernetes/yum/repos/kubernetes-el7-x86_64
enabled=1
gpgcheck=0
repo_gpgcheck=0
gpgkey=https://mirrors.aliyun.com/kubernetes/yum/doc/yum-key.gpg
https://mirrors.aliyun.com/kubernetes/yum/doc/rpm-package-key.gpg
EOF'


sudo setenforce 0


安装kubeadm, kubectl, kubelet
===========================


sudo yum install -y kubelet-1.23.6 kubeadm-1.23.6 kubectl-1.23.6 --disableexcludes=kubernetes


设置docker和kubelet开机自启并启动
=======================


sudo systemctl enable docker \&\& systemctl start docker
sudo systemctl enable kubelet \&\& systemctl start kubelet


设置网络桥接
======


sudo bash -c 'cat \<\<EOF \>  /etc/sysctl.d/k8s.conf
net.bridge.bridge-nf-call-ip6tables = 1
net.bridge.bridge-nf-call-iptables = 1
net.ipv4.ip_forward=1
EOF'
sudo sysctl --system


关闭防火墙
=====


sudo systemctl stop firewalld
sudo systemctl disable firewalld


关闭swap
======


sudo swapoff -a


设置开机自启
======


`sudo systemctl enable docker.service
sudo systemctl enable kubelet.service
`
3、启动 {#3启动}
注:Vagrantfile和setup.sh放在同一目录,并且在该目录下执行启动命令:
vagrant up
由于在启动中加入了脚本,此次启动执行的内容多,时间要比以往长些
4、通过远程连接工具连接 {#4通过远程连接工具连接}
目前,三台机器分别有两个用户,root和vagrant,密码全部是vagrant
5、部署主节点 {#5部署主节点}
注:这步时间较长,耐心等待
kubeadm init \
--apiserver-advertise-address=172.17.8.51 \
--image-repository registry.aliyuncs.com/google_containers \
--kubernetes-version v1.23.6 \
--service-cidr=10.96.0.0/12 \
--pod-network-cidr=10.244.0.0/16
出现下面的内容,主节点部署完成

6、使用 kubectl 工具 {#6使用-kubectl-工具}
执行命令:
mkdir -p $HOME/.kube
sudo cp -i /etc/kubernetes/admin.conf $HOME/.kube/config
sudo chown $(id -u):$(id -g) $HOME/.kube/config
7、安装 Pod 网络插件(CNI) {#7安装-pod-网络插件cni}
执行命令:
kubectl apply -f https://raw.githubusercontent.com/coreos/flannel/master/Documentation/kube-flannel.yml
注:如果连接不上,可以在当前目录新建文件kube-flannel.yml替换掉文件
kube-flannel.yml内容:
---
apiVersion: policy/v1beta1
kind: PodSecurityPolicy
metadata:
  name: psp.flannel.unprivileged
  annotations:
    seccomp.security.alpha.kubernetes.io/allowedProfileNames: docker/default
    seccomp.security.alpha.kubernetes.io/defaultProfileName: docker/default
    apparmor.security.beta.kubernetes.io/allowedProfileNames: runtime/default
    apparmor.security.beta.kubernetes.io/defaultProfileName: runtime/default
spec:
  privileged: false
  volumes:
  - configMap
  - secret
  - emptyDir
  - hostPath
  allowedHostPaths:
  - pathPrefix: "/etc/cni/net.d"
  - pathPrefix: "/etc/kube-flannel"
  - pathPrefix: "/run/flannel"
  readOnlyRootFilesystem: false
  # Users and groups
  runAsUser:
    rule: RunAsAny
  supplementalGroups:
    rule: RunAsAny
  fsGroup:
    rule: RunAsAny
  # Privilege Escalation
  allowPrivilegeEscalation: false
  defaultAllowPrivilegeEscalation: false
  # Capabilities
  allowedCapabilities: ['NET_ADMIN', 'NET_RAW']
  defaultAddCapabilities: []
  requiredDropCapabilities: []
  # Host namespaces
  hostPID: false
  hostIPC: false
  hostNetwork: true
  hostPorts:
  - min: 0
    max: 65535
  # SELinux
  seLinux:
    # SELinux is unused in CaaSP
    rule: 'RunAsAny'
---
kind: ClusterRole
apiVersion: rbac.authorization.k8s.io/v1
metadata:
  name: flannel
rules:
- apiGroups: ['extensions']
  resources: ['podsecuritypolicies']
  verbs: ['use']
  resourceNames: ['psp.flannel.unprivileged']
- apiGroups:
  - ""
  resources:
  - pods
  verbs:
  - get
- apiGroups:
  - ""
  resources:
  - nodes
  verbs:
  - list
  - watch
- apiGroups:
  - ""
  resources:
  - nodes/status
  verbs:
  - patch
---
kind: ClusterRoleBinding
apiVersion: rbac.authorization.k8s.io/v1
metadata:
  name: flannel
roleRef:
  apiGroup: rbac.authorization.k8s.io
  kind: ClusterRole
  name: flannel
subjects:
- kind: ServiceAccount
  name: flannel
  namespace: kube-system
---
apiVersion: v1
kind: ServiceAccount
metadata:
  name: flannel
  namespace: kube-system
---
kind: ConfigMap
apiVersion: v1
metadata:
  name: kube-flannel-cfg
  namespace: kube-system
  labels:
    tier: node
    app: flannel
data:
  cni-conf.json: |
    {
      "name": "cbr0",
      "cniVersion": "0.3.1",
      "plugins": [
        {
          "type": "flannel",
          "delegate": {
            "hairpinMode": true,
            "isDefaultGateway": true
          }
        },
        {
          "type": "portmap",
          "capabilities": {
            "portMappings": true
          }
        }
      ]
    }
  net-conf.json: |
    {
      "Network": "10.244.0.0/16",
      "Backend": {
        "Type": "vxlan"
      }
    }
---
apiVersion: apps/v1
kind: DaemonSet
metadata:
  name: kube-flannel-ds
  namespace: kube-system
  labels:
    tier: node
    app: flannel
spec:
  selector:
    matchLabels:
      app: flannel
  template:
    metadata:
      labels:
        tier: node
        app: flannel
    spec:
      affinity:
        nodeAffinity:
          requiredDuringSchedulingIgnoredDuringExecution:
            nodeSelectorTerms:
            - matchExpressions:
              - key: kubernetes.io/os
                operator: In
                values:
                - linux
      hostNetwork: true
      priorityClassName: system-node-critical
      tolerations:
      - operator: Exists
        effect: NoSchedule
      serviceAccountName: flannel
      initContainers:
      - name: install-cni-plugin
       #image: flannelcni/flannel-cni-plugin:v1.1.0 for ppc64le and mips64le (dockerhub limitations may apply)
        image: rancher/mirrored-flannelcni-flannel-cni-plugin:v1.1.0
        command:
        - cp
        args:
        - -f
        - /flannel
        - /opt/cni/bin/flannel
        volumeMounts:
        - name: cni-plugin
          mountPath: /opt/cni/bin
      - name: install-cni
       #image: flannelcni/flannel:v0.18.0 for ppc64le and mips64le (dockerhub limitations may apply)
        image: rancher/mirrored-flannelcni-flannel:v0.18.0
        command:
        - cp
        args:
        - -f
        - /etc/kube-flannel/cni-conf.json
        - /etc/cni/net.d/10-flannel.conflist
        volumeMounts:
        - name: cni
          mountPath: /etc/cni/net.d
        - name: flannel-cfg
          mountPath: /etc/kube-flannel/
      containers:
      - name: kube-flannel
       #image: flannelcni/flannel:v0.18.0 for ppc64le and mips64le (dockerhub limitations may apply)
        image: rancher/mirrored-flannelcni-flannel:v0.18.0
        command:
        - /opt/bin/flanneld
        args:
        - --ip-masq
        - --kube-subnet-mgr
        resources:
          requests:
            cpu: "100m"
            memory: "50Mi"
          limits:
            cpu: "100m"
            memory: "50Mi"
        securityContext:
          privileged: false
          capabilities:
            add: ["NET_ADMIN", "NET_RAW"]
        env:
        - name: POD_NAME
          valueFrom:
            fieldRef:
              fieldPath: metadata.name
        - name: POD_NAMESPACE
          valueFrom:
            fieldRef:
              fieldPath: metadata.namespace
        - name: EVENT_QUEUE_DEPTH
          value: "5000"
        volumeMounts:
        - name: run
          mountPath: /run/flannel
        - name: flannel-cfg
          mountPath: /etc/kube-flannel/
        - name: xtables-lock
          mountPath: /run/xtables.lock
      volumes:
      - name: run
        hostPath:
          path: /run/flannel
      - name: cni-plugin
        hostPath:
          path: /opt/cni/bin
      - name: cni
        hostPath:
          path: /etc/cni/net.d
      - name: flannel-cfg
        configMap:
          name: kube-flannel-cfg
      - name: xtables-lock
        hostPath:
          path: /run/xtables.lock
          type: FileOrCreate
8、节点加入集群 {#8节点加入集群}
在第5步kubeadm init命令输出的日志中,最后几行有需要执行的命令,那个命令拿出来直接在node2和node3上运行就可以了(token的有效期是24小时,超过了需要重新生成)
当然,如果你想我一样,忘记复制了还恰好关掉了远程,那么就有两种方式可以解决
-
通过生成新的token显示命令(对应8.1操作)
-
直接查看token(对应8.2操作)
8.1、执行下面的命令生成新的token:
kubeadm token create --print-join-command

这里显示的命令拿到要加入的节点(node2和node3)执行就可以加入集群中


然后回到master主节点执行命令,确认加入成功:
kubectl get nodes

8.2、查看token命令获取
kubeadm token list

主节点:
# 查看节点
kubectl get nodes

节点3:
kubeadm join 172.17.8.51:6443 --token o15q87.xtnzlfis6gtez1x6 --discovery-token-unsafe-skip-ca-verification

主节点:
# 查看节点
kubectl get nodes

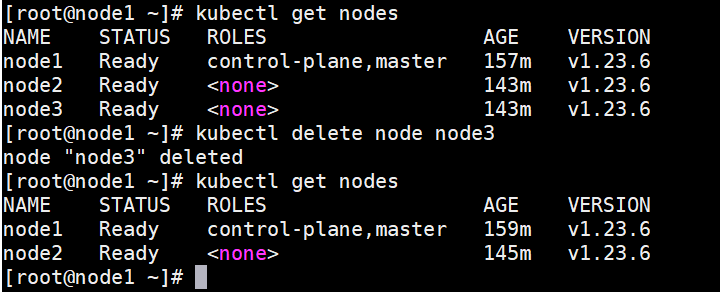
9、集群中移除节点 {#9集群中移除节点}
主节点执行:
# 查看节点
kubectl get nodes
# 移除节点3
kubectl delete node node3
# 查看节点
kubectl get nodes

删除的节点执行:
kubeadm reset
systemctl stop kubelet
systemctl stop docker
rm -rf /var/lib/cni/
rm -rf /var/lib/kubelet/*
rm -rf /etc/cni/
systemctl start docker
systemctl start kubelet
 51工具盒子


