1.什么是DeepLearning4j?
DeepLearning4J(DL4J)是一套基于Java语言的神经网络工具包,可以构建、定型和部署神经网络。DL4J与Hadoop和Spark集成,支持分布式CPU和GPU,为商业环境(而非研究工具目的)所设计。Skymind是DL4J的商业支持机构。Deeplearning4j拥有先进的技术,以即插即用为目标,通过更多预设的使用,避免多余的配置,让非企业也能够进行快速的原型制作。DL4J同时可以规模化定制。DL4J遵循Apache 2.0许可协议,一切以其为基础的衍生作品均属于衍生作品的作
Deeplearning4j的功能
Deeplearning4j包括了分布式、多线程的深度学习框架,以及普通的单线程深度学习框架。定型过程以集群进行,也就是说,Deeplearning4j可以快速处理大量数据。神经网络可通过[迭代化简]平行定型,与 Java、 Scala 和 Clojure 均兼容。Deeplearning4j在开放堆栈中作为模块组件的功能,使之成为首个为微服务架构打造的深度学习框架。
Deeplearning4j的组件
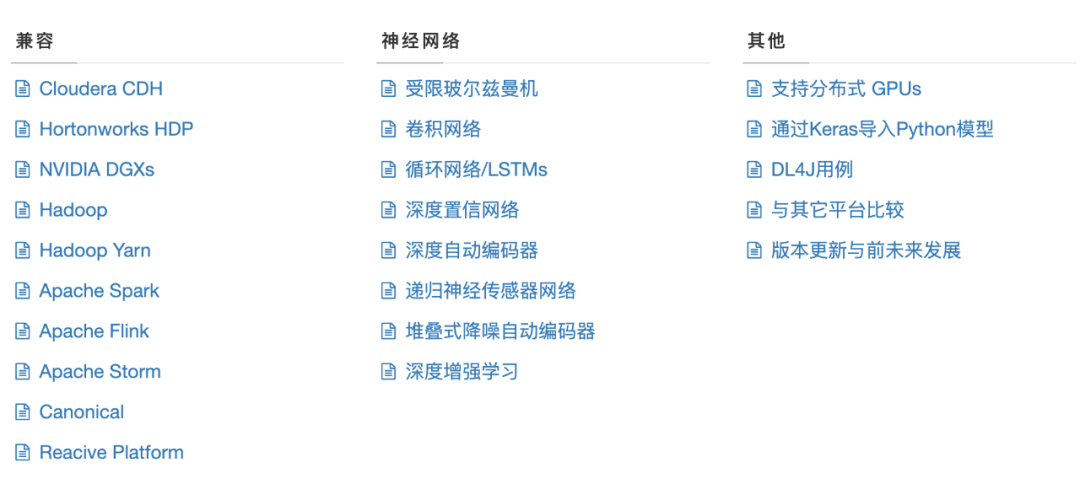
深度神经网络能够实现前所未有的准确度。对神经网络的简介请参见概览页。简而言之,Deeplearning4j能够让你从各类浅层网络(其中每一层在英文中被称为layer)出发,设计深层神经网络。这一灵活性使用户可以根据所需,在分布式、生产级、能够在分布式CPU或GPU的基础上与Spark和Hadoop协同工作的框架内,整合受限玻尔兹曼机、其他自动编码器、卷积网络或递归网络。此处为我们已经建立的各个库及其在系统整体中的所处位置: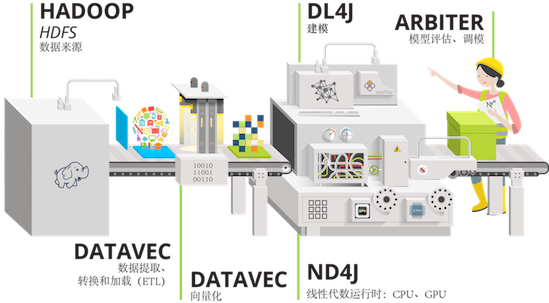
DeepLearning4J用于设计神经网络:
-
Deeplearning4j(简称DL4J)是为Java和Scala编写的首个商业级开源分布式深度学习
-
DL4J与Hadoop和Spark集成,为商业环境(而非研究工具目的)所设计。
-
支持GPU和CPU
-
受到 Cloudera, Hortonwork, NVIDIA, Intel, IBM 等认证,可以在Spark, Flink, Hadoop 上运行
-
支持并行迭代算法架构
-
DeepLearning4J的JavaDoc可在此处获取
-
DeepLearning4J示例的Github代码库请见此处。相关示例的简介汇总请见此处。
-
开源工具 ASF 2.0许可证:github.com/deeplearning4j/deeplearning4j
2.训练模型
训练和测试数据集下载
- https://raw.githubusercontent.com/zq2599/blog_download_files/master/files/mnist_png.tar.gz
MNIST简介
-
MNIST是经典的计算机视觉数据集,来源是National Institute of Standards and Technology (NIST,美国国家标准与技术研究所),包含各种手写数字图片,其中训练集60,000张,测试集 10,000张,
-
MNIST来源于250 个不同人的手写,其中 50% 是高中学生, 50% 来自人口普查局 (the Census Bureau) 的工作人员.,测试集(test set) 也是同样比例的手写数字数据
-
MNIST官网:http://yann.lecun.com/exdb/mnist/
数据集简介
从MNIST官网下载的原始数据并非图片文件,需要按官方给出的格式说明做解析处理才能转为一张张图片,这些事情显然不是本篇的主题,因此咱们可以直接使用DL4J为我们准备好的数据集(下载地址稍后给出),该数据集中是一张张独立的图片,这些图片所在目录的名字就是该图片具体的数字
模型训练
LeNet-5简介
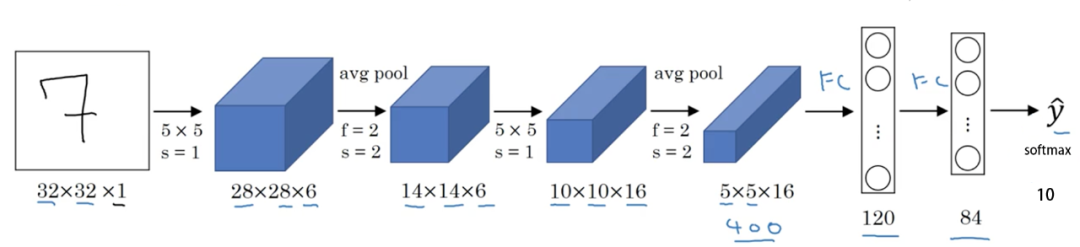
LeNet-5 结构:
- 输入层
图片大小为 32×32×1,其中 1 表示为黑白图像,只有一个 channel。
- 卷积层
filter 大小 5×5,filter 深度(个数)为 6,padding 为 0, 卷积步长 s=1=1,输出矩阵大小为 28×28×6,其中 6 表示 filter 的个数。
- 池化层
average pooling,filter 大小 2×2(即 f=2=2),步长 s=2=2,no padding,输出矩阵大小为 14×14×6。
- 卷积层
filter 大小 5×5,filter 个数为 16,padding 为 0, 卷积步长 s=1=1,输出矩阵大小为 10×10×16,其中 16 表示 filter 的个数。
- 池化层
average pooling,filter 大小 2×2(即 f=2=2),步长 s=2=2,no padding,输出矩阵大小为 5×5×16。注意,在该层结束,需要将 5×5×16 的矩阵flatten 成一个 400 维的向量。
- 全连接层(Fully Connected layer,FC)
neuron 数量为 120。
- 全连接层(Fully Connected layer,FC)
neuron 数量为 84。
- 全连接层,输出层
现在版本的 LeNet-5 输出层一般会采用 softmax 激活函数,在 LeNet-5 提出的论文中使用的激活函数不是 softmax,但其现在不常用。该层神经元数量为 10,代表 0~9 十个数字类别。(图 1 其实少画了一个表示全连接层的方框,而直接用 ^y^ 表示输出层。) * * * * * * * * * * * * * * * * * * * * * * * * * * * * * * * * * * * * * * * * * * * * * * * * * * * * * * * * * * * * * * * * * * * * * * * * * * * * * * * * * * * * * * * * * * * * * * * * * * * * * * * * * * * * * * * * * * * * * * * * * * * * * * * * * * * * * * * * * * * * * * * * * * * * * * * * * * * * * * * * * * * * * * * * * * * * * * * * * * * * * * * * * * * * * * * * * * * * * * * * * * * * * * * * * * * * * * *
/******************************************************************************* * Copyright (c) 2020 Konduit K.K. * Copyright (c) 2015-2019 Skymind, Inc. * * This program and the accompanying materials are made available under the * terms of the Apache License, Version 2.0 which is available at * https://www.apache.org/licenses/LICENSE-2.0. * * Unless required by applicable law or agreed to in writing, software * distributed under the License is distributed on an "AS IS" BASIS, WITHOUT * WARRANTIES OR CONDITIONS OF ANY KIND, either express or implied. See the * License for the specific language governing permissions and limitations * under the License. * * SPDX-License-Identifier: Apache-2.0 ******************************************************************************/
package com.et.dl4j.model;
import lombok.extern.slf4j.Slf4j;import org.datavec.api.io.labels.ParentPathLabelGenerator;import org.datavec.api.split.FileSplit;import org.datavec.image.loader.NativeImageLoader;import org.datavec.image.recordreader.ImageRecordReader;import org.deeplearning4j.datasets.datavec.RecordReaderDataSetIterator;import org.deeplearning4j.nn.conf.MultiLayerConfiguration;import org.deeplearning4j.nn.conf.NeuralNetConfiguration;import org.deeplearning4j.nn.conf.inputs.InputType;import org.deeplearning4j.nn.conf.layers.ConvolutionLayer;import org.deeplearning4j.nn.conf.layers.DenseLayer;import org.deeplearning4j.nn.conf.layers.OutputLayer;import org.deeplearning4j.nn.conf.layers.SubsamplingLayer;import org.deeplearning4j.nn.multilayer.MultiLayerNetwork;import org.deeplearning4j.nn.weights.WeightInit;import org.deeplearning4j.optimize.listeners.ScoreIterationListener;import org.deeplearning4j.util.ModelSerializer;import org.nd4j.evaluation.classification.Evaluation;import org.nd4j.linalg.activations.Activation;import org.nd4j.linalg.dataset.api.iterator.DataSetIterator;import org.nd4j.linalg.dataset.api.preprocessor.DataNormalization;import org.nd4j.linalg.dataset.api.preprocessor.ImagePreProcessingScaler;import org.nd4j.linalg.learning.config.Nesterovs;import org.nd4j.linalg.lossfunctions.LossFunctions;import org.nd4j.linalg.schedule.MapSchedule;import org.nd4j.linalg.schedule.ScheduleType;
import java.io.File;import java.util.HashMap;import java.util.Map;import java.util.Random;
/** * Implementation of LeNet-5 for handwritten digits image classification on MNIST dataset (99% accuracy) * <a href="http://yann.lecun.com/exdb/publis/pdf/lecun-01a.pdf">[LeCun et al., 1998. Gradient based learning applied to document recognition]</a> * Some minor changes are made to the architecture like using ReLU and identity activation instead of * sigmoid/tanh, max pooling instead of avg pooling and softmax output layer. * <p> * This example will download 15 Mb of data on the first run. * * @author hanlon * @author agibsonccc * @author fvaleri * @author dariuszzbyrad */@Slf4jpublic class LeNetMNISTReLu { //dataset github:https://raw.githubusercontent.com/zq2599/blog_download_files/master/files/mnist_png.tar.gz // 存放文件的地址,请酌情修改// private static final String BASE_PATH = System.getProperty("java.io.tmpdir") + "/mnist"; private static final String BASE_PATH = "/Users/liuhaihua/Downloads";
public static void main(String[] args) throws Exception { // 图片像素高 int height = 28; // 图片像素宽 int width = 28;
// 因为是黑白图像,所以颜色通道只有一个 int channels = 1;
// 分类结果,0-9,共十种数字 int outputNum = 10;
// 批大小 int batchSize = 54;
// 循环次数 int nEpochs = 1;
// 初始化伪随机数的种子 int seed = 1234;
// 随机数工具 Random randNumGen = new Random(seed);
log.info("检查数据集文件夹是否存在:{}", BASE_PATH + "/mnist_png");
if (!new File(BASE_PATH + "/mnist_png").exists()) { log.info("数据集文件不存在,请下载压缩包并解压到:{}", BASE_PATH); return; }
// 标签生成器,将指定文件的父目录作为标签 ParentPathLabelGenerator labelMaker = new ParentPathLabelGenerator(); // 归一化配置(像素值从0-255变为0-1) DataNormalization imageScaler = new ImagePreProcessingScaler();
// 不论训练集还是测试集,初始化操作都是相同套路: // 1. 读取图片,数据格式为NCHW // 2. 根据批大小创建的迭代器 // 3. 将归一化器作为预处理器
log.info("训练集的矢量化操作..."); // 初始化训练集 File trainData = new File(BASE_PATH + "/mnist_png/training"); FileSplit trainSplit = new FileSplit(trainData, NativeImageLoader.ALLOWED_FORMATS, randNumGen); ImageRecordReader trainRR = new ImageRecordReader(height, width, channels, labelMaker); trainRR.initialize(trainSplit); DataSetIterator trainIter = new RecordReaderDataSetIterator(trainRR, batchSize, 1, outputNum); // 拟合数据(实现类中实际上什么也没做) imageScaler.fit(trainIter); trainIter.setPreProcessor(imageScaler);
log.info("测试集的矢量化操作..."); // 初始化测试集,与前面的训练集操作类似 File testData = new File(BASE_PATH + "/mnist_png/testing"); FileSplit testSplit = new FileSplit(testData, NativeImageLoader.ALLOWED_FORMATS, randNumGen); ImageRecordReader testRR = new ImageRecordReader(height, width, channels, labelMaker); testRR.initialize(testSplit); DataSetIterator testIter = new RecordReaderDataSetIterator(testRR, batchSize, 1, outputNum); testIter.setPreProcessor(imageScaler); // same normalization for better results
log.info("配置神经网络");
// 在训练中,将学习率配置为随着迭代阶梯性下降 Map<Integer, Double> learningRateSchedule = new HashMap<>(); learningRateSchedule.put(0, 0.06); learningRateSchedule.put(200, 0.05); learningRateSchedule.put(600, 0.028); learningRateSchedule.put(800, 0.0060); learningRateSchedule.put(1000, 0.001);
// 超参数 MultiLayerConfiguration conf = new NeuralNetConfiguration.Builder() .seed(seed) // L2正则化系数 .l2(0.0005) // 梯度下降的学习率设置 .updater(new Nesterovs(new MapSchedule(ScheduleType.ITERATION, learningRateSchedule))) // 权重初始化 .weightInit(WeightInit.XAVIER) // 准备分层 .list() // 卷积层 .layer(new ConvolutionLayer.Builder(5, 5) .nIn(channels) .stride(1, 1) .nOut(20) .activation(Activation.IDENTITY) .build()) // 下采样,即池化 .layer(new SubsamplingLayer.Builder(SubsamplingLayer.PoolingType.MAX) .kernelSize(2, 2) .stride(2, 2) .build()) // 卷积层 .layer(new ConvolutionLayer.Builder(5, 5) .stride(1, 1) // nIn need not specified in later layers .nOut(50) .activation(Activation.IDENTITY) .build()) // 下采样,即池化 .layer(new SubsamplingLayer.Builder(SubsamplingLayer.PoolingType.MAX) .kernelSize(2, 2) .stride(2, 2) .build()) // 稠密层,即全连接 .layer(new DenseLayer.Builder().activation(Activation.RELU) .nOut(500) .build()) // 输出 .layer(new OutputLayer.Builder(LossFunctions.LossFunction.NEGATIVELOGLIKELIHOOD) .nOut(outputNum) .activation(Activation.SOFTMAX) .build()) .setInputType(InputType.convolutionalFlat(height, width, channels)) // InputType.convolutional for normal image .build();
MultiLayerNetwork net = new MultiLayerNetwork(conf); net.init();
// 每十个迭代打印一次损失函数值 net.setListeners(new ScoreIterationListener(10));
log.info("神经网络共[{}]个参数", net.numParams());
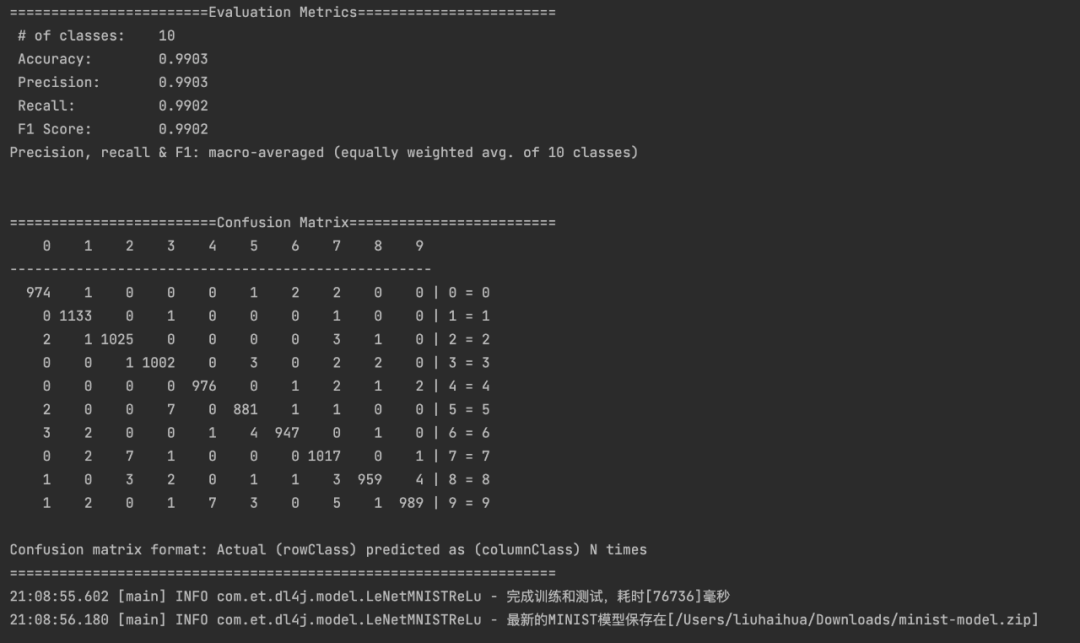
long startTime = System.currentTimeMillis(); // 循环操作 for (int i = 0; i < nEpochs; i++) { log.info("第[{}]个循环", i); net.fit(trainIter); Evaluation eval = net.evaluate(testIter); log.info(eval.stats()); trainIter.reset(); testIter.reset(); } log.info("完成训练和测试,耗时[{}]毫秒", System.currentTimeMillis()-startTime);
// 保存模型 File ministModelPath = new File(BASE_PATH + "/minist-model.zip"); ModelSerializer.writeModel(net, ministModelPath, true); log.info("最新的MINIST模型保存在[{}]", ministModelPath.getPath()); }}
输出模型文件和得分结果
3.编写模型预测接口
pom.xml
<?xml version="1.0" encoding="UTF-8"?><project xmlns="http://maven.apache.org/POM/4.0.0"         xmlns:xsi="http://www.w3.org/2001/XMLSchema-instance"         xsi:schemaLocation="http://maven.apache.org/POM/4.0.0 http://maven.apache.org/xsd/maven-4.0.0.xsd">    <parent>        <artifactId>springboot-demo</artifactId>        <groupId>com.et</groupId>        <version>1.0-SNAPSHOT</version>    </parent>    <modelVersion>4.0.0</modelVersion>
    <artifactId>Deeplearning4j</artifactId>
    <properties>        <maven.compiler.source>8</maven.compiler.source>        <maven.compiler.target>8</maven.compiler.target>        <dl4j-master.version>1.0.0-beta7</dl4j-master.version>        <nd4j.backend>nd4j-native</nd4j.backend>    </properties>    <dependencies>
        <dependency>            <groupId>org.springframework.boot</groupId>            <artifactId>spring-boot-starter-web</artifactId>        </dependency>
        <dependency>            <groupId>org.springframework.boot</groupId>            <artifactId>spring-boot-autoconfigure</artifactId>        </dependency>        <dependency>            <groupId>org.springframework.boot</groupId>            <artifactId>spring-boot-starter-test</artifactId>            <scope>test</scope>        </dependency>        <dependency>            <groupId>org.projectlombok</groupId>            <artifactId>lombok</artifactId>            <version>1.18.20</version>        </dependency>
        <dependency>            <groupId>ch.qos.logback</groupId>            <artifactId>logback-classic</artifactId>        </dependency>
        <dependency>            <groupId>org.deeplearning4j</groupId>            <artifactId>deeplearning4j-core</artifactId>            <version>${dl4j-master.version}</version>        </dependency>
        <dependency>            <groupId>org.nd4j</groupId>            <artifactId>${nd4j.backend}</artifactId>            <version>${dl4j-master.version}</version>        </dependency>
        <!--用于本地GPU-->        <!--        <dependency>-->        <!--            <groupId>org.deeplearning4j</groupId>-->        <!--            <artifactId>deeplearning4j-cuda-9.2</artifactId>-->        <!--            <version>${dl4j-master.version}</version>-->        <!--        </dependency>-->
        <!--        <dependency>-->        <!--            <groupId>org.nd4j</groupId>-->        <!--            <artifactId>nd4j-cuda-9.2-platform</artifactId>-->        <!--            <version>${dl4j-master.version}</version>-->        <!--        </dependency>-->

    </dependencies></project>
cotroller
package com.et.dl4j.controller;
import com.et.dl4j.service.PredictService;import org.springframework.beans.factory.annotation.Autowired;import org.springframework.web.bind.annotation.*;import org.springframework.web.multipart.MultipartFile;
import java.util.HashMap;import java.util.Map;
@RestControllerpublic class HelloWorldController {    @RequestMapping("/hello")    public Map<String, Object> showHelloWorld(){        Map<String, Object> map = new HashMap<>();        map.put("msg", "HelloWorld");        return map;    }   @Autowired    PredictService predictService;

   @PostMapping("/predict-with-black-background")   public int predictWithBlackBackground(@RequestParam("file") MultipartFile file) throws Exception {      // 训练模型的时候,用的数字是白字黑底,      // 因此如果上传白字黑底的图片,可以直接拿去识别,而无需反色处理      return predictService.predict(file, false);   }
   @PostMapping("/predict-with-white-background")   public int predictWithWhiteBackground(@RequestParam("file") MultipartFile file) throws Exception {      // 训练模型的时候,用的数字是白字黑底,      // 因此如果上传黑字白底的图片,就需要做反色处理,      // 反色之后就是白字黑底了,可以拿去识别      return predictService.predict(file, true);   }}
service
package com.et.dl4j.service;
import org.springframework.web.multipart.MultipartFile;

public interface PredictService {
    /**     * 取得上传的图片,做转换后识别成数字     * @param file 上传的文件     * @param isNeedRevert 是否要做反色处理     * @return     */    int predict(MultipartFile file, boolean isNeedRevert) throws Exception ;}
package com.et.dl4j.service.impl;import com.et.dl4j.service.PredictService;import com.et.dl4j.util.ImageFileUtil;import lombok.extern.slf4j.Slf4j;import org.deeplearning4j.nn.multilayer.MultiLayerNetwork;import org.deeplearning4j.util.ModelSerializer;import org.nd4j.linalg.api.ndarray.INDArray;import org.springframework.beans.factory.annotation.Value;import org.springframework.stereotype.Service;import org.springframework.web.multipart.MultipartFile;
import javax.annotation.PostConstruct;import java.io.File;

@Service@Slf4jpublic class PredictServiceImpl implements PredictService {
    /**     * -1表示识别失败     */    private static final int RLT_INVALID = -1;
    /**     * 模型文件的位置     */    @Value("${predict.modelpath}")    private String modelPath;
    /**     * 处理图片文件的目录     */    @Value("${predict.imagefilepath}")    private String imageFilePath;
    /**     * 神经网络     */    private MultiLayerNetwork net;
    /**     * bean实例化成功就加载模型     */    @PostConstruct    private void loadModel() {        log.info("load model from [{}]", modelPath);
        // 加载模型        try {            net = ModelSerializer.restoreMultiLayerNetwork(new File(modelPath));            log.info("module summary\n{}", net.summary());        } catch (Exception exception) {            log.error("loadModel error", exception);        }    }
    @Override    public int predict(MultipartFile file, boolean isNeedRevert) throws Exception {        log.info("start predict, file [{}], isNeedRevert [{}]", file.getOriginalFilename(), isNeedRevert);
        // 先存文件        String rawFileName = ImageFileUtil.save(imageFilePath, file);
        if (null==rawFileName) {            return RLT_INVALID;        }
        // 反色处理后的文件名        String revertFileName = null;
        // 调整大小后的文件名        String resizeFileName;
        // 是否需要反色处理        if (isNeedRevert) {            // 把原始文件做反色处理,返回结果是反色处理后的新文件            revertFileName = ImageFileUtil.colorRevert(imageFilePath, rawFileName);
            // 把反色处理后调整为28*28大小的文件            resizeFileName = ImageFileUtil.resize(imageFilePath, revertFileName);        } else {            // 直接把原始文件调整为28*28大小的文件            resizeFileName = ImageFileUtil.resize(imageFilePath, rawFileName);        }
        // 现在已经得到了结果反色和调整大小处理过后的文件,        // 那么原始文件和反色处理过的文件就可以删除了        ImageFileUtil.clear(imageFilePath, rawFileName, revertFileName);
        // 取出该黑白图片的特征        INDArray features = ImageFileUtil.getGrayImageFeatures(imageFilePath, resizeFileName);                // 将特征传给模型去识别        return net.predict(features)[0];    }}
application.properties
# 上传文件总的最大值spring.servlet.multipart.max-request-size=1024MB
# 单个文件的最大值spring.servlet.multipart.max-file-size=10MB
# 处理图片文件的目录predict.imagefilepath=/Users/liuhaihua/Downloads/images/
# 模型所在位置predict.modelpath=/Users/liuhaihua/Downloads/minist-model.zip
工具类
package com.et.dl4j.util;
import lombok.extern.slf4j.Slf4j;import org.datavec.api.split.FileSplit;import org.datavec.image.loader.NativeImageLoader;import org.datavec.image.recordreader.ImageRecordReader;import org.deeplearning4j.datasets.datavec.RecordReaderDataSetIterator;import org.nd4j.linalg.api.ndarray.INDArray;import org.nd4j.linalg.dataset.api.iterator.DataSetIterator;import org.nd4j.linalg.dataset.api.preprocessor.ImagePreProcessingScaler;import org.springframework.web.multipart.MultipartFile;
import javax.imageio.ImageIO;import java.awt.*;import java.awt.image.BufferedImage;import java.io.File;import java.io.IOException;import java.util.UUID;

@Slf4jpublic class ImageFileUtil {
    /**     * 调整后的文件宽度     */    public static final int RESIZE_WIDTH = 28;
    /**     * 调整后的文件高度     */    public static final int RESIZE_HEIGHT = 28;
    /**     * 将上传的文件存在服务器上     * @param base 要处理的文件所在的目录     * @param file 要处理的文件     * @return     */    public static String save(String base, MultipartFile file) {
        // 检查是否为空        if (file.isEmpty()) {            log.error("invalid file");            return null;        }
        // 文件名来自原始文件        String fileName = file.getOriginalFilename();
        // 要保存的位置        File dest = new File(base + fileName);
        // 开始保存        try {            file.transferTo(dest);        } catch (IOException e) {            log.error("upload fail", e);            return null;        }
        return fileName;    }
    /**     * 将图片转为28*28像素     * @param base     处理文件的目录     * @param fileName 待调整的文件名     * @return     */    public static String resize(String base, String fileName) {
        // 新文件名是原文件名在加个随机数后缀,而且扩展名固定为png        String resizeFileName = fileName.substring(0, fileName.lastIndexOf(".")) + "-" + UUID.randomUUID() + ".png";
        log.info("start resize, from [{}] to [{}]", fileName, resizeFileName);
        try {            // 读原始文件            BufferedImage bufferedImage = ImageIO.read(new File(base + fileName));
            // 缩放后的实例            Image image = bufferedImage.getScaledInstance(RESIZE_WIDTH, RESIZE_HEIGHT, Image.SCALE_SMOOTH);
            BufferedImage resizeBufferedImage = new BufferedImage(28, 28, BufferedImage.TYPE_INT_RGB);            Graphics graphics = resizeBufferedImage.getGraphics();
            // 绘图            graphics.drawImage(image, 0, 0, null);            graphics.dispose();
            // 转换后的图片写文件            ImageIO.write(resizeBufferedImage, "png", new File(base + resizeFileName));
        } catch (Exception exception) {            log.info("resize error from [{}] to [{}], {}", fileName, resizeFileName, exception);            resizeFileName = null;        }
        log.info("finish resize, from [{}] to [{}]", fileName, resizeFileName);
        return resizeFileName;    }
    /**     * 将RGB转为int数字     * @param alpha     * @param red     * @param green     * @param blue     * @return     */    private static int colorToRGB(int alpha, int red, int green, int blue) {        int pixel = 0;
        pixel += alpha;        pixel = pixel << 8;
        pixel += red;        pixel = pixel << 8;
        pixel += green;        pixel = pixel << 8;
        pixel += blue;
        return pixel;    }
    /**     * 反色处理     * @param base 处理文件的目录     * @param src 用于处理的源文件     * @return 反色处理后的新文件     * @throws IOException     */    public static String colorRevert(String base, String src) throws IOException {        int color, r, g, b, pixel;
        // 读原始文件        BufferedImage srcImage = ImageIO.read(new File(base + src));
        // 修改后的文件        BufferedImage destImage = new BufferedImage(srcImage.getWidth(), srcImage.getHeight(), srcImage.getType());
        for (int i=0; i<srcImage.getWidth(); i++) {
            for (int j=0; j<srcImage.getHeight(); j++) {                color = srcImage.getRGB(i, j);                r = (color >> 16) & 0xff;                g = (color >> 8) & 0xff;                b = color & 0xff;                pixel = colorToRGB(255, 0xff - r, 0xff - g, 0xff - b);                destImage.setRGB(i, j, pixel);            }        }
        // 反射文件的名字        String revertFileName =  src.substring(0, src.lastIndexOf(".")) + "-revert.png";
        // 转换后的图片写文件        ImageIO.write(destImage, "png", new File(base + revertFileName));
        return revertFileName;    }
    /**     * 取黑白图片的特征     * @param base     * @param fileName     * @return     * @throws Exception     */    public static INDArray getGrayImageFeatures(String base, String fileName) throws Exception {        log.info("start getImageFeatures [{}]", base + fileName);
        // 和训练模型时一样的设置        ImageRecordReader imageRecordReader = new ImageRecordReader(RESIZE_HEIGHT, RESIZE_WIDTH, 1);
        FileSplit fileSplit = new FileSplit(new File(base + fileName),                NativeImageLoader.ALLOWED_FORMATS);
        imageRecordReader.initialize(fileSplit);
        DataSetIterator dataSetIterator = new RecordReaderDataSetIterator(imageRecordReader, 1);        dataSetIterator.setPreProcessor(new ImagePreProcessingScaler(0, 1));
        // 取特征        return dataSetIterator.next().getFeatures();    }
    /**     * 批量清理文件     * @param base      处理文件的目录     * @param fileNames 待清理文件集合     */    public static void clear(String base, String...fileNames) {        for (String fileName : fileNames) {
            if (null==fileName) {                continue;            }
            File file = new File(base + fileName);
            if (file.exists()) {                file.delete();            }        }    }

}
DemoApplication.java
package com.et.dl4j;
import org.springframework.boot.SpringApplication;import org.springframework.boot.autoconfigure.SpringBootApplication;
@SpringBootApplicationpublic class DemoApplication {
   public static void main(String[] args) {      SpringApplication.run(DemoApplication.class, args);   }}
以上只是一些关键代码,所有代码请参见下面代码仓库
代码仓库
- https://github.com/Harries/springboot-demo
4.测试
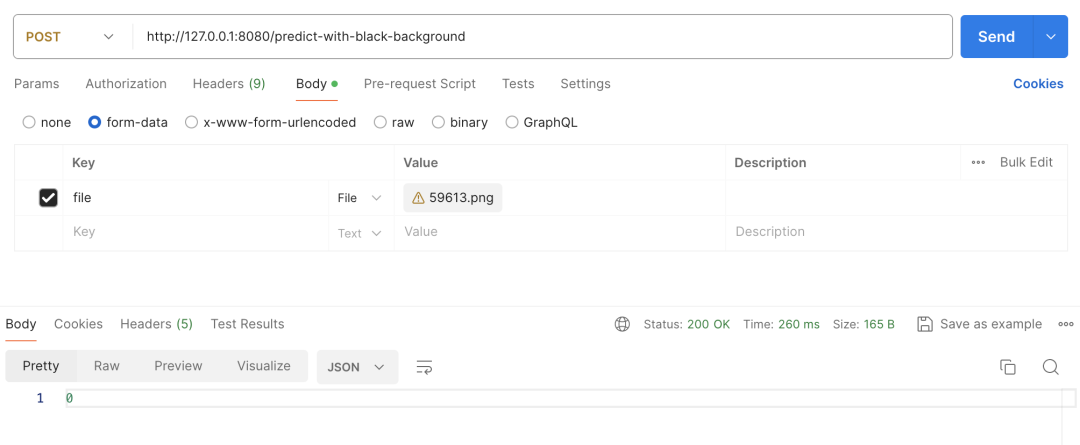
启动Spring Boot应用,上传图片测试
-
如果用户输入的是黑底白字的图片,只需要将上述流程中的反色处理去掉即可
-
为白底黑字图片提供专用接口predict-with-white-background
-
为黑底白字图片提供专用接口predict-with-black-background
5.引用
-
https://mgubaidullin.github.io/deeplearning4j-docs/cn/quickstart
-
https://blog.csdn.net/boling_cavalry/article/details/118239403
-
http://www.liuhaihua.cn/archives/710793.html